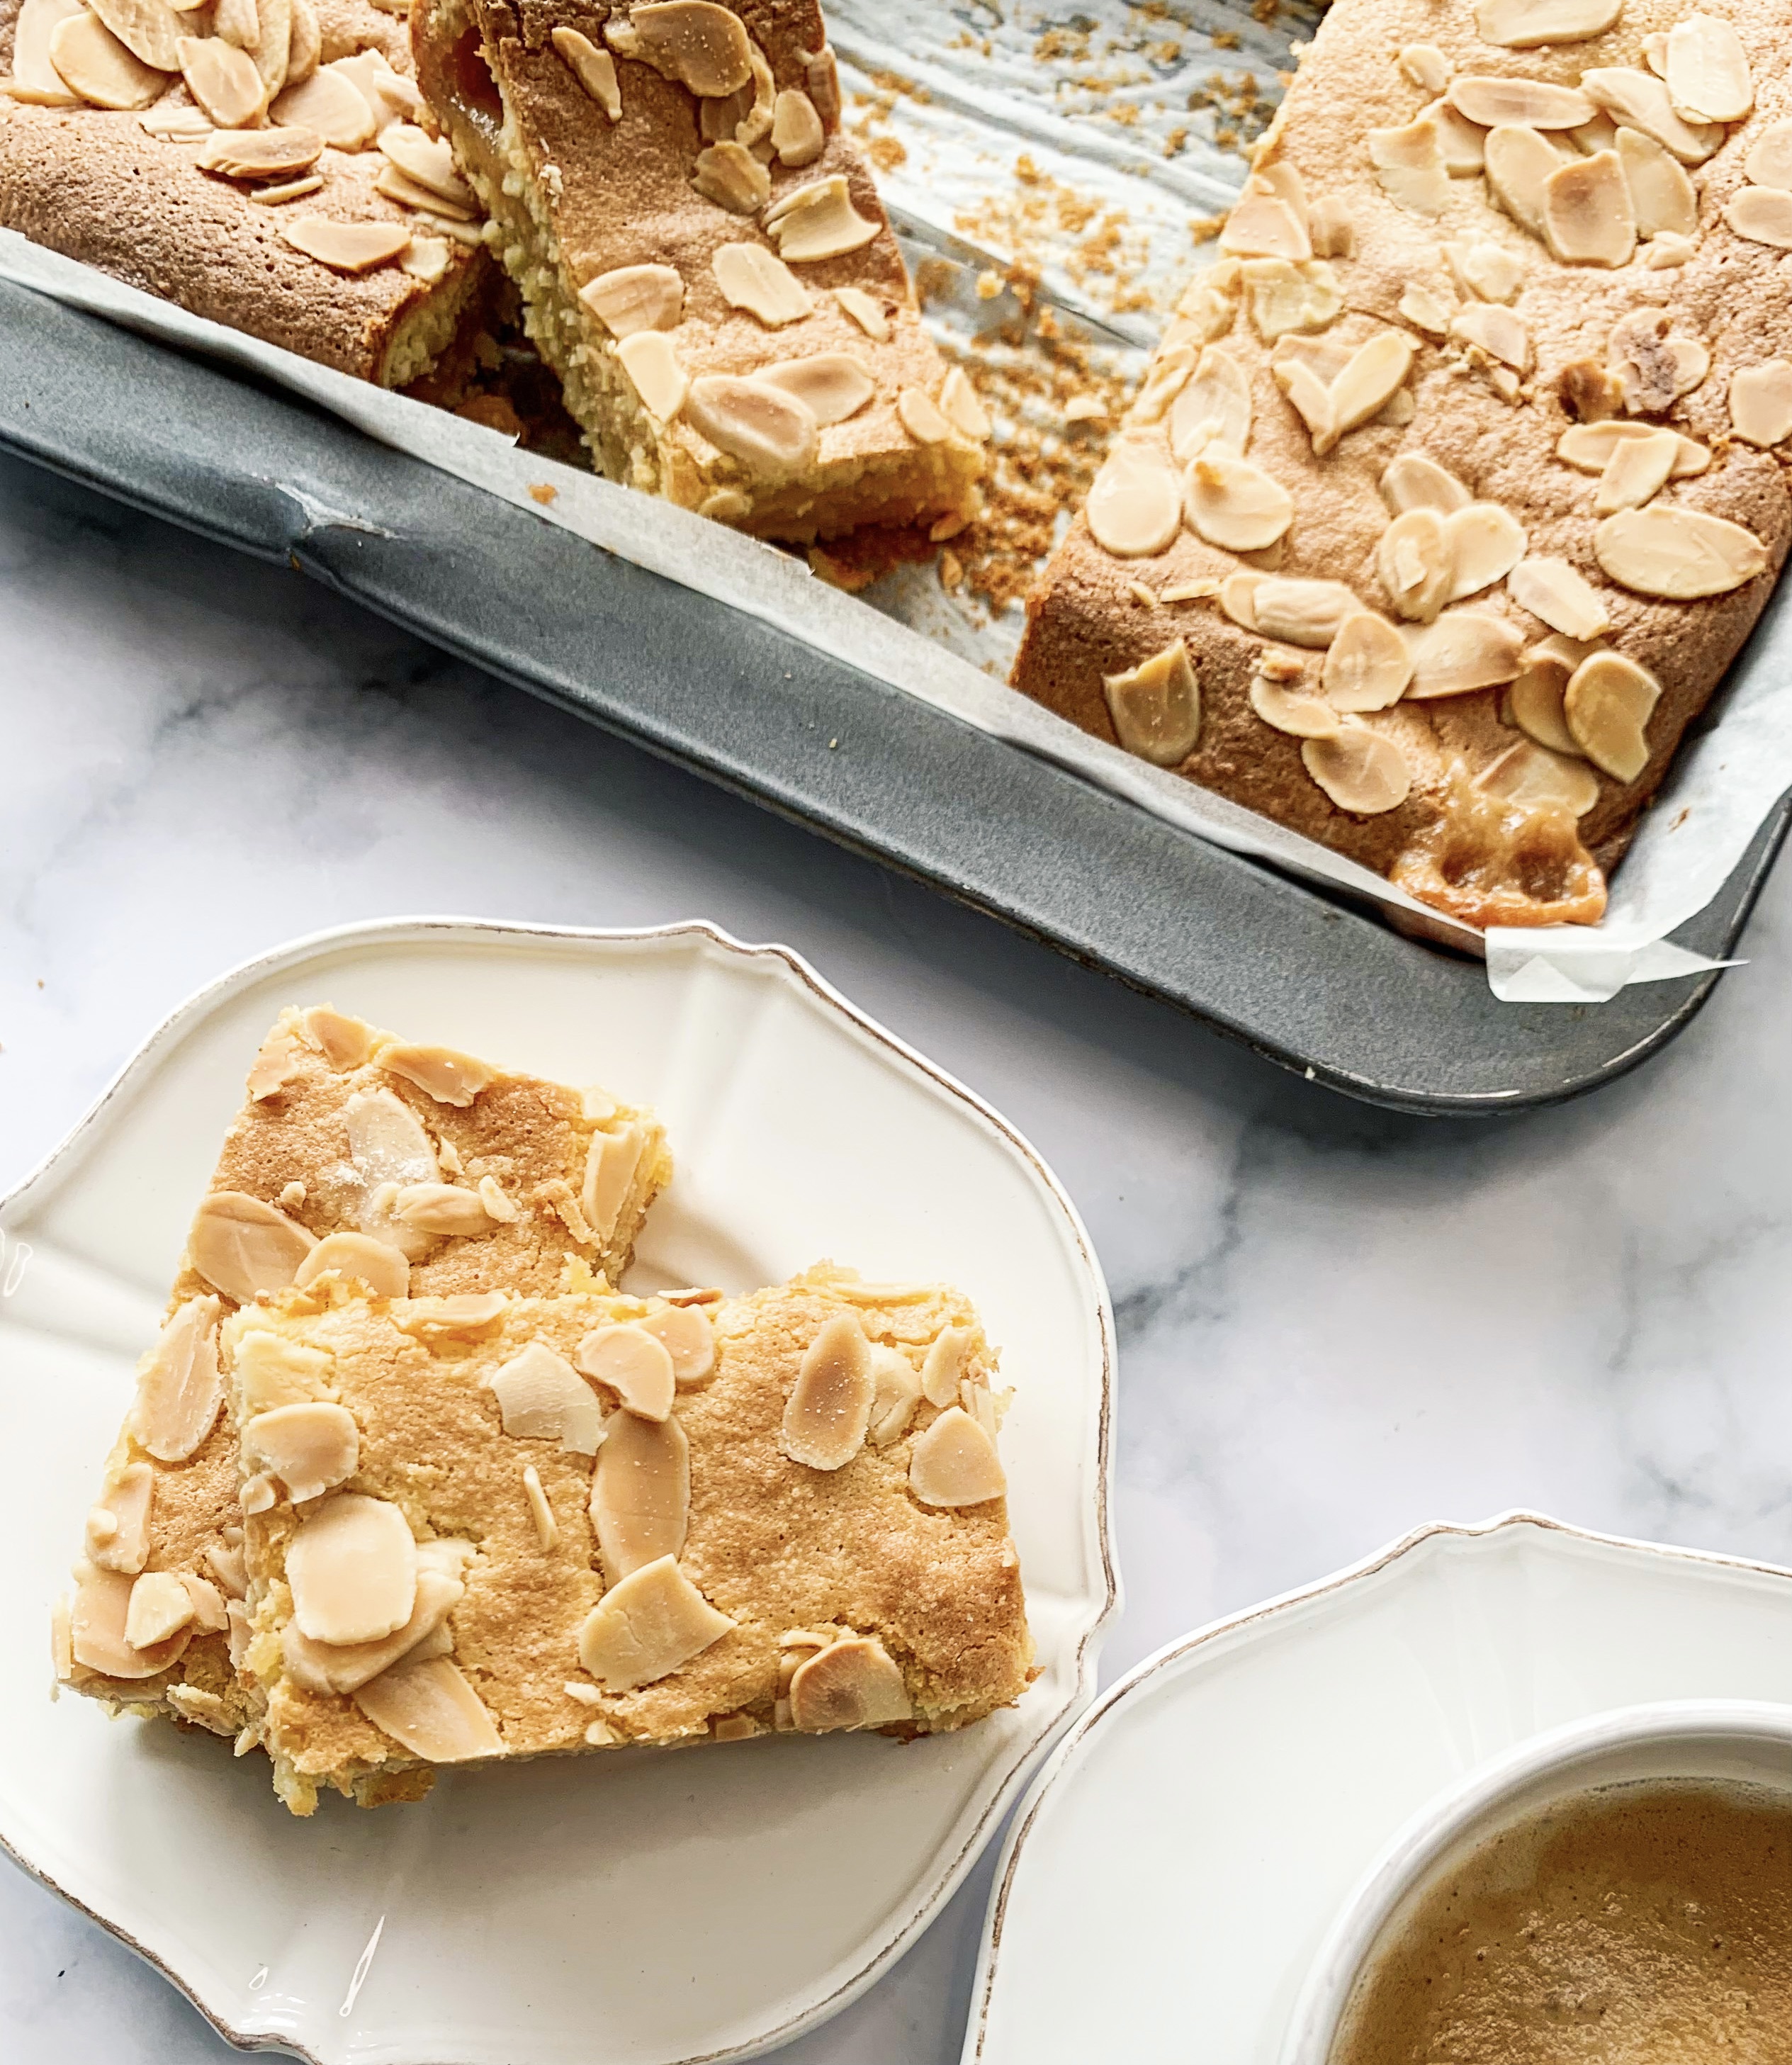
If like me you love almonds and marzipan then you will definitely love these! My friend introduced them to me – she was so adamant that I should try them that she cooked me some. I was sold. The recipe on paper is super easy, but I will warn you that rolling out the marzipan requires some elbow grease; I must admit that I nearly gave up – but believe me it’s worth it! They are super sweet so are best cut into small slices (although I ate many more than one!). They are fantastic with an espresso or a strong cup of tea…
250g butter, melted
400g marzipan
4 eggs
350g ground almonds
225g caster sugar
4 teaspoons almond extract
Zest of orange (optional)
50g flaked almonds
(Baking tin – 30 x 23cm, lined with baking parchment)
Knead the marzipan to soften it. Then roll it between two pieces of baking parchment; I found that starting off this way was easiest and then finished rolling without the top sheet of parchment. Roll to a rectangle that will fit the baking tin.
Put the eggs into a large mixing bowl. Add the ground almonds, sugar and almond extract and then add the melted butter. Beat with an electric mixer at high speed until smooth and creamy. Add the grated orange zest if using and mix well.
Pour half of the mixture into the prepared baking tin and smooth over with a palette knife. Gently place the rolled-out marzipan on top then pour over the remaining mixture, smoothing it over, taking care to cover all of the marzipan.
Bake in a preheated oven, 180’c fan, for 30 minutes until a light golden colour.
Allow to cool in the tin before cutting into small slices. (Keeps for up to five days in an airtight tin).
I am a planner. I’m happiest when I have a plan, big or small. Perhaps, that is why I’m so content in my kitchen where you can find me following the plan of a recipe – by my own admission I’m not a creator of recipes but I am extremely good at spotting a top-notch recipe when I see it; which is, of course, great for you! However, just recently one of these recipes was so good that it upset my plans for Menu Mistress. I write up my new recipe posts at least 6 weeks in advance; I have it all mapped out, all under control – ‘planned’. So when the other day I discovered the aforementioned recipe, I was in a bit of a quandary. No, it couldn’t wait until January, it was made for November! That, of course, has meant I have had to change my ‘post’ plan at the last minute, which as you can imagine is something that is quite out of character for me. However, I hope that you’ll agree that sometimes a change ‘out of the blue’ can be good – delicious even! So, this month ‘Marmalade-Roasted Chicken Legs & Squash’, a recipe from the fabulous chef of London’s ‘Sessions Arts Club’ (review here!) and author of the cookbook ‘One’, has made it onto November’s menus!…
Drum roll please for this month’s menus!…
Menu One, ‘Rolled Pork with Cider’, is a recipe that simply sums up the spirit of November – cider and apples how can one resist? I found this recipe in Donna Hay’s cookbook ‘Seasons’ and as with a lot of her recipes, it’s super easy to make. Menu Two is ‘Baked Sausages, Leeks, Apples & Cider’, this is a fantastic midweek supper dish from Diana Henry’s cookbook ‘Pure Simple Cooking’, it’s perfect on a winter’s evening! Menu Three is the celebrated ‘Marmalade-Roasted Chicken Legs & Squash’; I think I’ve already sold you this dish! And finally, Menu Four is a vegetarian pasta dish, ‘Pasta & Lentils’ is a wonderful wintery pasta dish which will please vegetarians and meat lovers alike. Enjoy!
Menu One
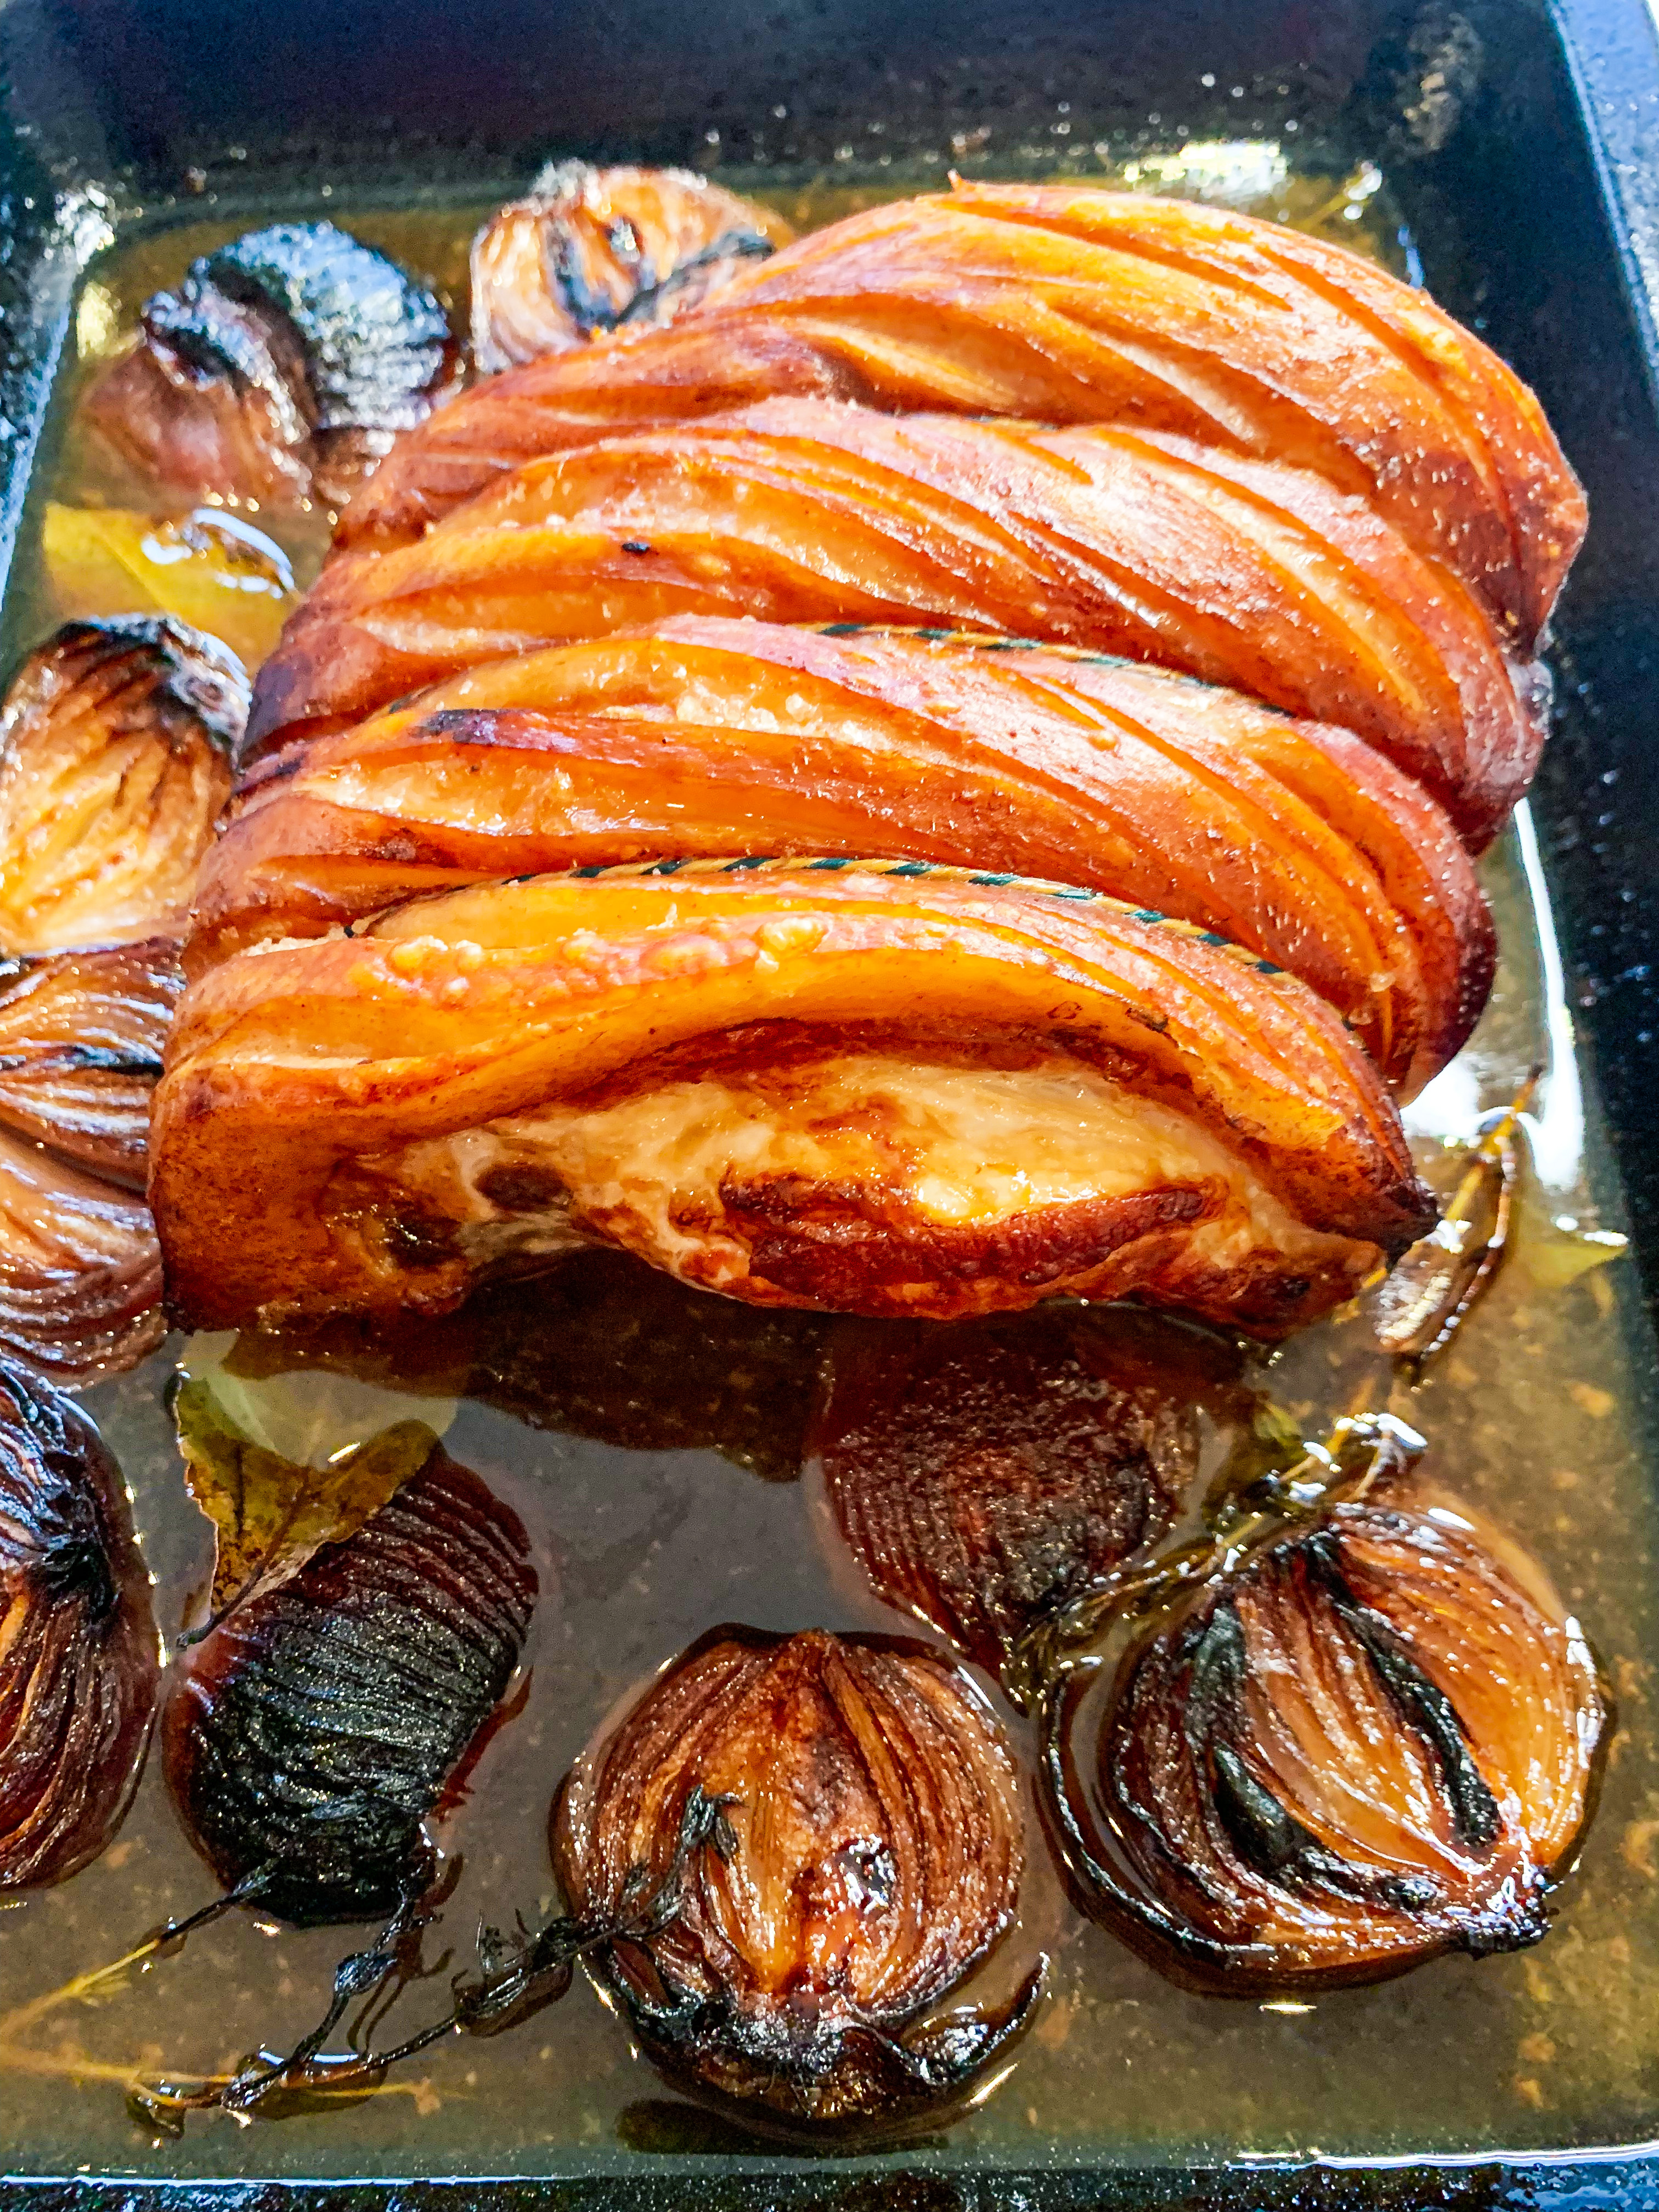
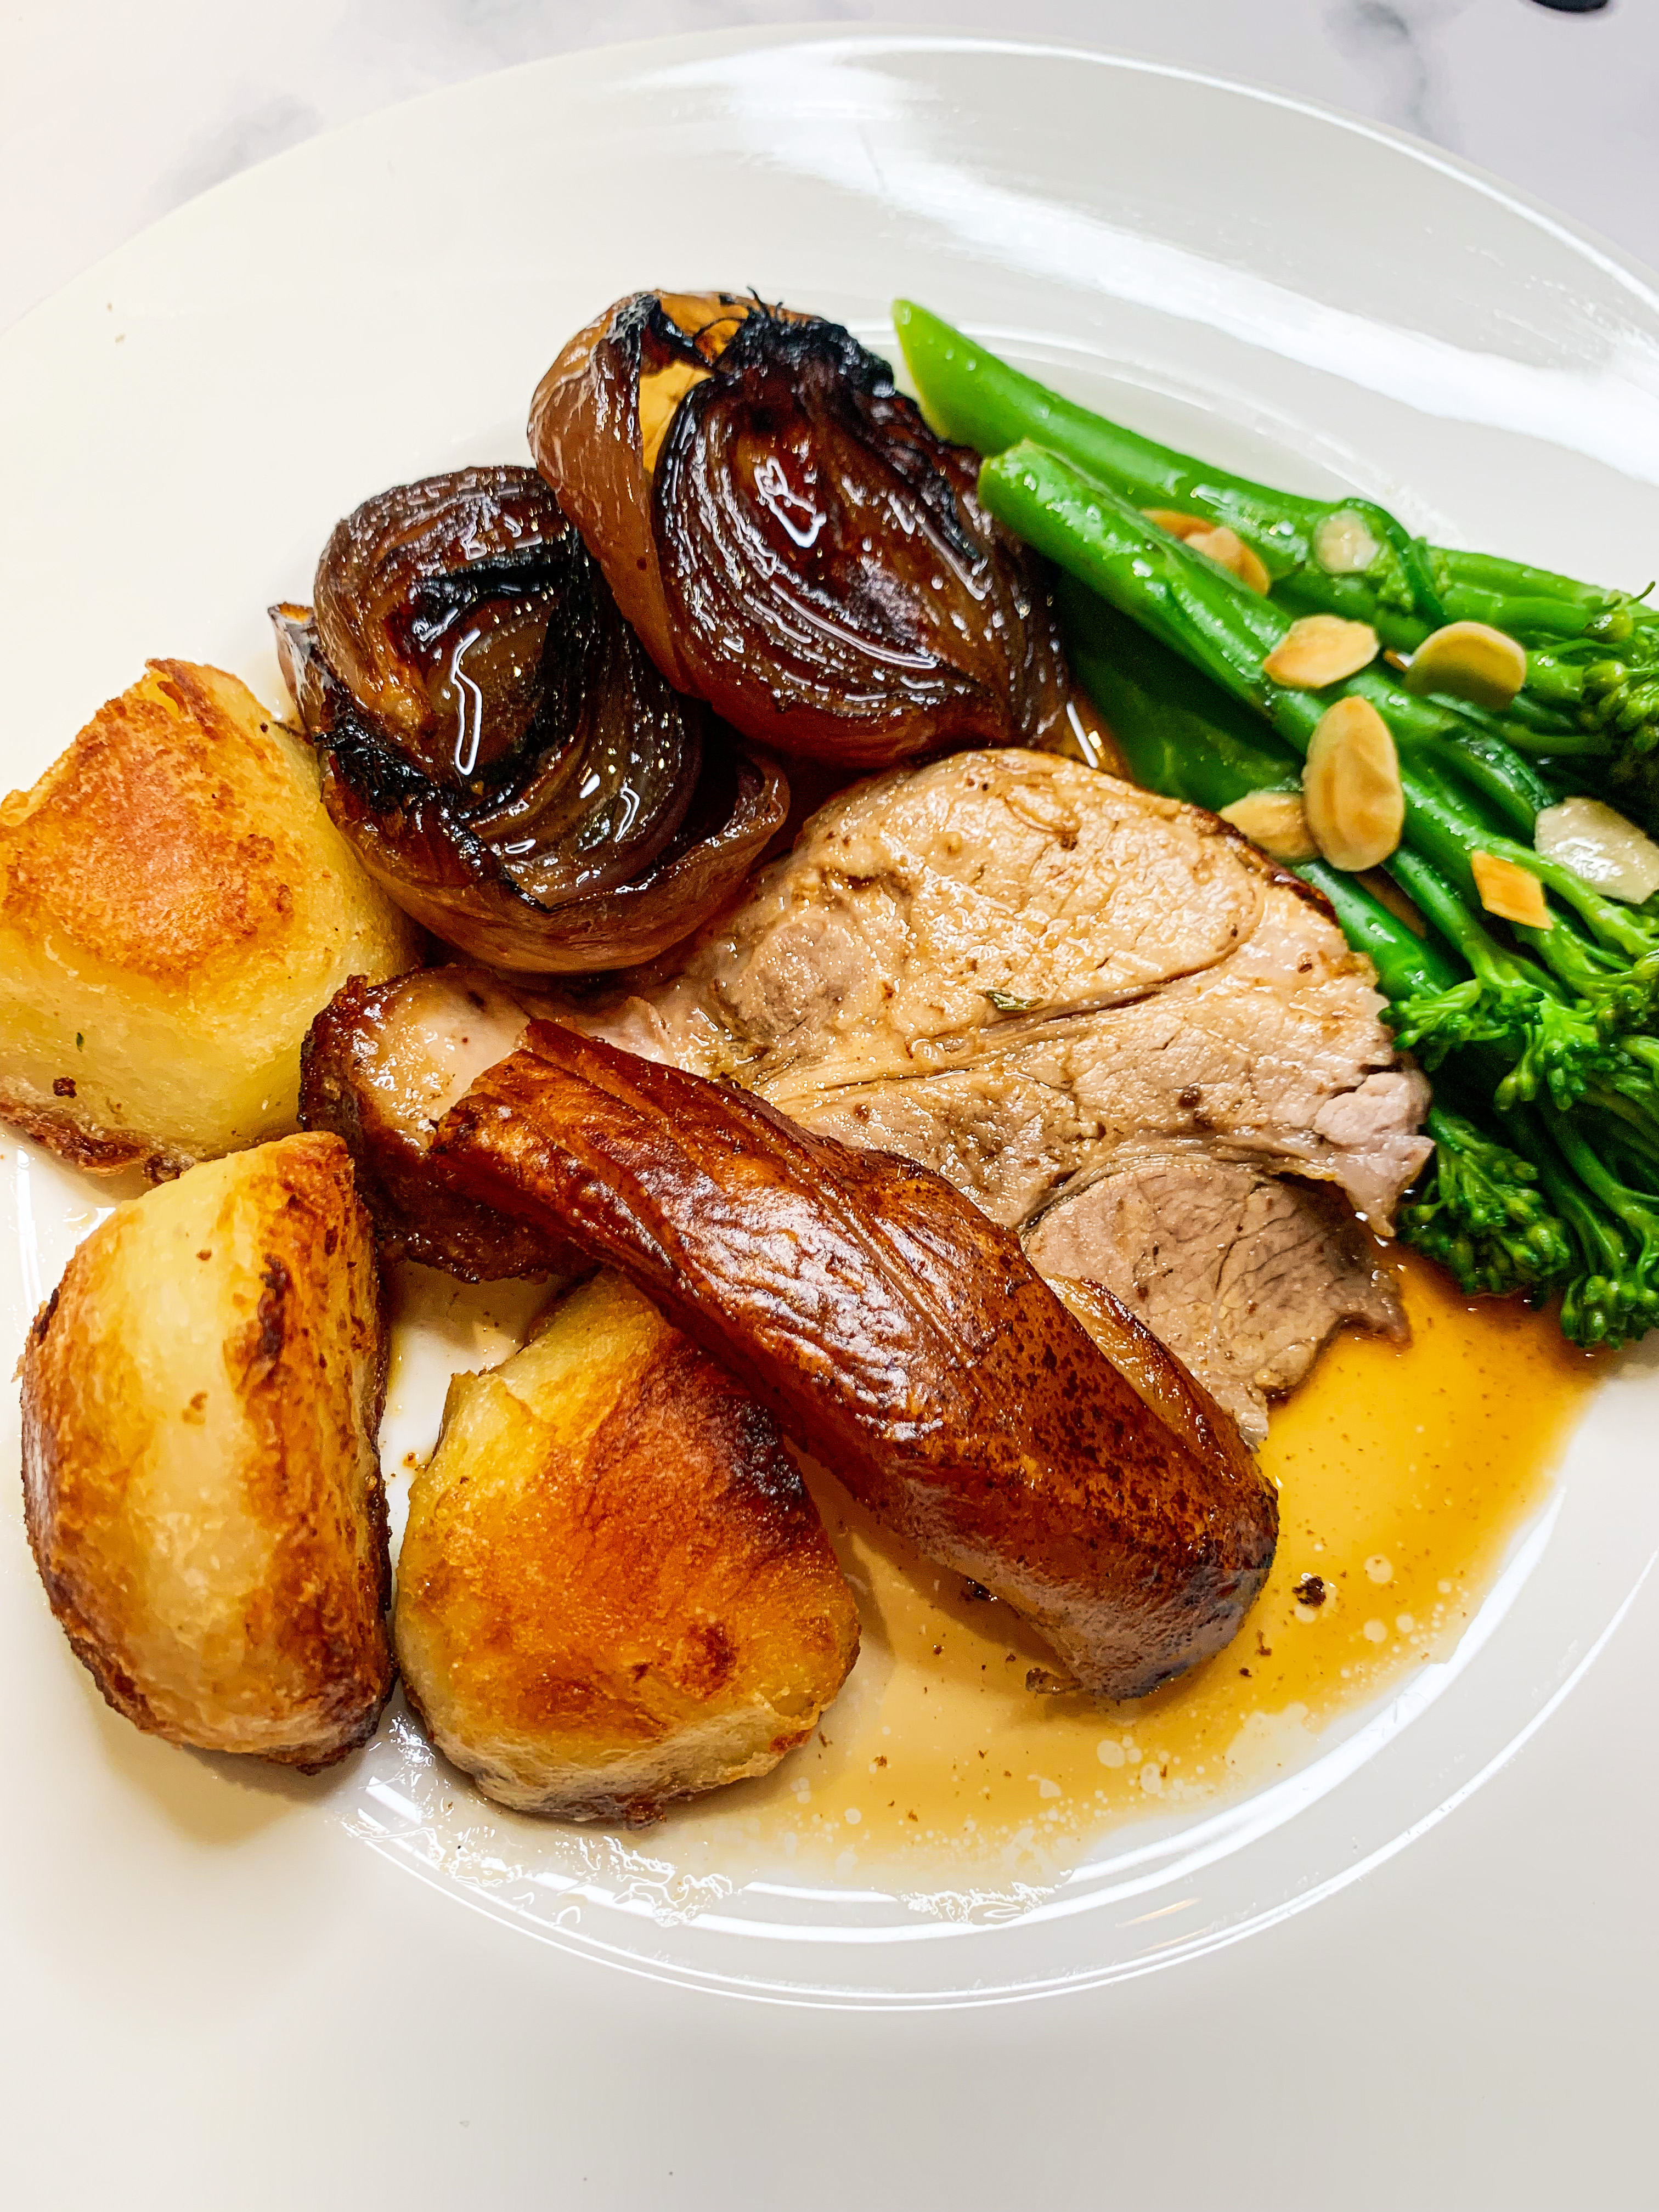
Cider Roasted Pork Shoulder (Serves 4)
This is a recipe that simply cries to be eaten on a cold day! Pork, cider and apples how can one resist?! I found this recipe in Donna Hay’s cookbook ‘Seasons’, and as with a lot of her recipes, it’s super easy to make. This really is a recipe you need to make a note of…
1.8kg pork shoulder, tied and skin scored
Sea salt
2 tablespoons olive oil
6 red onions, peeled and halved
250ml apple juice
750ml dry cider
75g brown sugar
4 fresh bay leaves
4 sprigs thyme
Rub the skin of the pork with the salt.
Place the oil and onions in a deep baking dish, top with the pork and roast a preheated oven, 220’c fan, for 30 minutes.
Place the apple juice, cider and sugar in a bowl and whisk to combine. Add the apple mixture, bay leaves and thyme to the pork (do not pour it over the skin of the pork as you want this to crisp up), cover with foil. Reduce the oven temperature to 180’c and roast for a further 2 hours.
Remove the foil, increase the heat to 200’c and roast for a further 30 minutes or until the skin is gold and crispy.
Remove the pork and set aside. Place the baking dish over a medium heat and cook the juices for 10 minutes or until thick and syrupy.
Serve the pork with the juices and onions. Roast potatoes and ‘Tenderstem Broccoli with Lemon & Almonds’ are good accompaniments (recipes below)
‘Staple Side Dish’ – Tenderstem Broccoli with Lemon Butter and Almonds (Serves 4)
This is a lovely fresh recipe which really takes tenderstem broccoli to another level.
200g Tenderstem Broccoli
20g unsalted butter
Juice of half a lemon
A generous handful of flaked almonds
Sea salt and black pepper
First of all put the flaked almonds in a small, dry frying pan, place over a moderate heat, stirring, until the almonds are browned – toasted. Remove to a plate.
Steam the tenderstem broccoli for about 4 minutes until just cooked.
Melt the butter in a small frying pan and add the lemon juice, stirring well.
Add the tenderstem broccoli, stirring to give it a good coating of the butter mixture, season with salt and pepper and sprinkle with the reserved toasted almonds.
Staple Side Dish – Perfect Roast Potatoes
Everybody has their favourite roast potato recipe. I must admit that having tried various recipes, I have always returned to the one I found years ago in Delia Smith’s ‘Winter Collection Cookbook’ – you can’t beat it in my opinion. I use either olive oil or goose fat (I buy it in jars), depending on my mood. The olive oil gives a lighter, cleaner taste, whereas the goose fat has a richer flavour – both crisp up the potatoes equally well.
1.8kg Maris Piper or other floury, roasting potatoes
110g olive oil or goose fat (see note above)
Sea salt
Place the fat in the roasting tin and place in the oven, 190’c fan, on the highest shelf so that the oil preheats whilst you prepare the potatoes.
Peel the potatoes and cut into evenly sized pieces.
Place the potatoes in a saucepan, cover with boiling water and add the salt. Simmer for 10 minutes until the outer edge of the potatoes is fluffy – test with the points of a fork.
Drain the potatoes well and return to the saucepan. Place a lid over the pan and shake it vigorously. By shaking the potatoes in the saucepan in this way the cooked edges will become floury and fluffy – perfect for crisping up in the oven.
Remove the roasting tin from the oven and place the potatoes in the hot fat – careful as the oil may spit! Baste them well and return to the oven for about 40 minutes until they are golden brown and crisped.
Sprinkle with salt and serve straightaway – do not allow them to sit around otherwise they will loose their crunch (if they are cooked before you are ready, turn off the oven and leave them inside – but with caution, they don’t like to wait!)
Menu Two
Baked Sausages with Leeks, Apples & Cider (Serves 4)
This is a fantastic midweek supper dish from Diana Henry’s cookbook ‘Pure Simple Cooking’, it’s perfect on a winter’s evening, but I’ve been known to serve it in all weathers!.. Serve with mashed potatoes (recipe below!)
3 leeks, washed and chopped into 1-inch lengths
2 apples, halved, cored and cut into wedges
8 good quality pork sausages (gluten-free if required)
3 tablespoons olive oil
Sea salt and black pepper
30g salted butter, cut into small cubes
280ml cider
2 tablespoons coarse-grain mustard
Put the leeks and apples into an oveproof dish and arrange the sausages in a single layer on top. Drizzle with olive oil and season with salt and pepper, and toss everything around. Dot with the butter and pour in the cider. Bake in a preheated oven, 190’c, for 50-60 minutes.
About 10 minutes before the end of the cooking time, spread the mustard over the sausages and any sticking-out apple pieces, and return to the oven.
Serve with mashed potatoes (‘My Favourite Mashed Potato’ recipe below!)
Staple Side Dish – ‘Favourite’ Mashed Potato (Serves 4)
There are numerous recipes for mashed potato, and yes, I have tried many, but this one is probably my favourite. It actually doesn’t contain any butter, which makes me feel that it could be healthy, although admittedly it does contain double cream! Don’t be put off by the garlic, you really can’t taste it, it just enhances the flavour of the potato. I must admit I ‘cheat’ when it comes to mashing, I am fortunate to have an amazing kitchen appliance, a Thermomix, this is a serious piece of kitchen kit; I can actually steam my potatoes in it and then mash them in seconds. If you don’t have a Thermomix you can either mash by hand, however, for an easier option I would recommend doing as Delia Smith suggests in her ‘Winter Cookbook’ – whisk them with an electric hand whisk. When whisking them you do have to be careful – make sure that the potatoes are absolutely cooked, otherwise they will go gluey. Start off with the speed slow to break up the potatoes and then increase to a high speed to quickly whip them until smooth – don’t do it for too long, as again, they will go gluey, which is not good!
1kg potatoes (floury, such as Maris Piper)
100ml full-fat milk
100ml double cream
2 cloves garlic, sliced
Sea salt and black pepper
Peel the potatoes and cut into even sized chunks. Steam until completely cooked through.
Put the milk, cream and garlic in a small saucepan and bring to the boil. Remove from the heat.
Mash the potatoes (see note above) adding the milk mixture a little at a time. Season well with salt and pepper.
Menu Three
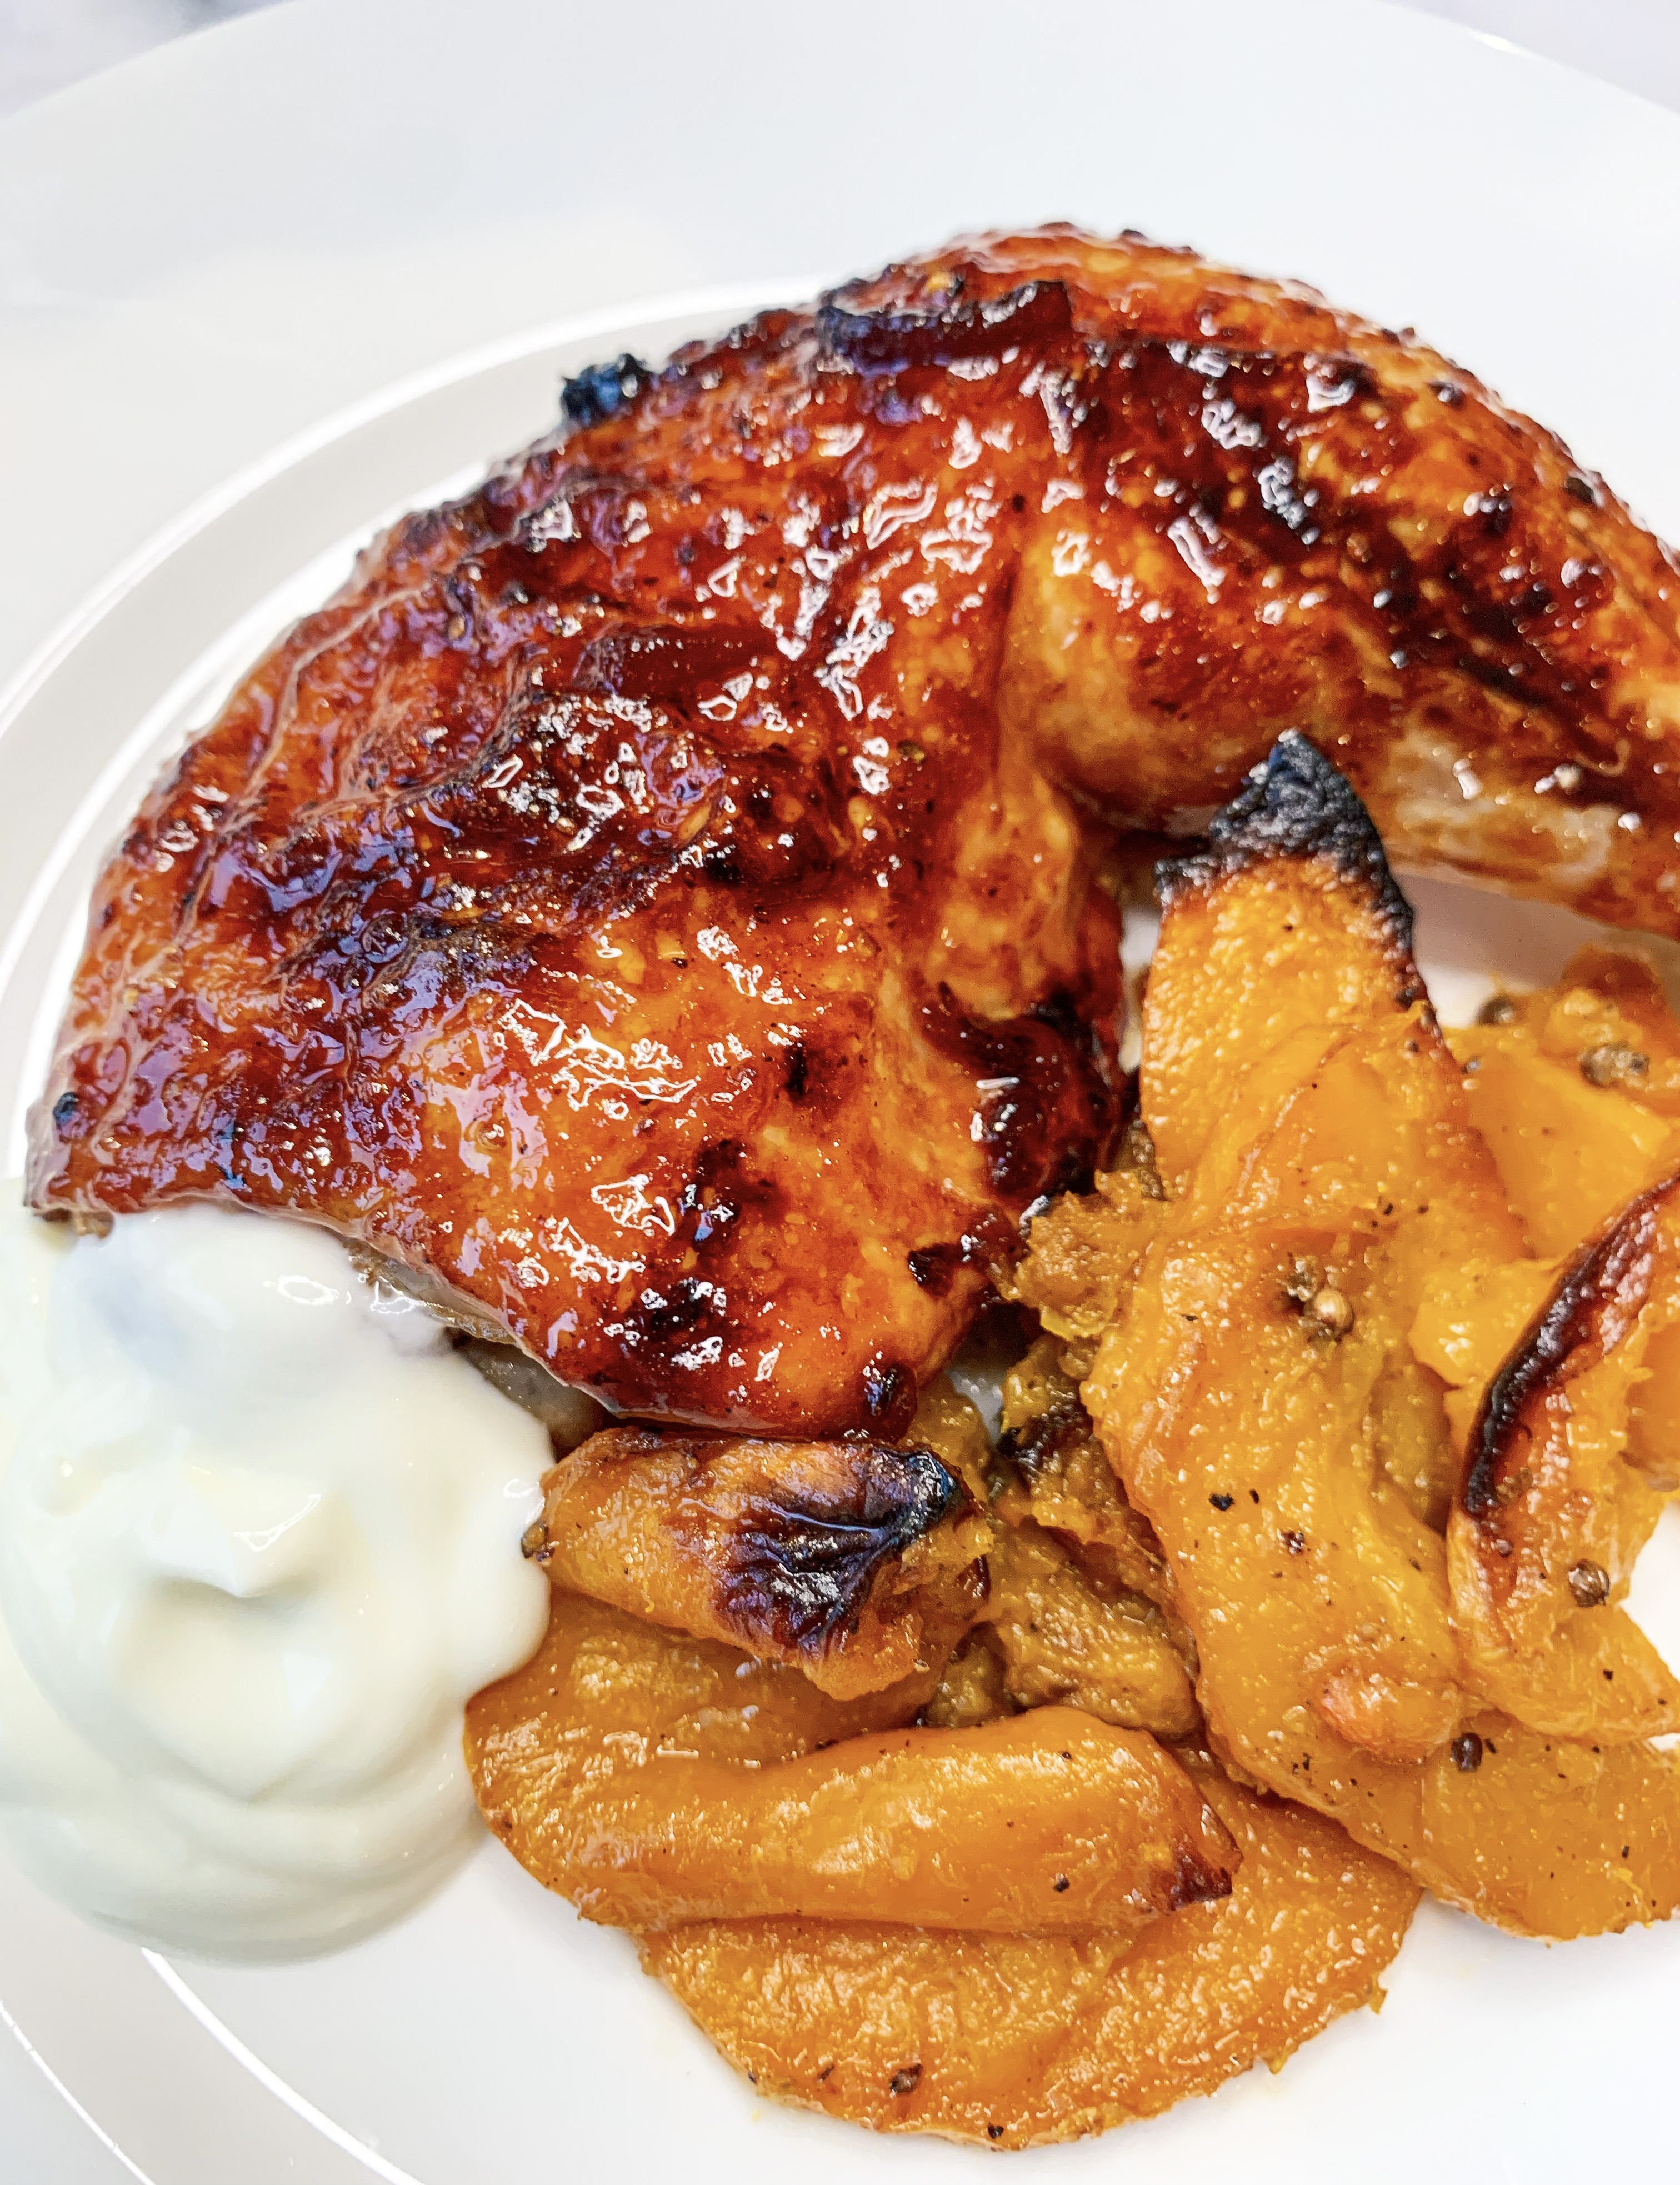
Marmalade-Roasted Chicken Legs & Squash (Serves 4)
Every cold, blustery day needs this recipe! It’s comfort food at its best, the chicken meat becomes sticky and unctuous, and teamed with the soft, slightly sweet roasted butternut squash it is simply perfect. I found this recipe in Florence Knight’s cookbook ‘One’, it’s become a family favourite!
800g Butternut squash
2 teaspoons coriander seeds
½ teaspoon dried chilli flakes
2 tablespoons chicken stock (or water)
100g Muscovado sugar (plus a sprinkle)
4 chicken legs, skin on
2 tablespoons thick-cut marmalade
1 tablespoon tomato ketchup
2 teaspoons sunflower oil
2 garlic cloves
Sea salt and black pepper
Olive oil
Natural yogurt to serve
First of all, prepare the butternut squash by cutting it in half, peeling it, removing the seeds, and cutting it into even-sized slices – roughly the thickness of a pound coin. Place them in a roasting tray with the coriander seeds, dried chilli flakes, chicken stock, a good pinch of salt and black pepper, a glug of olive oil and a sprinkle of the sugar.
In a separate roasting tray, rub the chicken legs with the rest of the sugar, the marmalade, ketchup and sunflower oil. Bash the garlic cloves with the flat of your knife, remove the skin and fold through the sticky chicken along with a pinch of salt and pepper.
Place both roasting tins in a preheated oven, 200’c fan. Glaze the chicken every 10 minutes. After 30-40 minutes remove the chicken, cover with foil and leave to rest whilst the butternut squash finishes cooking for about another five minutes.
Once the butternut squash is cooked through and caramelised, scoop a third of it into a bowl, add a splash of olive oil and use a fork to roughly mash it. Fold it back through the remaining caramelised pieces.
Spoon portions of the butternut squash onto plates, topping each with a sticky chicken leg and a spoonful of tart, natural yoghurt.
Menu Four
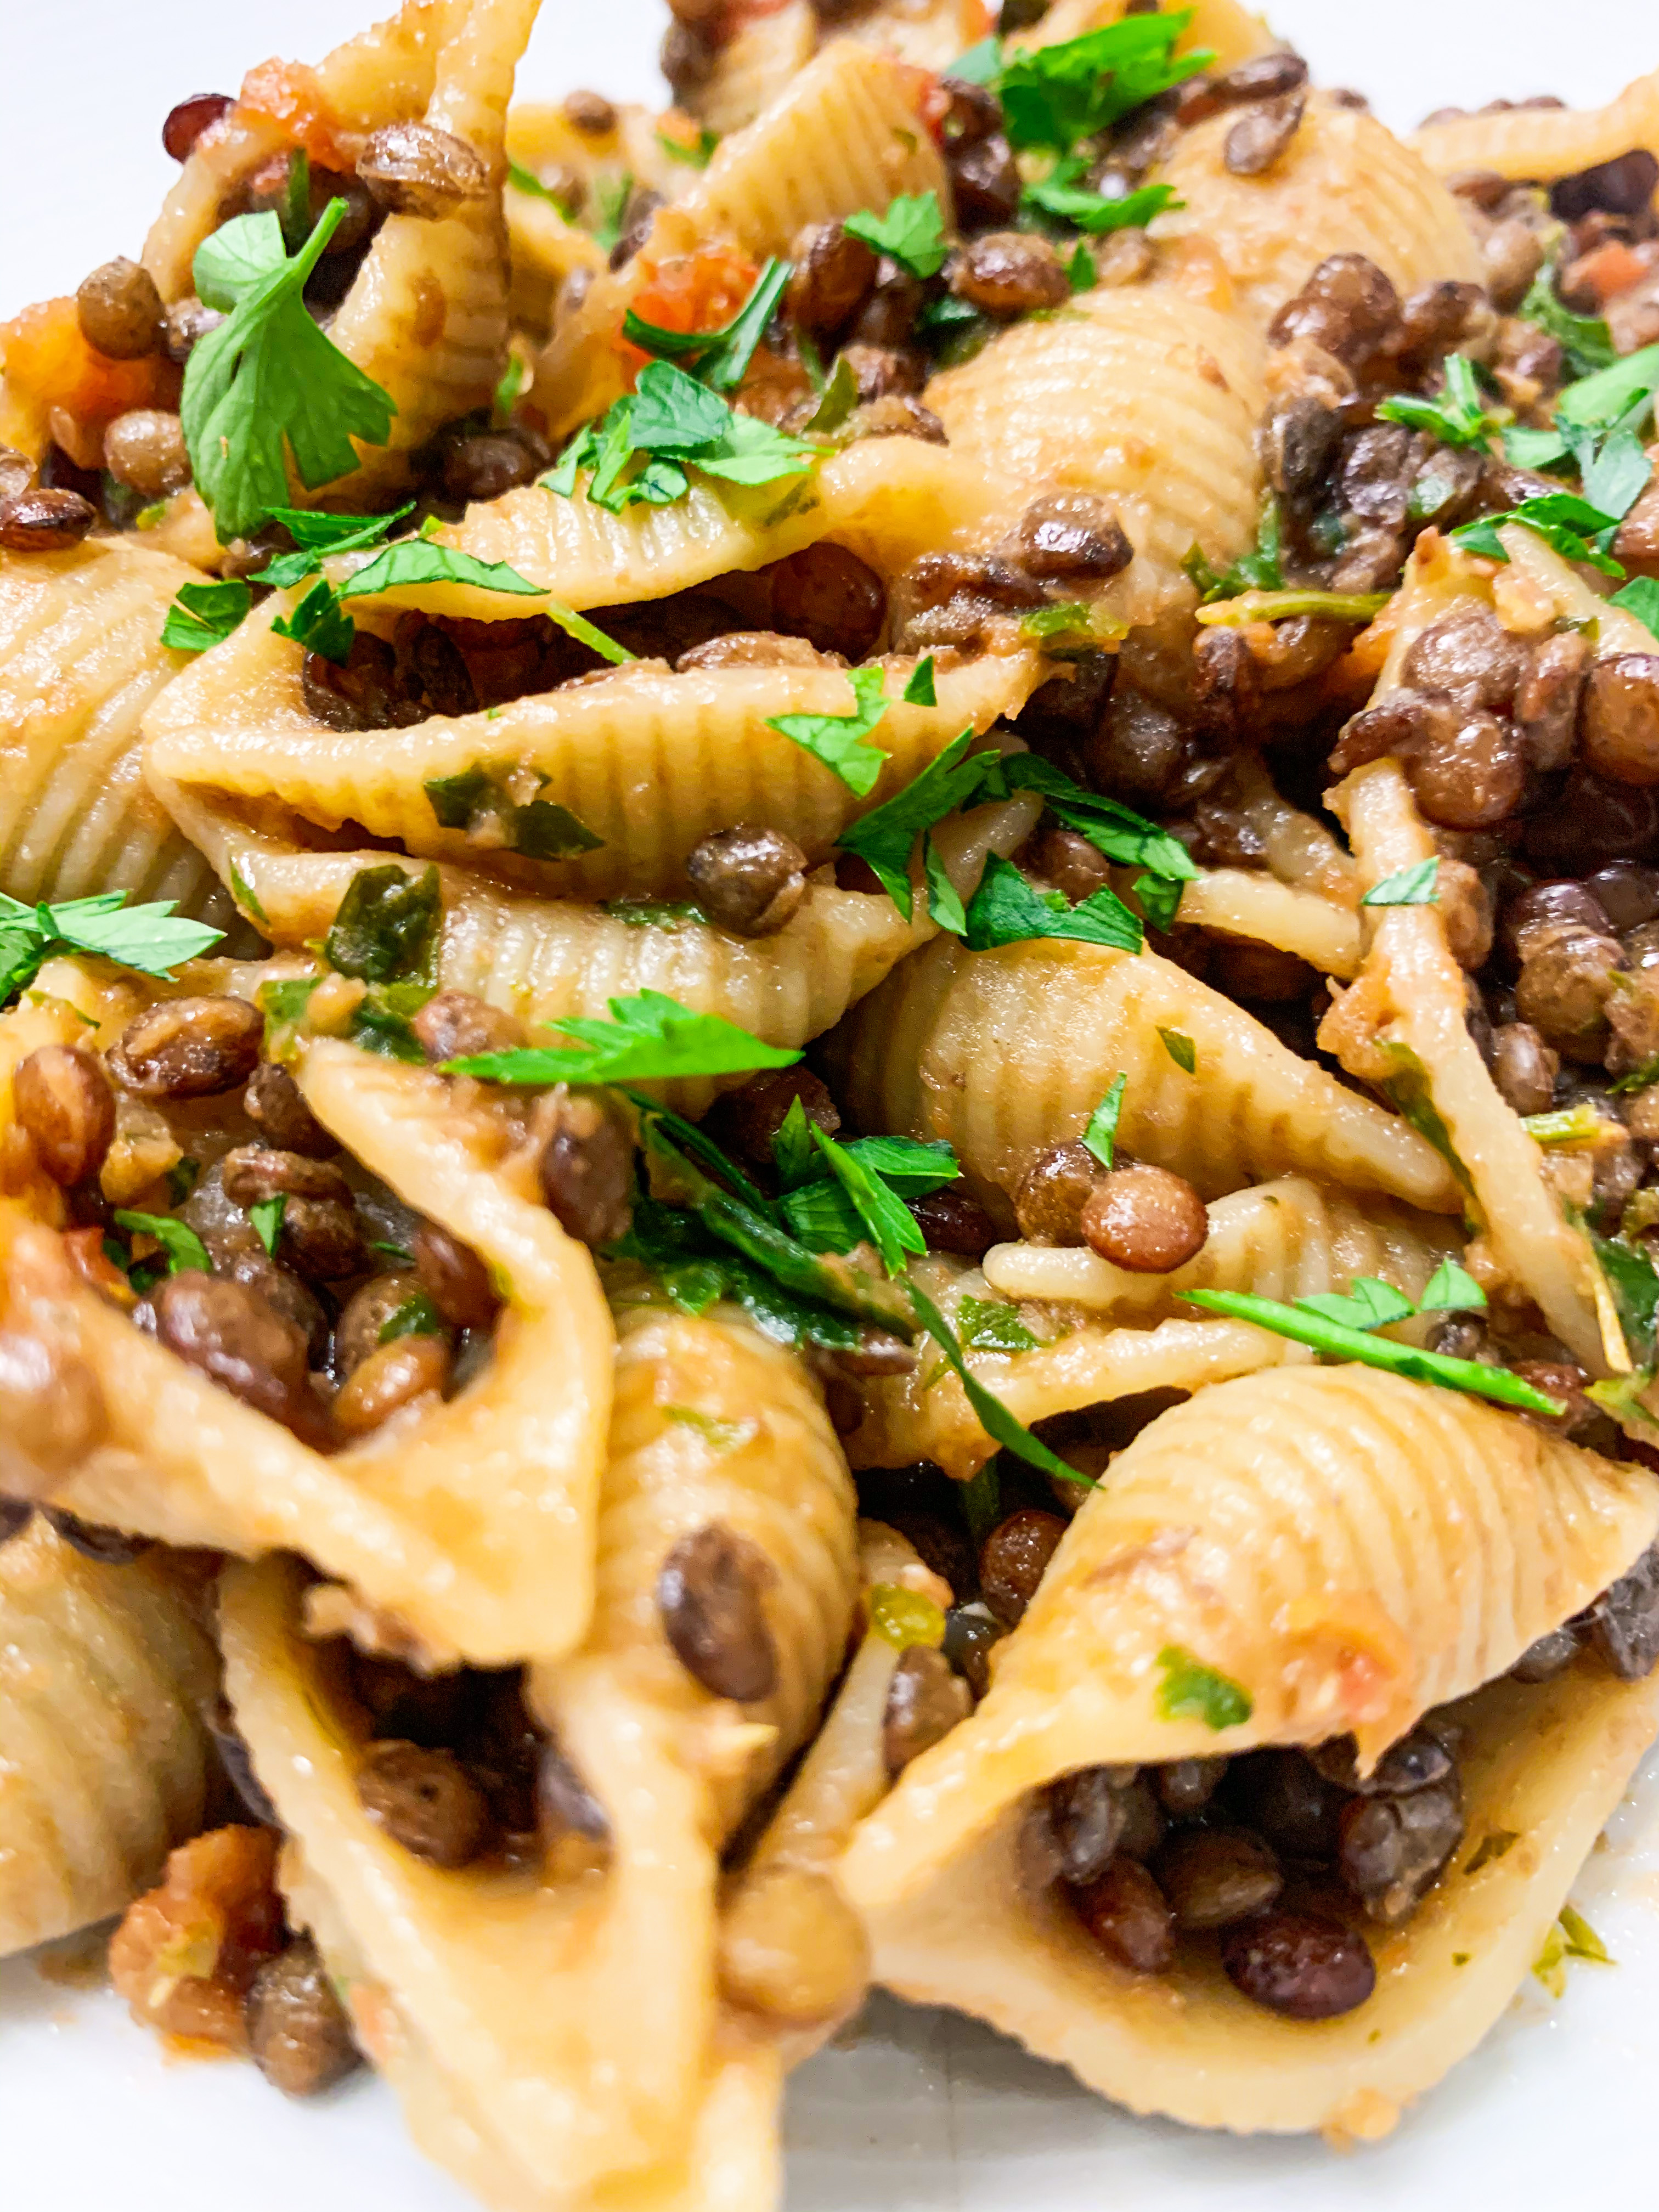
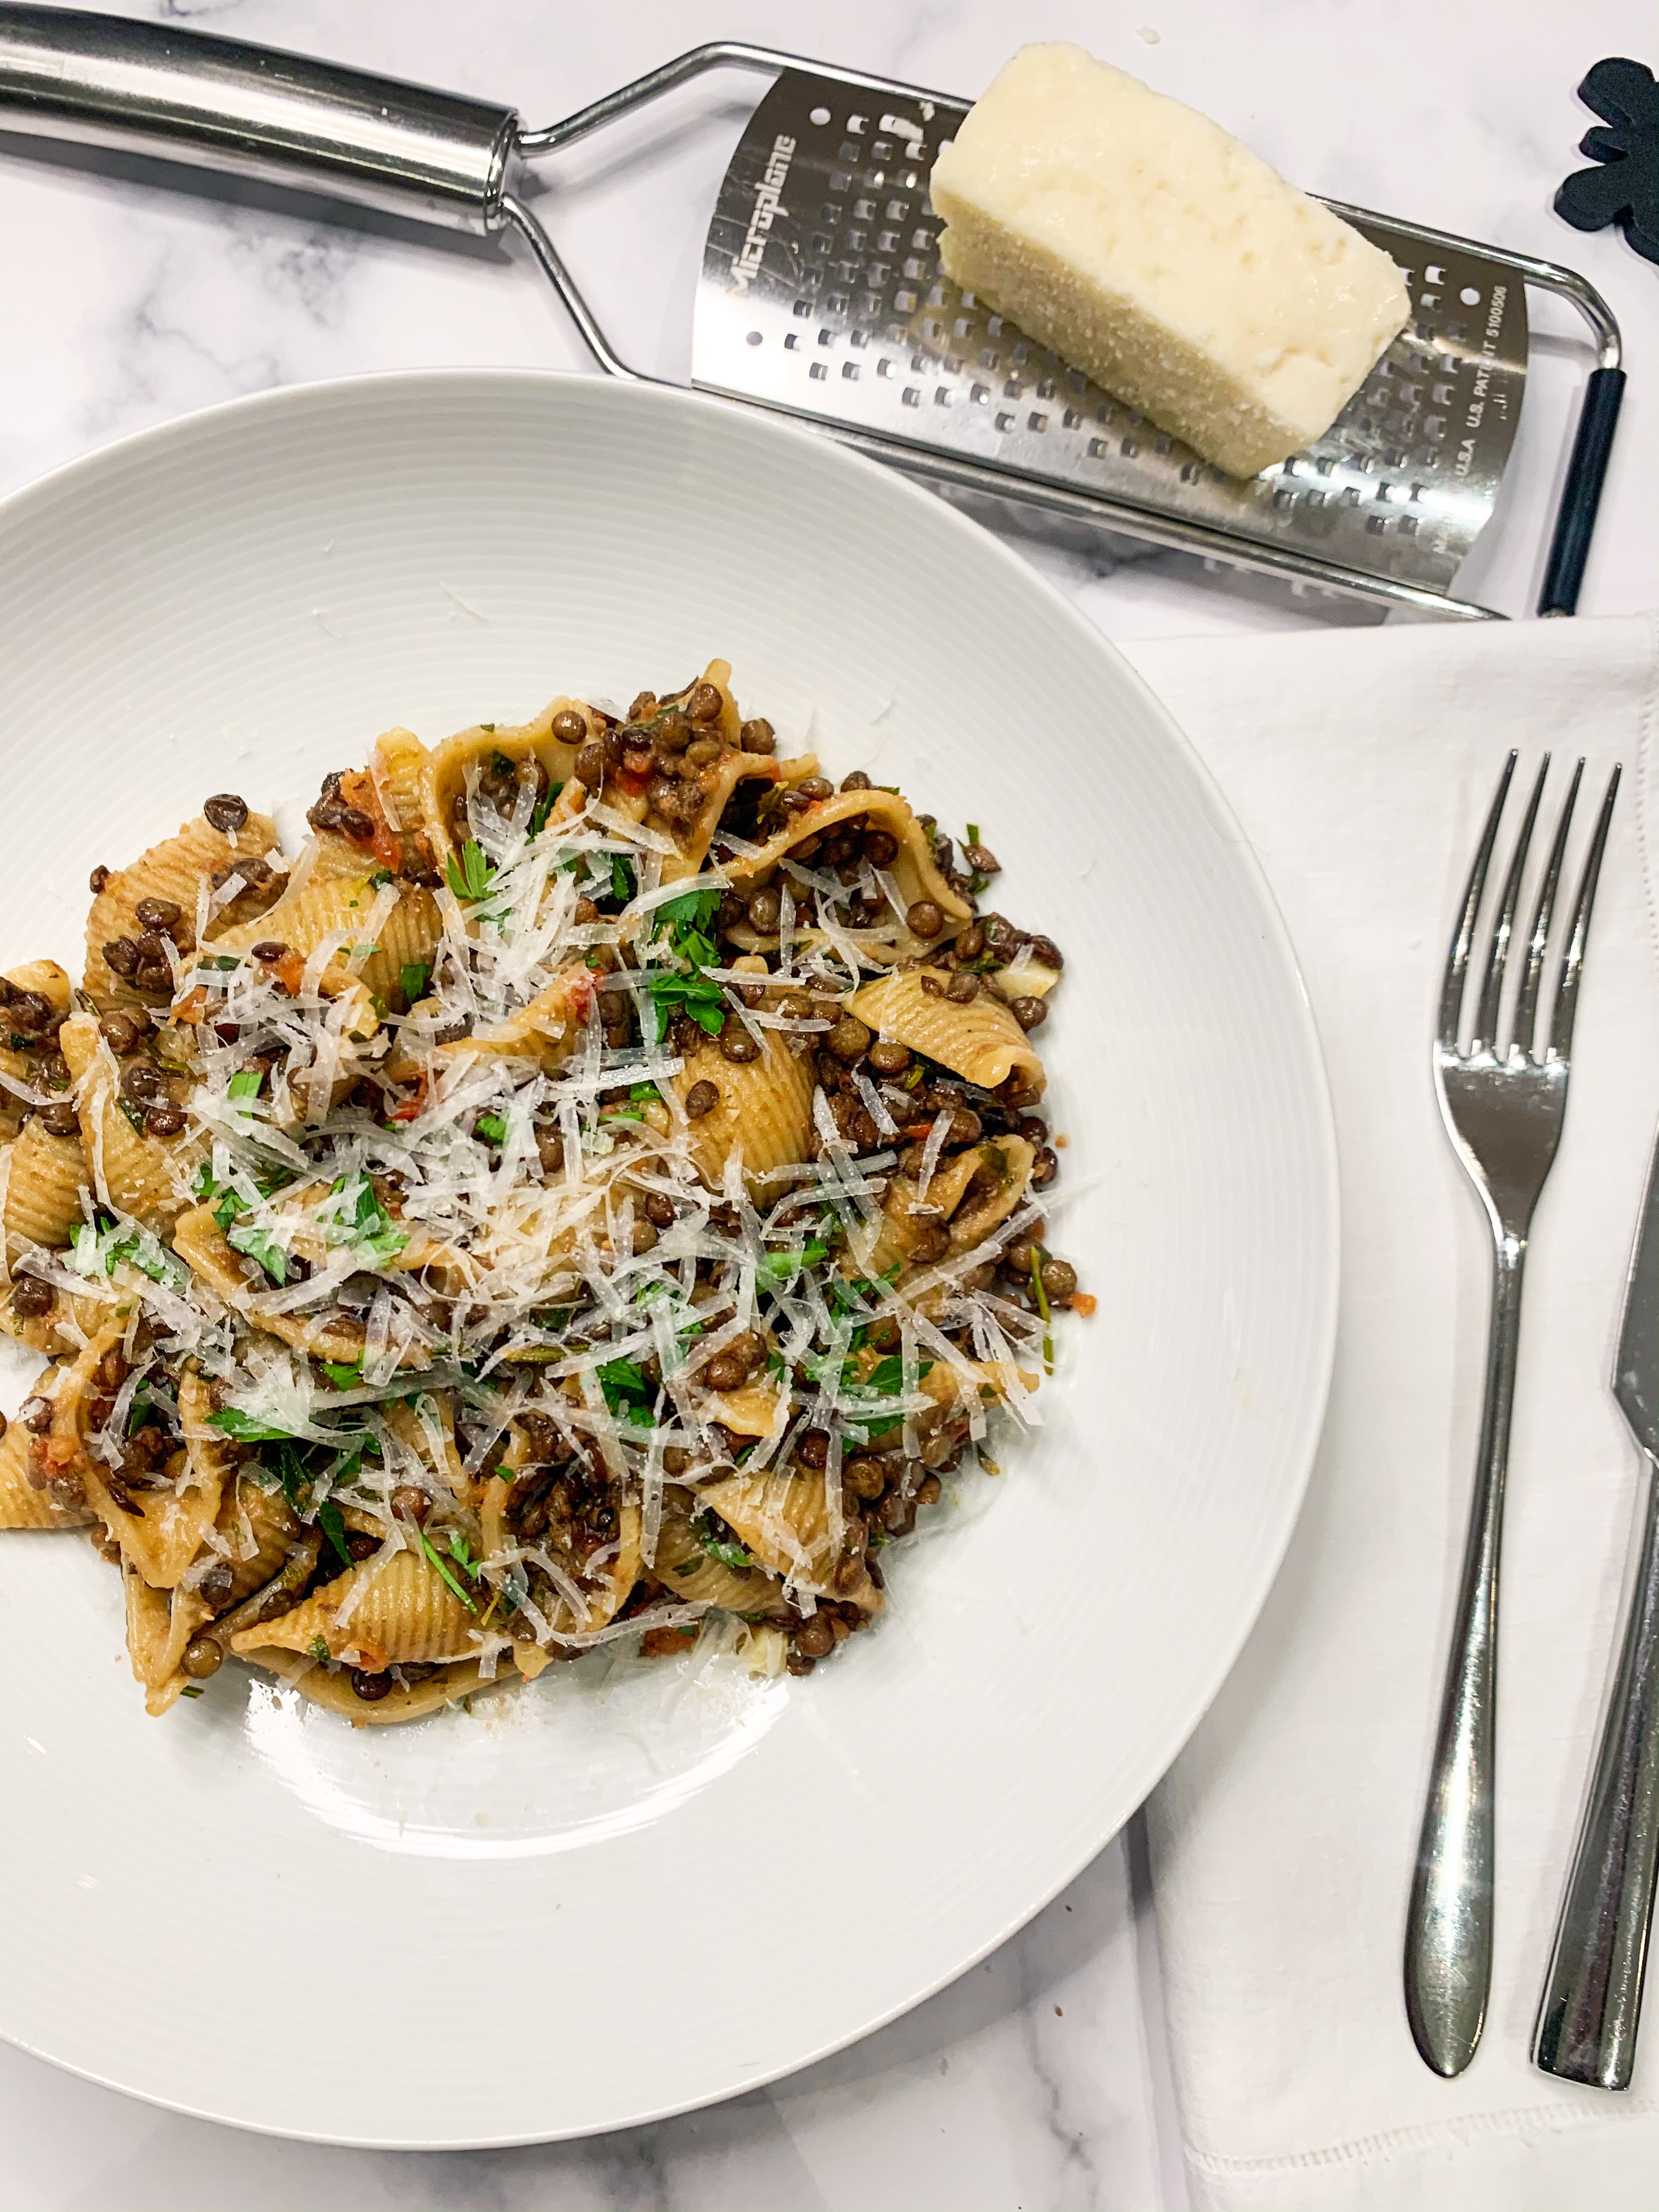
Pasta & Lentils (Serves 4-5)
This is a delicious vegetarian pasta with a wonderful fulfilling flavour; it will be loved by vegetarians and meat lovers alike!…
Put the lentils in a sieve and rinse them under cold water, picking out any gritty bits. Place in a saucepan, cover with cold water, bring to the boil, boiling for 5 minutes, then drain, reserving the cooking liquid and rinse them.
Put 3 litres of hot water, including the reserved cooking liquid from the lentils, in a saucepan and mix in the Marigold Swiss bouillon powder. Add the onion, sage leaves, rosemary sprigs and 1 level tablespoon of salt.
Add the lentils to the pan, cover and bring to the boil, stirring once or twice. Let the lentils cook for about 20 minutes until just tender.
Add the pasta shells to the saucepan and cook with the lentils for a further 10-11 minutes – until the pasta it just al dente (check the packet instructions for cooking time).
Meanwhile, squeeze the seeds out from the tomatoes. Chop the tomatoes together with the garlic and parsley, to form a coarse mixture. Spoon the mixture into a large frying pan, pour in the 4 tablespoons of olive oil and heat gently for 5 minutes.
When the pasta is nearly cooked drain the pasta and lentils, pick out the onions, sage and rosemary. Add the pasta and lentils to the frying pan and stir-fry with the parsley mixture over a medium-high heat for 3-4 minutes turning the mixture over and over.
Serve in pasta bowls, drizzled with olive oil and sprinkled with the cheese.
This is delicious, perfect for a mid-winter evening!… And it’s so easy to make – you have been warned! The maple syrup adds a lovely dimension, a beautiful balance with the bourbon, however you could use sugar syrup instead.
4 tablespoons bourbon whiskey (I like Makers Mark)
2 tablespoons fresh lemon juice
1½ tablespoons pure maple syrup (or sugar syrup)
A handful of ice
Orange peel and a cocktail cherry to garnish
Add the bourbon whiskey, lemon juice and maple syrup with a handful of ice to a cocktail shaker. Shake for 15 seconds until cold.
Strain into a glass, with or without a couple of ice cubes. Garnish with a twist of orange and a cocktail cherry. Enjoy!
This is one of those recipes which I pull out every autumn, it’s a family favourite and appears on our menu quite a lot over the winter months. I first shared this recipe with you in the autumn of 2020; if you haven’t already tried it you really should, it’s a delicious creamy dish – a real ‘hug on a plate’! I found the recipe years ago in a magazine, the cutting is now rather dog-eared as I’ve cooked it so many times! The crackling, which is made from the rind of the chops, is my personal addition and one which, I must admit, is one of my more brilliant ideas(!); it is really worth making as it makes this dish extra special. I like to serve this with my ‘favourite’ mashed potato or, if I’m feeling a little lazy, jacket potatoes, and for some greenery I like tenderstem broccoli with lemon butter and almonds (all recipes are here).
1-2 tablespoons of olive oil
4 pork chops
4 bushy sprigs of thyme, leaves picked and chopped
2 medium pears
15g butter
200ml dry cider
150ml double cream
Sea salt and Black pepper
For the Crackling
1-2 tablespoons malt vinegar
Sea salt
First of all make the crackling: cut off the rind from the chops. Score the rinds a couple of times. Pour boiling water over each piece, dry it, and sprinkle over the malt vinegar, rubbing it in, finally sprinkle with salt. Leave to one side for 30 minutes. After 30 minutes, place on a baking tray and cook in the oven, 200’c, for 30 minutes until crisp.
Meanwhile, lightly oil the chops, sprinkle over the thyme and season with salt and pepper.
Halve and core the pears, cut into large dice. Melt the butter in a frying pan and cook the diced pear until golden and slightly caramelised on each side. Remove from the pan and set aside.
In the same pan brown the chops on each side over a moderate heat. When browned place on a baking tray and cook in the oven, 200’c fan, for 10 minutes.
Meanwhile, deglaze the frying pan with the cider, stirring to dissolve any sticky residue that the chops have left behind. Boil and reduce the cider for 3-4 minutes.
Add the cream, whisk lightly to mix in and allow to bubble down for a minute or so.
Return the chops and the pears to the pan to reheat everything. Check the seasoning. Serve with the crackling, mashed potato or jacket potatoes and tenderstem broccoli (recipes here).
This recipe is from Ottolenghi’s cookbook ‘Sweet’. Originally when I bought this book I somehow overlooked it (he calls it his ‘Take-Home Chocolate Cake’); it only came to my attention when a friend told me that it’s also known as ‘The Worlds Best Chocolate Cake’. Well how could I not try it?… And yes, it is very, very good; depending on my mood it’s my ‘new’ favourite chocolate cake – there are so many! It’s great as a celebratory cake (topped with a rose as in the photo!); in fact I made it just recently for my Dad’s 90th birthday. It’s extremely easy to make, it’s a melt and mix recipe, you don’t even need a food processor and, if required, it works beautifully with gluten-free flour (I use Doves).
For the cake: 250g unsalted butter, at room temperature and cut into 2cm cubes, plus extra for greasing 200g dark chocolate, chopped into 2cm pieces ((I use Lindt Excellence 70% Cocoa Dark Chocolate) 1½ tsp instant coffee granules, dissolved in 350ml boiling water 250g caster sugar 2 large eggs, lightly beaten 2 tsp vanilla extract 240g self-rising flour (gluten-free if required) 30g Dutch-processed cocoa powder, plus 1½ teaspoons, for dusting 1/4 tsp salt
For the chocolate ganache: 200g dark chocolate, broken or chopped roughly into 2cm pieces (I use Lindt Excellence 70% Cocoa Dark Chocolate) 200ml double cream 1 tbsp golden syrup 1 tbsp unsalted butter, softened
(*23cm round cake tin, greased and base lined with greaseproof paper)
Place the butter, chocolate and hot coffee in a large heatproof bowl and mix well until everything is melted, combined and smooth. Whisk in the sugar by hand until dissolved. Add the eggs and vanilla extract, and whisk again until thoroughly combined and smooth. Sift the flour, cocoa powder and salt together into a bowl and then whisk this into the melted chocolate mixture. The batter here is liquid, don’t worry this is how it should be!
Pour the batter into the prepared tin and bake in a preheated oven, 150’c fan, for 1 hour, or until the cake is cooked and a skewer inserted into the centre comes out clean or with just a few dry crumbs attached. The top will form a crust and crack a little, but don’t worry, this is expected and it will be covered by the ganache! Leave the cake to cool for 20 minutes before removing from the pan, then set aside until completely cool.
To make the chocolate ganache, place the chocolate pieces in a food processor, process until fine and set aside. Combine the cream and golden syrup in a small pan and place over medium-high heat. As soon as bubbles begin to appear (just before it comes to a boil), remove from the heat. Get the food processor running again, with the chocolate still inside, and pour in the hot cream in a steady stream. Process for 10 seconds, then add the butter. Continue to process until mixture is shiny and smooth. (You can also make the ganache by hand; just make sure the chocolate is chopped fairly finely before adding the cream mixture. Stir with a wooden spoon until almost melted, then add the butter. Stir again until the ganache is smooth.)
Use a rubber spatula to scrape the ganache into a bowl and cover with plastic wrap, with the plastic actually touching the top of the ganache. Set aside until it has set to the consistency you want. If you want a thin layer to spread over the cake, it can be poured over while liquid so that you get an even, light and shiny coating. For a thicker ganache with a spreading consistency, leave it for about 2 hours at room temperature.
Finally, peel the parchment from the cake and discard. Transfer to a serving platter and spread the ganache over the top of the cake. (This cake will keep well for 4 to 5 days in an airtight container, if refrigerated bring the slices to room temperature before tucking in!)