
(All Recipes have Gluten-Free Options)
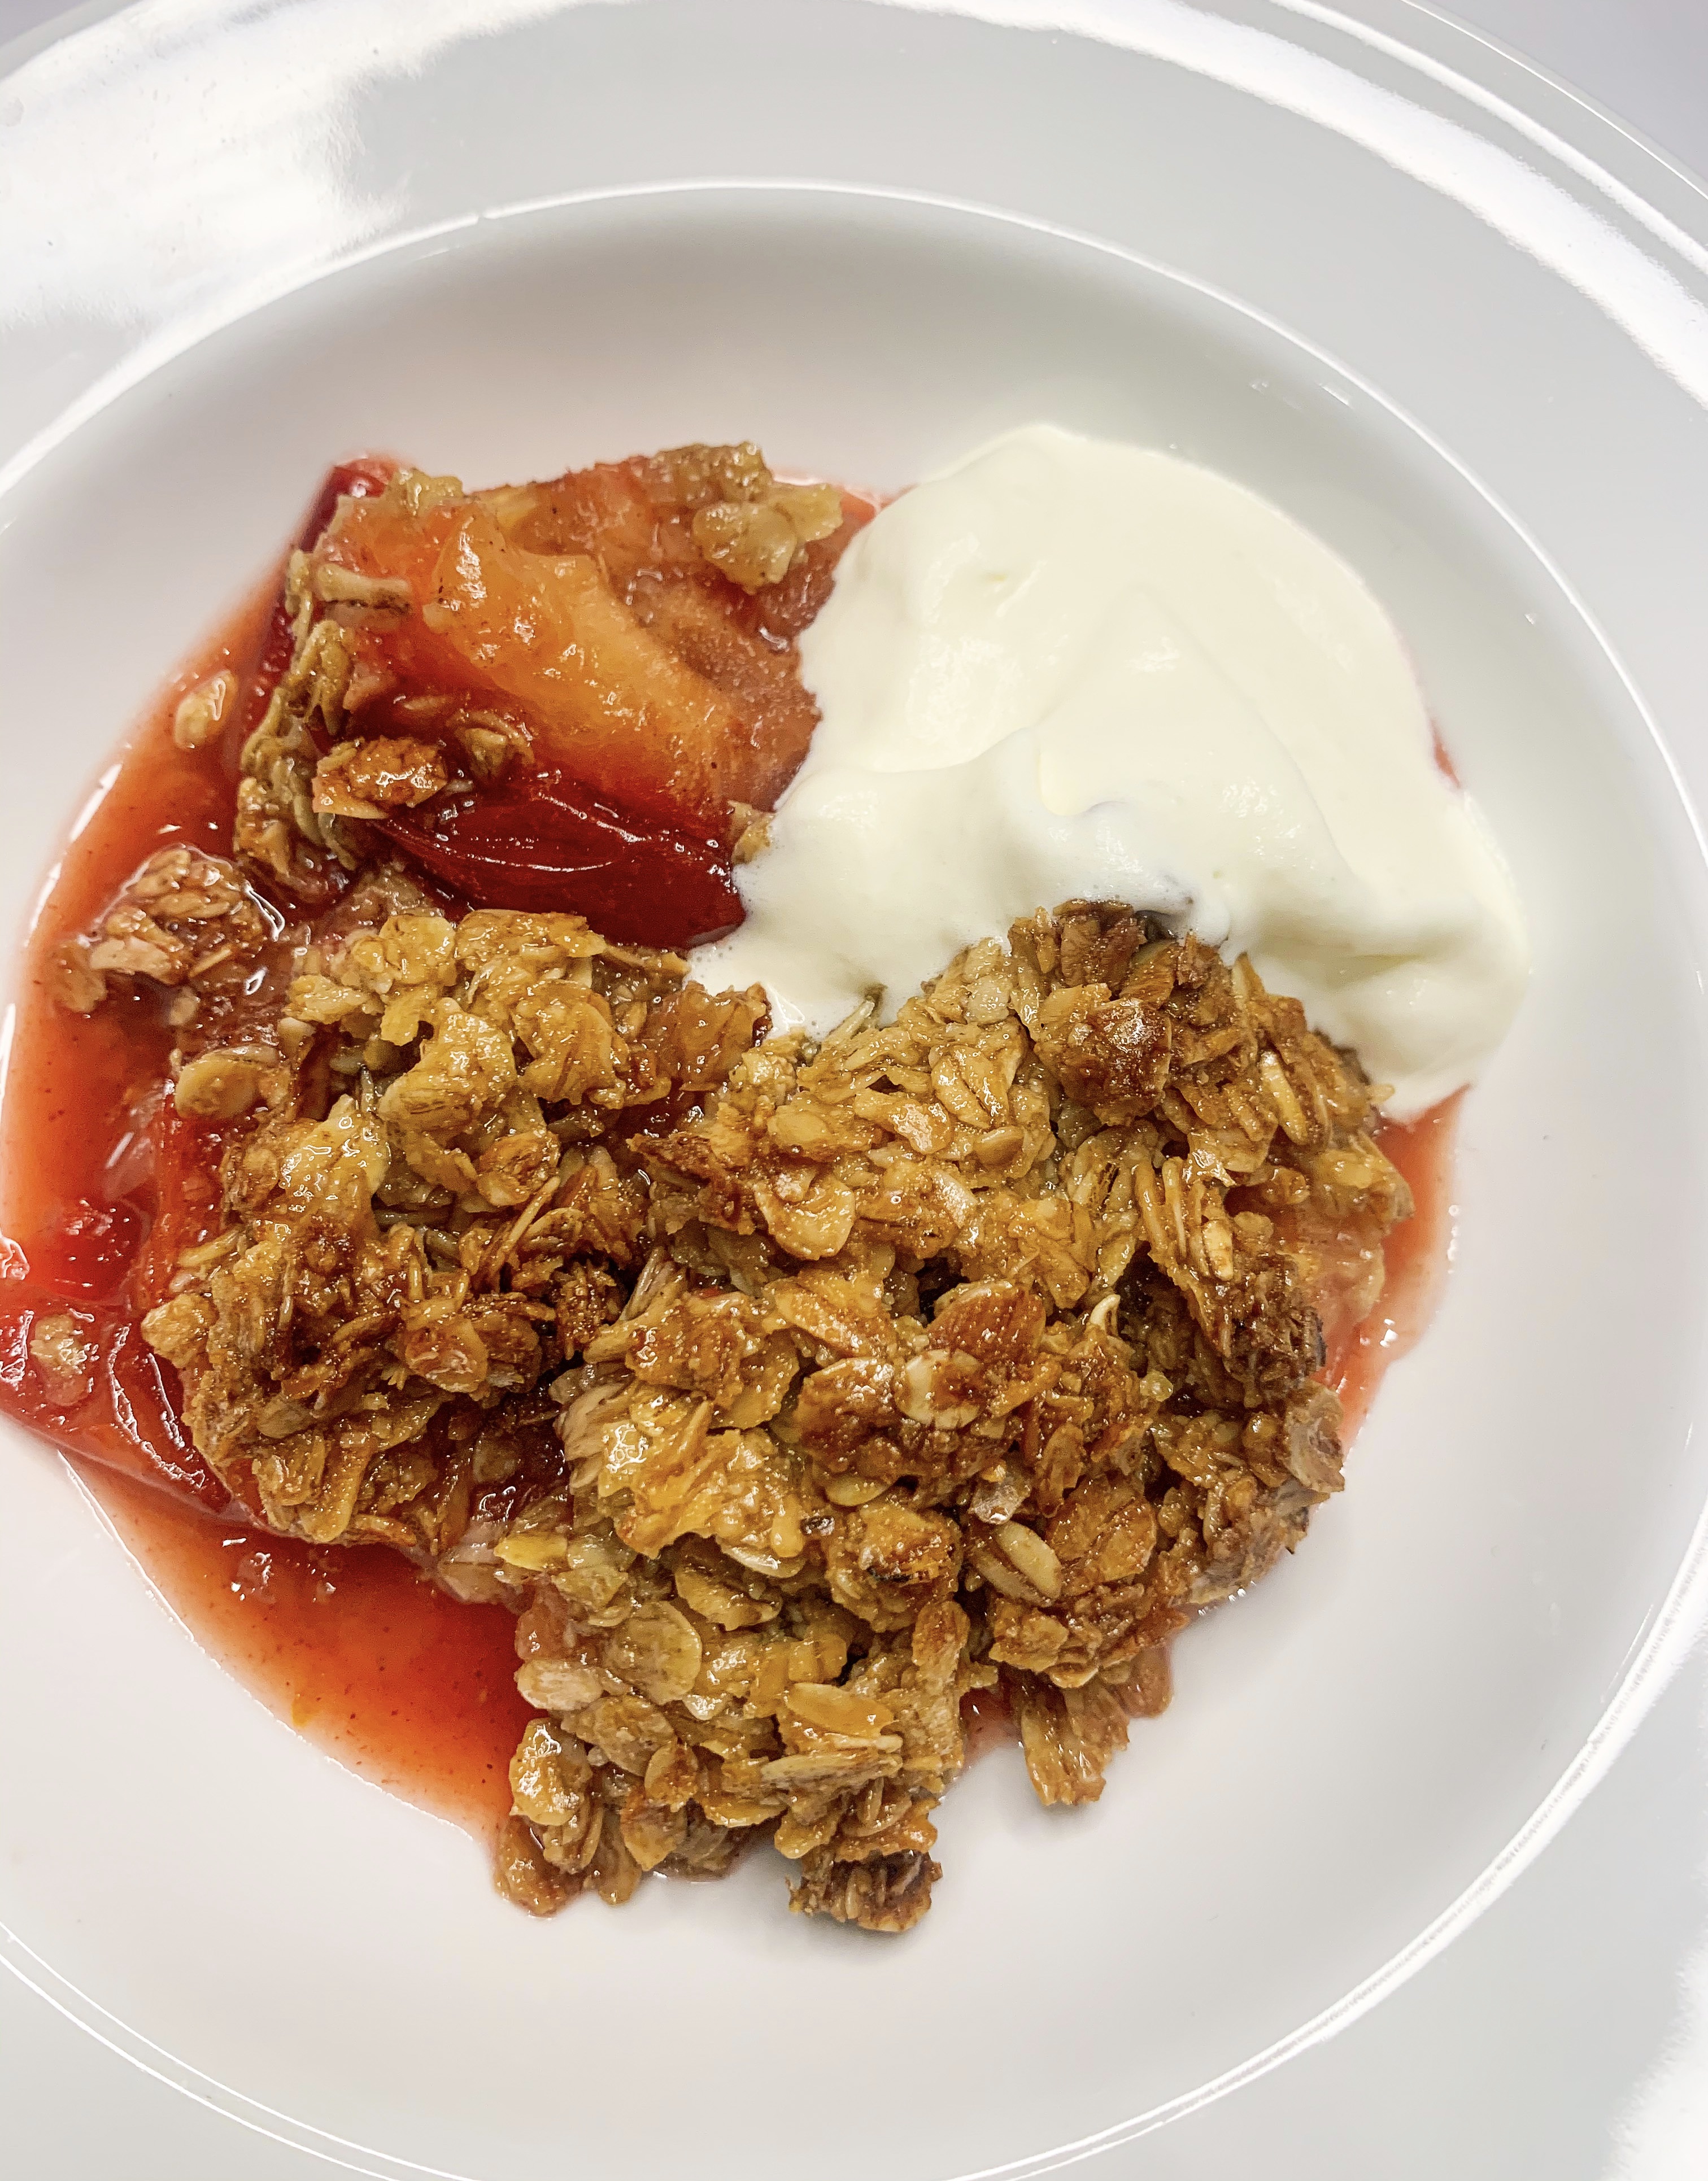
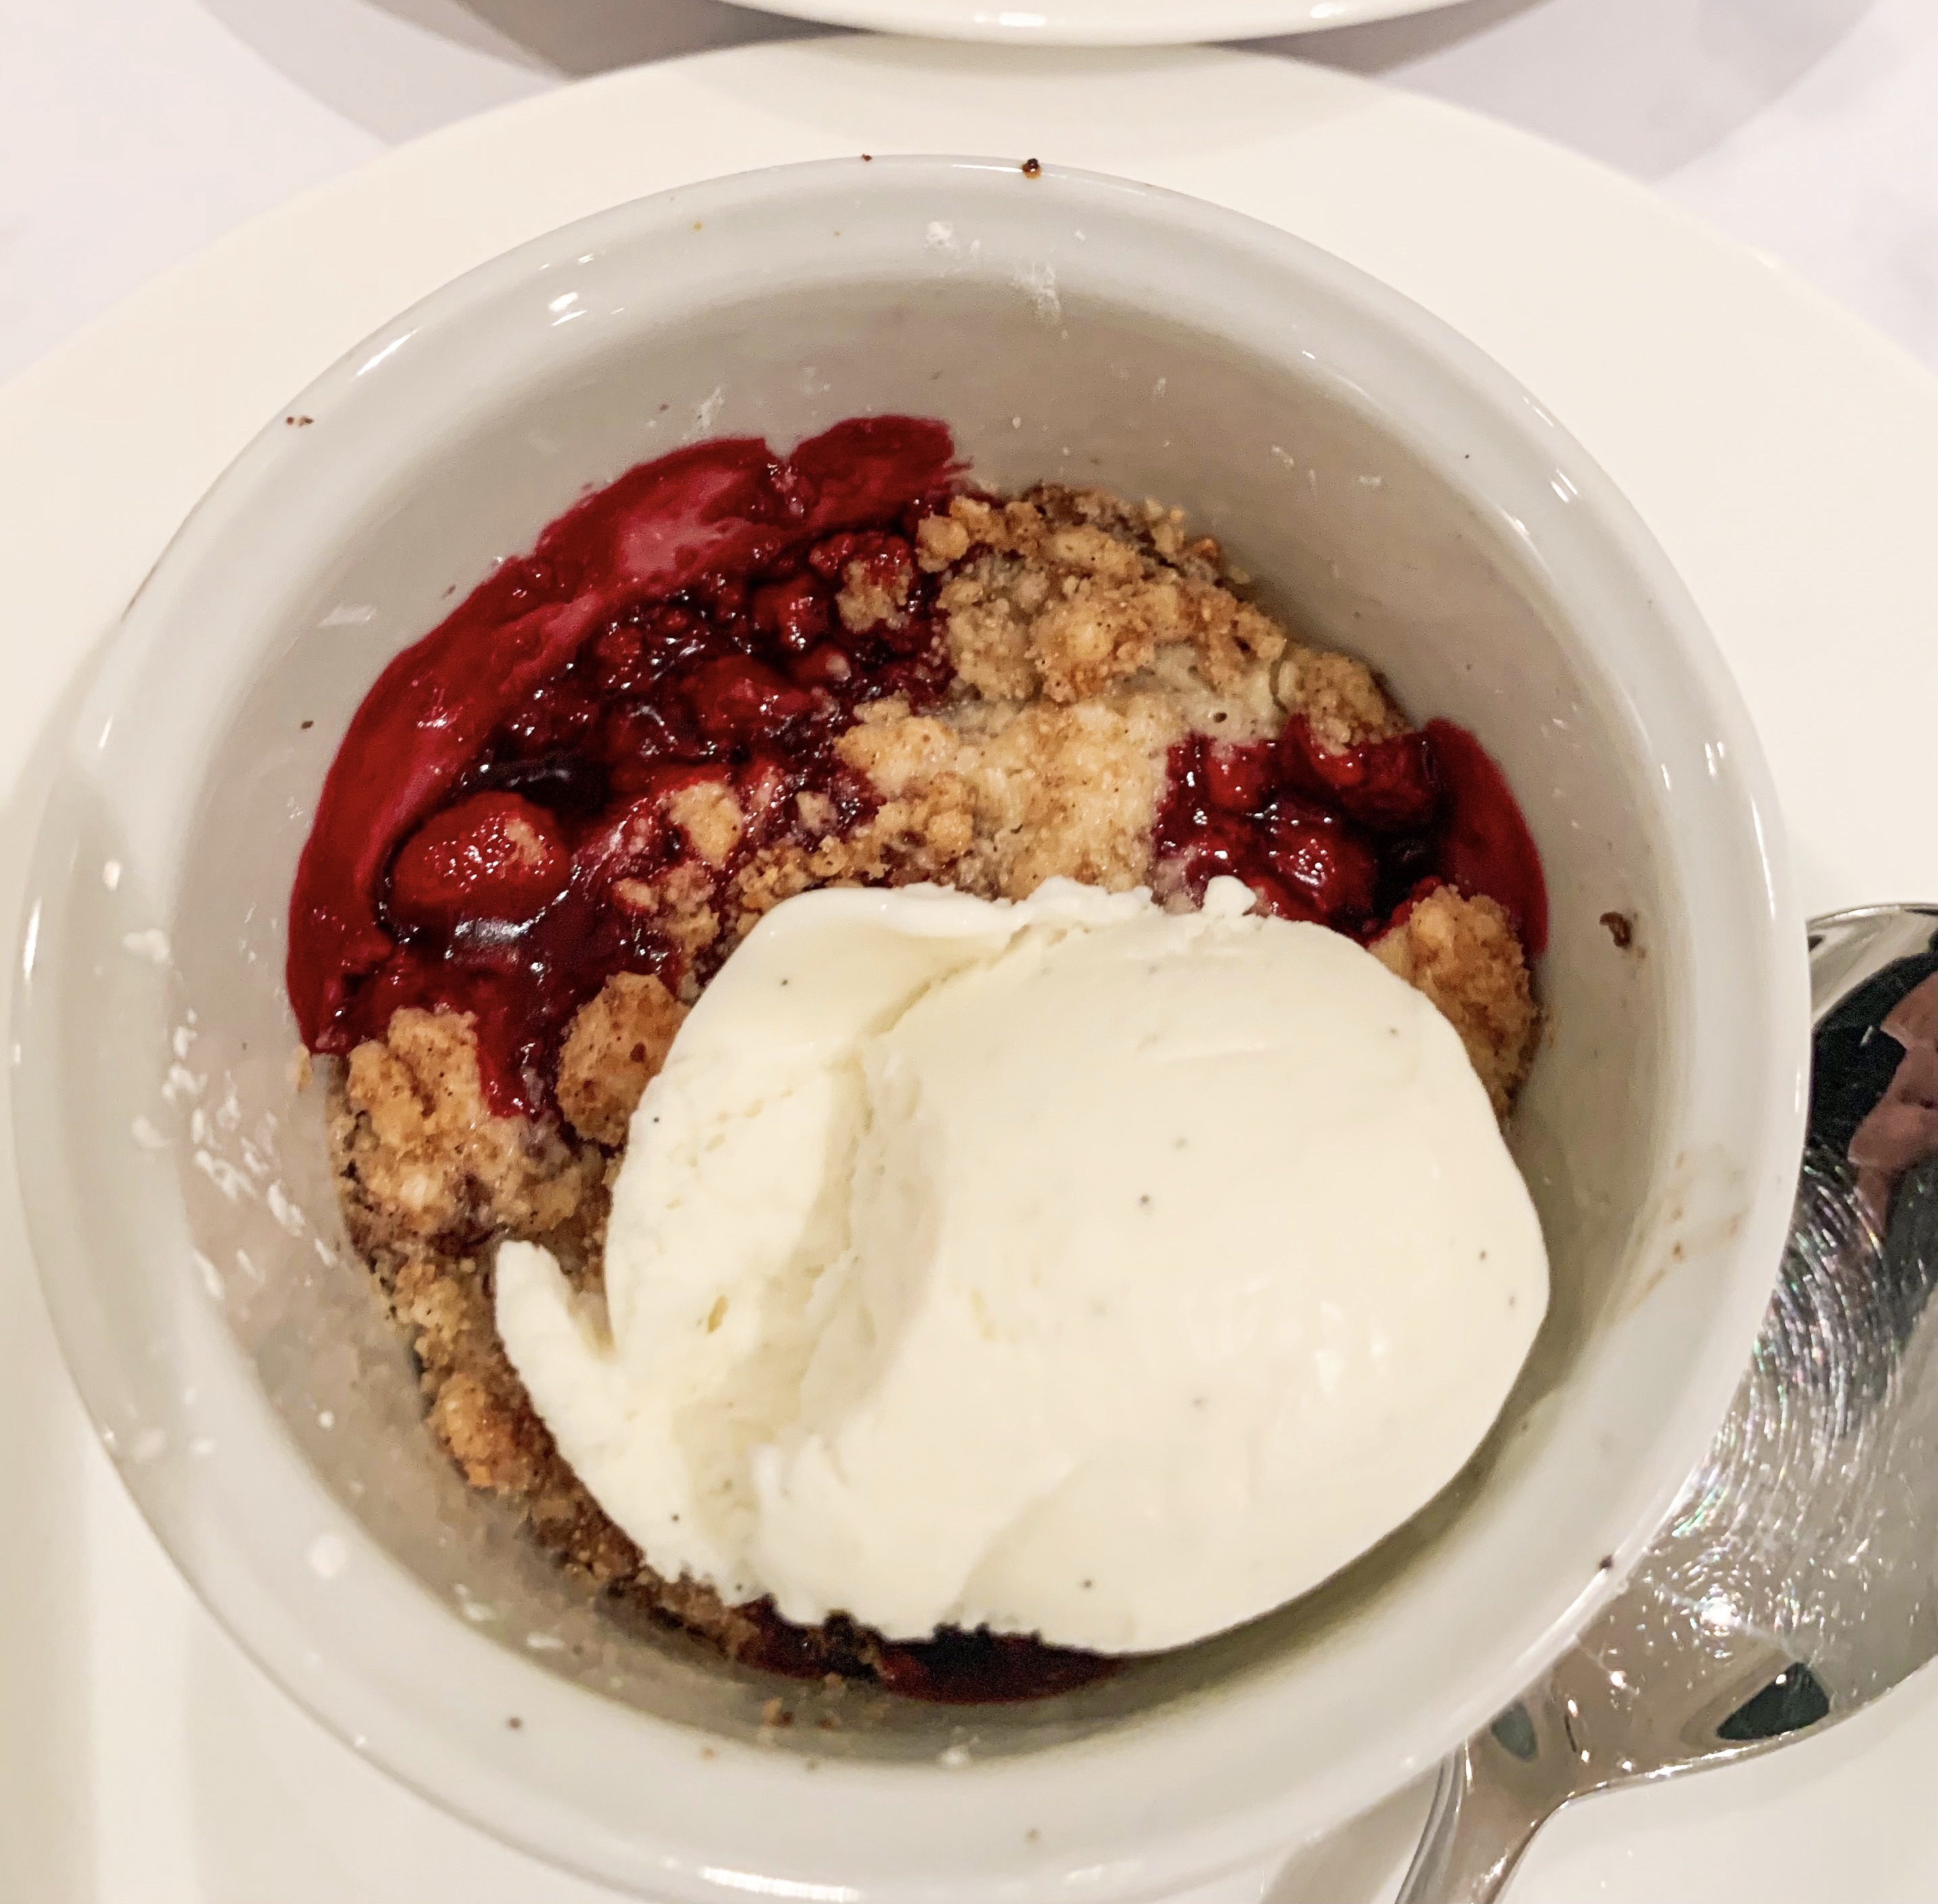
Nectarine & Raspberry Crisp (serves 6-8)
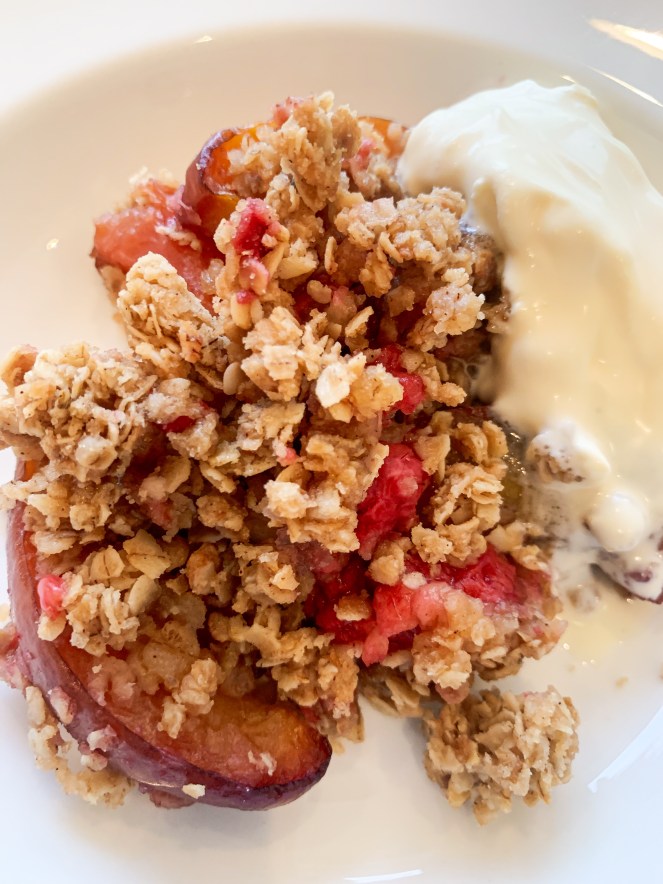
This is a recipe which I’ve been making for years. It’s from Darina Allen’s cookbook, ‘A Year at Ballymaloe’. These days, nectarines are available year-round, and although when they’re out of season they tend to be hard and underripe, they’re great for cooking with. This dessert will give you a taste of summer in the deepest, darkest days of winter. Depending on the ripeness of the nectarines, when cooked they will either retain an ‘al dente’ bite or will be softly stewed; either way, they will taste wonderful with the raspberries, which will have melted down to give a syrupy sauce. It’s a delicious dessert, especially with a large dollop of whipped cream!..
115g plain white flour (gluten-free if required)
230g soft brown sugar
340g porridge oats
¼ teaspoon freshly ground nutmeg
⅓ teaspoon ground cinnamon
225g butter, melted
900g nectarines
340g raspberries
1 tablespoon cornflour
Whipped cream, to serve
*You will need a Lasagne-type dish approx. 30x25cm
- Put all the dry ingredients into a bowl, add the melted butter and mix until crumbly.
- Slice the nectarines into the oven proof dish. Add the raspberries, sprinkle over the cornflour and mix well. Top with the crumble mixture.
- Bake in a preheated oven, 180’c fan, for about 40mins or until the topping is crisp and golden and the fruit is tender (see note above).
- Serve with softly whipped cream!
Vanilla Pavlova with Passion Fruit Cream, Pineapple and Mint Salsa (Serves 8)
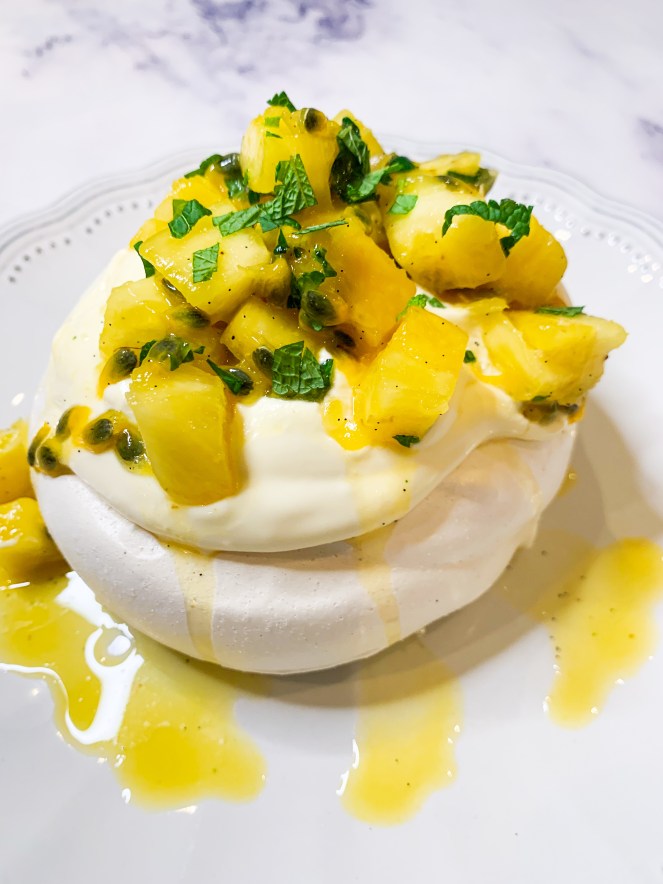
This is a real show-stopping dessert. The combination of the fresh pineapple and passion fruit alongside the whipped cream and marshmallow-like texture of the meringue is sublime – plus there’s the fresh tang from the mint! This glorious recipe is from Paul Ainsworth’s cookbook ‘For the Food I Love’.
6 egg whites
1 teaspoon vanilla bean paste
330g caster sugar
1½ tablespoon cornflour
2 teaspoons lemon juice
Zest of 1 lime
For the Pineapple and Mint Salsa:
1 ripe pineapple, peeled, cored and diced
1 pod of vanilla, seeds removed
4 passion fruit
12 mint leaves
For the Passion Fruit Cream:
125g crème fraiche
20g icing sugar
150ml double cream
- First, make the meringue. Whisk the egg whites and vanilla paste together until light and fluffy. Now slowly start to whisk in the sugar, 1 tablespoon at a time, until fully incorporated. Continue to whisk until the meringue forms soft peaks. Sift the cornflour and using a spatula fold it through the fluffy egg white. Finally, fold through the lemon juice.
- Onto a baking sheet lined with baking paper, spoon (or pipe) the meringue, forming 8 domed circles (approx. 10cm). Bake in a preheated oven, 110’c fan for 55 minutes, then turn off the oven and leave the pavlovas in the oven to cool and dry.
- To make the pineapple and mint salsa, take a bowl and add the pineapple and vanilla seeds (from the pod). Cut the passion fruit in half and scrape out the fruit into a sieve over a small bowl to collect the juice. Keep back 1 tablespoon of juice for the fruit cream (see below) and add the rest to the salsa, along with the passion fruit seeds. Chop up some of the mint but reserve a few leaves for decoration. Now give the salsa a good stir.
- Next make the passion fruit cream. Take a mixing bowl and add the crème fraiche, icing sugar and reserved 1 tablespoon of passion fruit juice, whisk together to combine. In a separate bowl, whisk the double cream until you have soft peaks. Fold the whipped double cream through the passion fruit mixture and whip until stiff. Chill in the fridge until ready to serve.
- To serve, place the pavlovas onto a large platter or individual plates. Divide the passion fruit cream between the pavlovas in neat dollops, then spoon over the pineapple and mint salsa. Finish with lime zest and reserved mint leaves.
Banana Soufflés with Caramel Sauce (Serves 6)

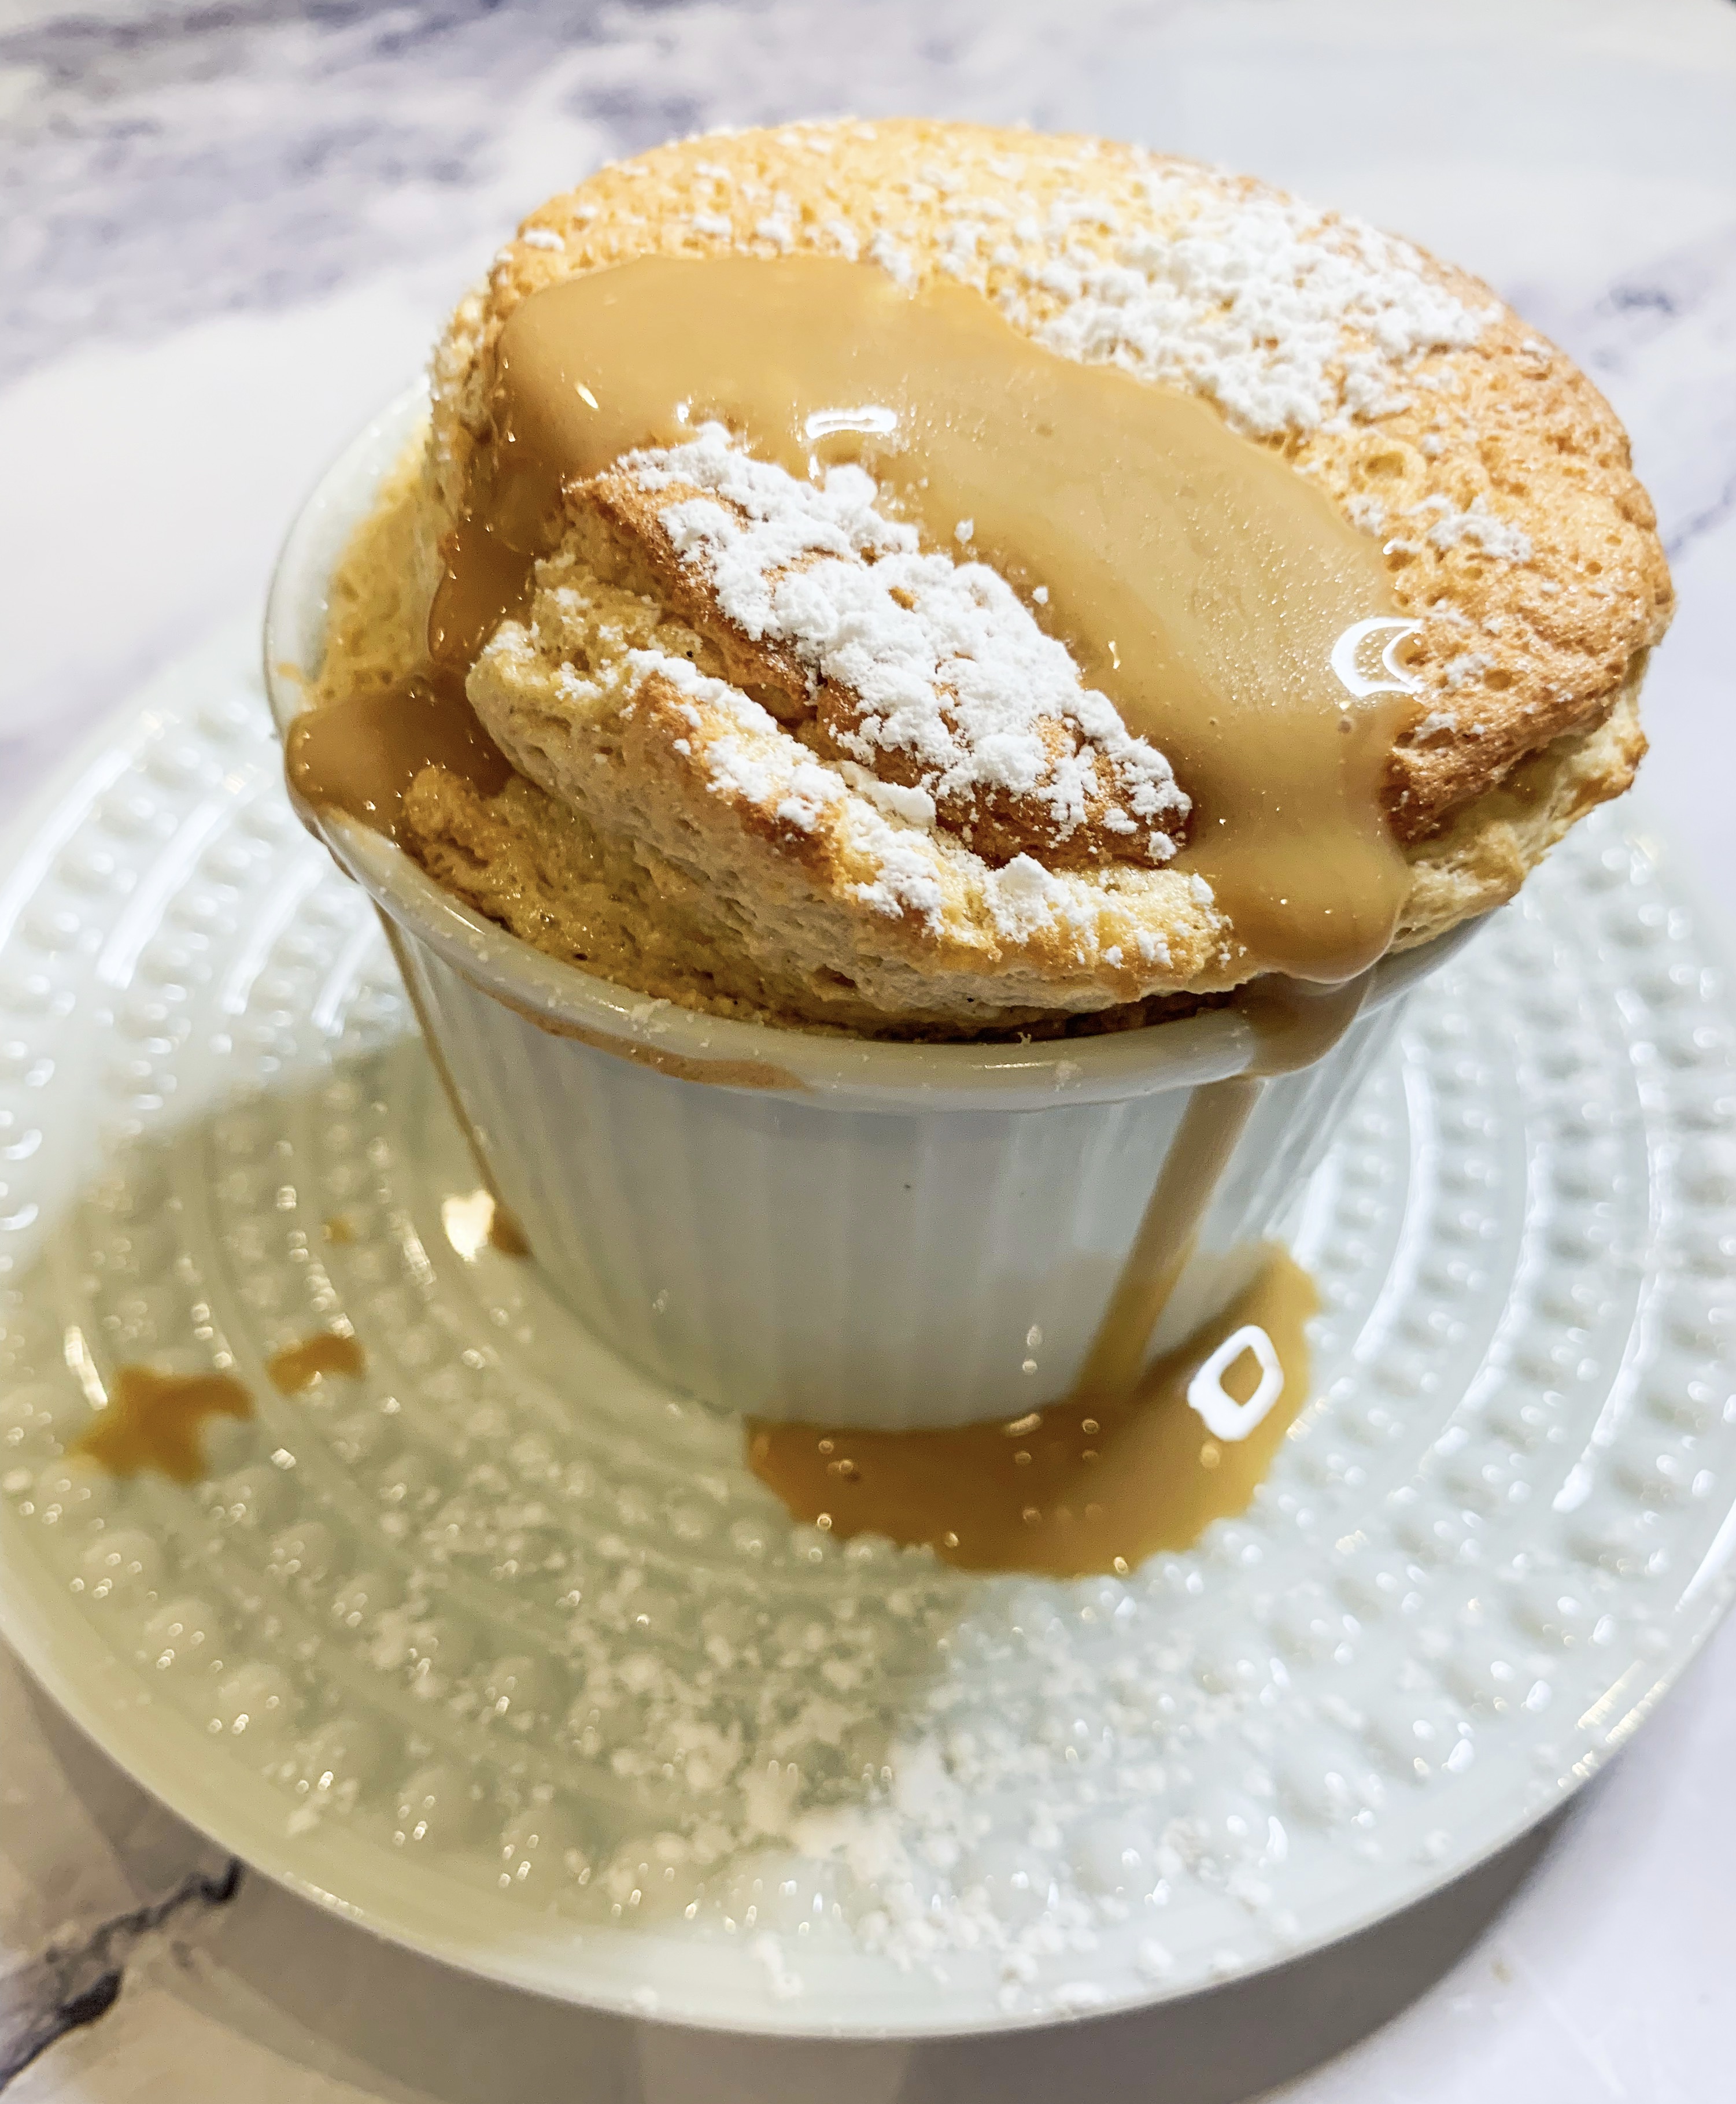
Oh my, these are good!.. They are soft, fluffy and fruity; a super light dessert which will impress everyone. Soufflés have a reputation for being difficult to make, but believe me when I say that these are super easy. The soufflé mix can be made up to two hours in advance, just keep chilled in the ramekins and bake straight from the fridge. Meanwhile, the caramel sauce can be made up to 2 days in advance; keep chilled and reheat gently to serve.
*It’s important to get the size of the ramekins right to make sure that they rise up – I used ramekins with a 200ml capacity (9cm diameter) and they rose up perfectly.
20g butter, softened for coating the ramekins
100g caster sugar, plus extra for coating
75ml whole milk
2 large eggs, separated
2 tablespoons cornflour
1 large ripe banana, about 100g
1 teaspoon vanilla bean paste
Icing sugar, for dusting
For the caramel sauce:
20g dark muscovado sugar
1 tablespoon golden syrup
25g butter
150ml double cream
- Preheat the oven to 180’c fan and put a baking tray in the oven.
- Grease 6 ramekins (see note above) with butter and evenly coat the base and sides with a little sugar.
- Heat the milk until it’s just at a simmer then remove from the heat. Using an electric whisk, beat the egg yolks and 50g of the caster sugar together until pale, then whisk in the cornflour. Now, gradually whisk in the warm milk.
- Place the banana and vanilla bean paste in a food processor or blender and whizz until very smooth. Stir into the milk mixture.
- Using clean beaters, whisk the 2 egg whites until stiff, then gradually add the remaining sugar, whisking until shiny.
- Use a metal spoon to fold the banana mixture into the egg whites, a quarter at a time, until blended and mousse-like.
- Spoon the mixture into the prepared ramekins. Place on the hot baking tray and bake in the preheated oven, 180’c fan, for 12-15 minutes until risen and golden brown.
- Meanwhile, make the caramel sauce. Place the sugar, butter and syrup in a pan and heat gently, stirring, until smooth. Bring to a simmer then stir in the cream and cook gently for a further 2 minutes.
- Remove the soufflés from the oven dust with icing sugar and serve immediately with the warm sauce – it’s a good idea to make sure your guests are seated at the table so you can serve them the moment they come out of the oven so that everyone can appreciate them in their full ‘risen’ glory!
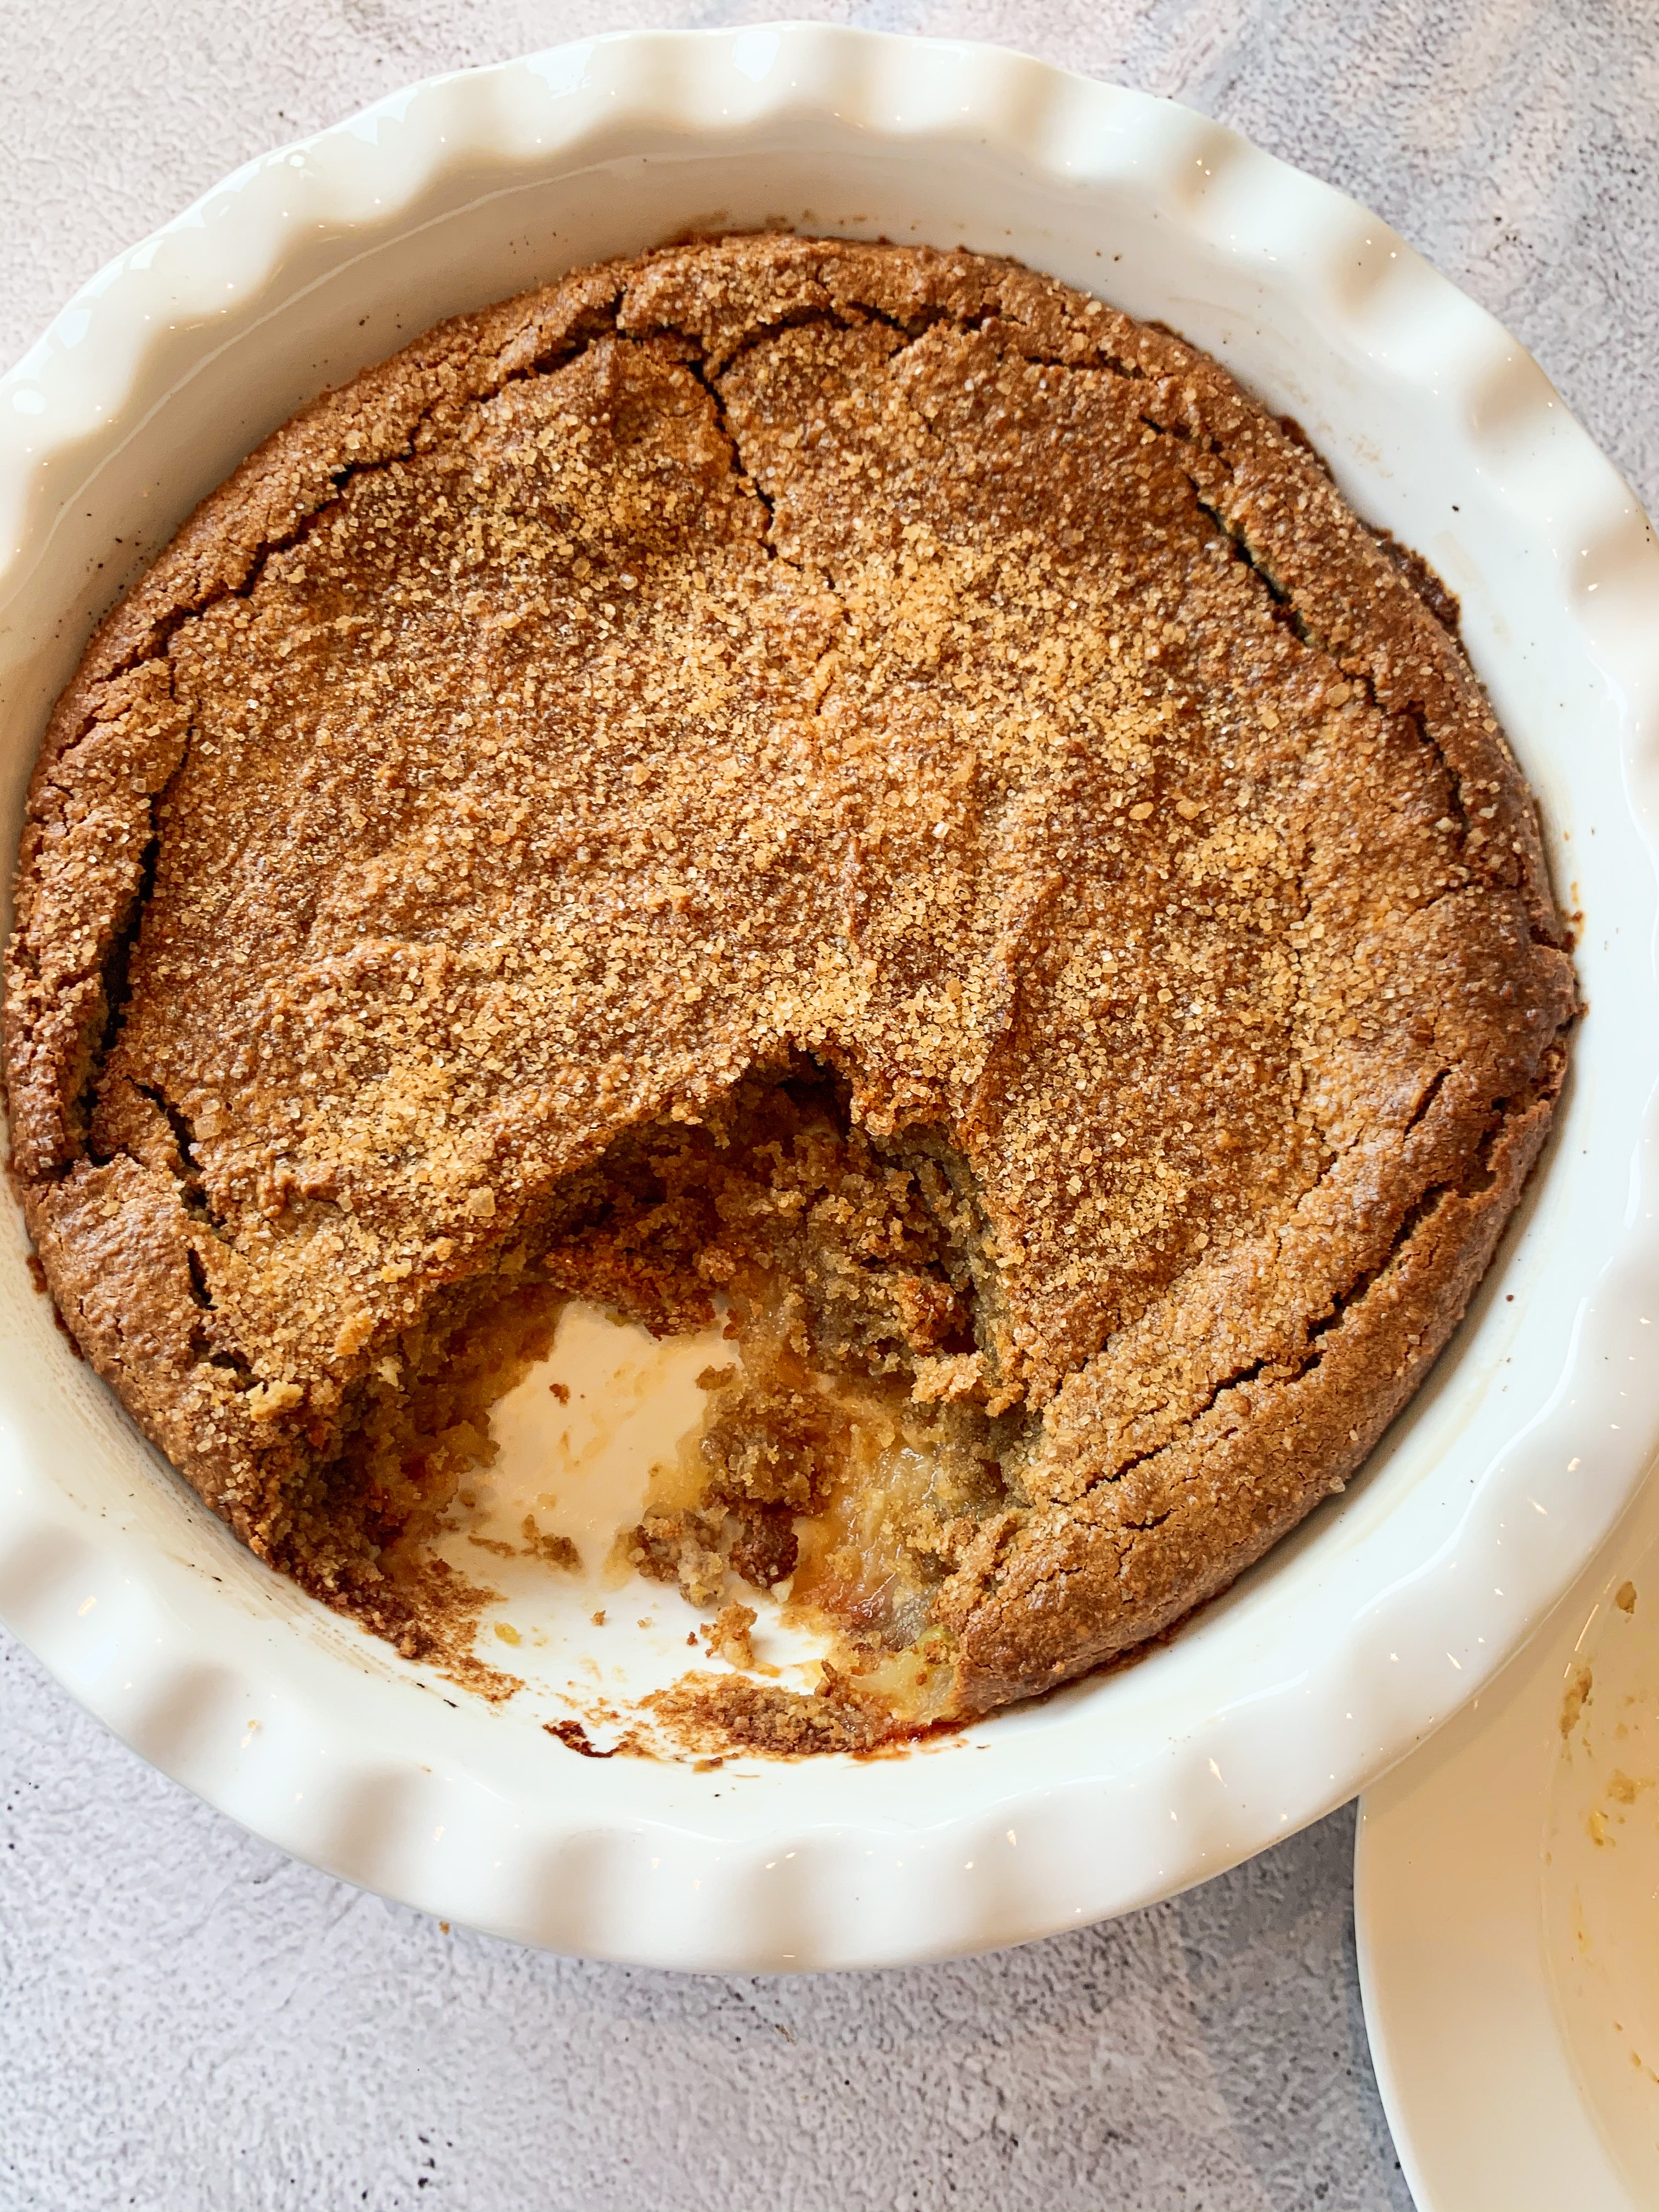
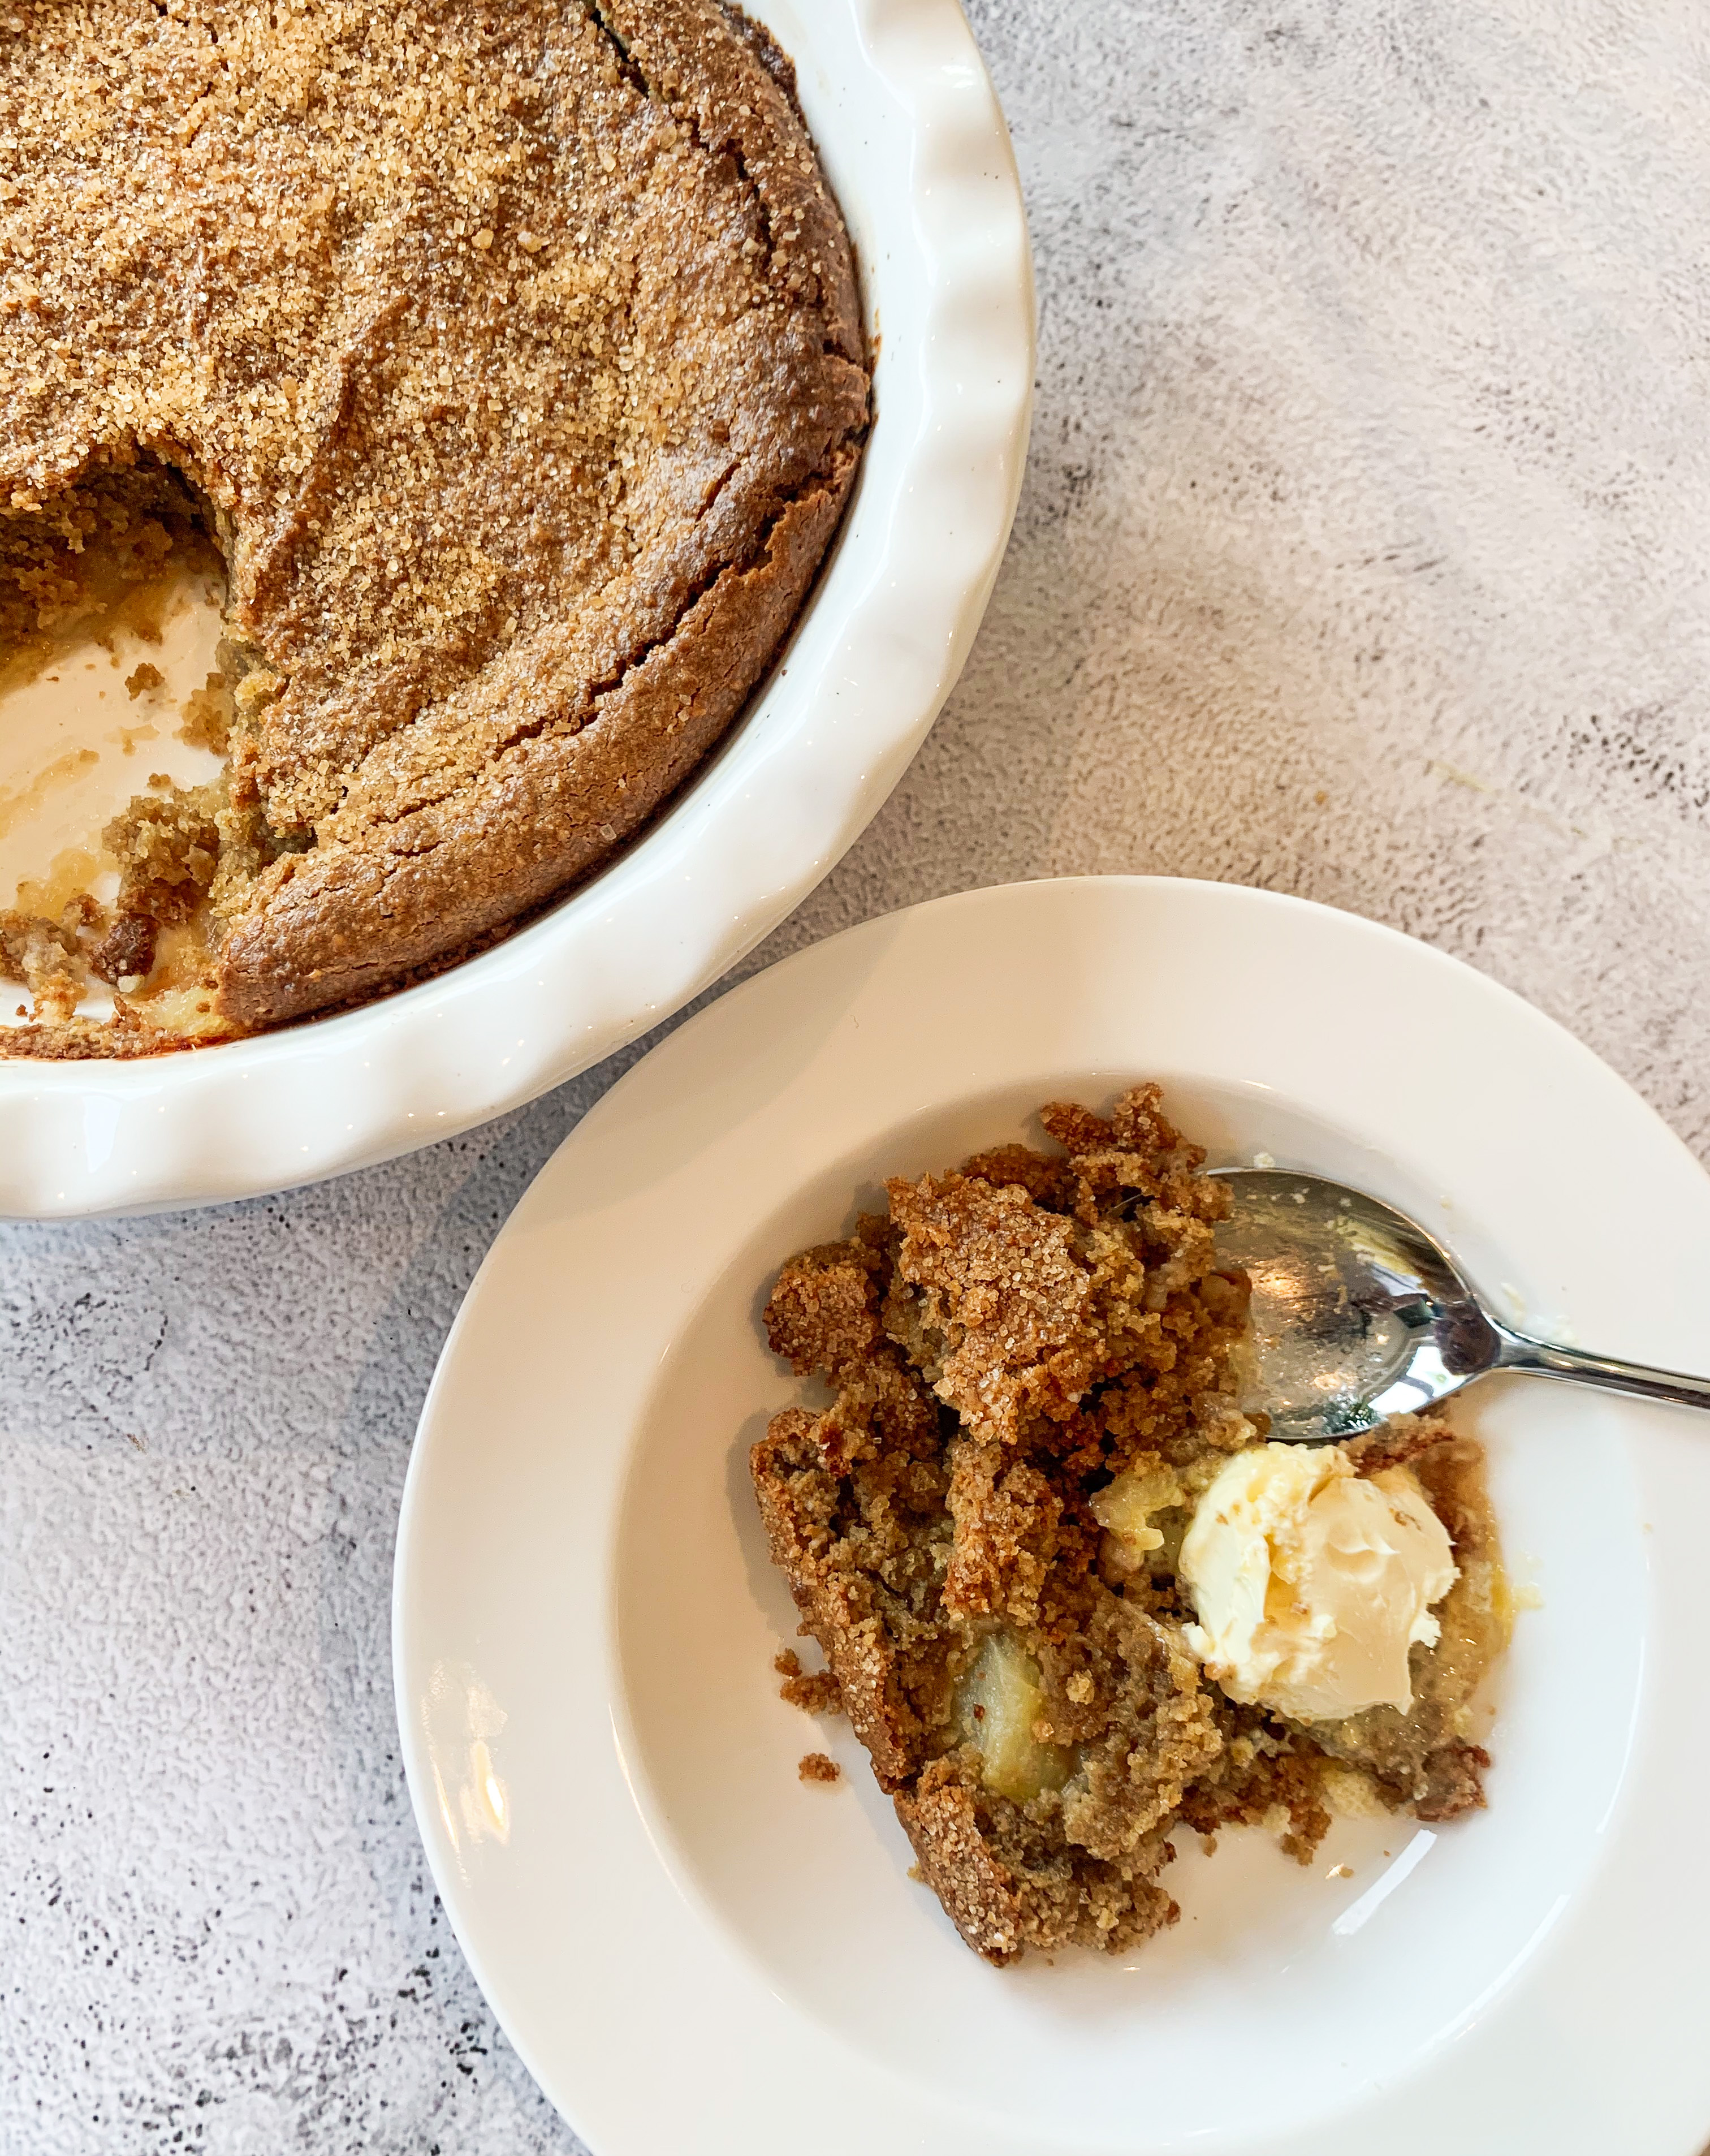
Italian Apple Tart
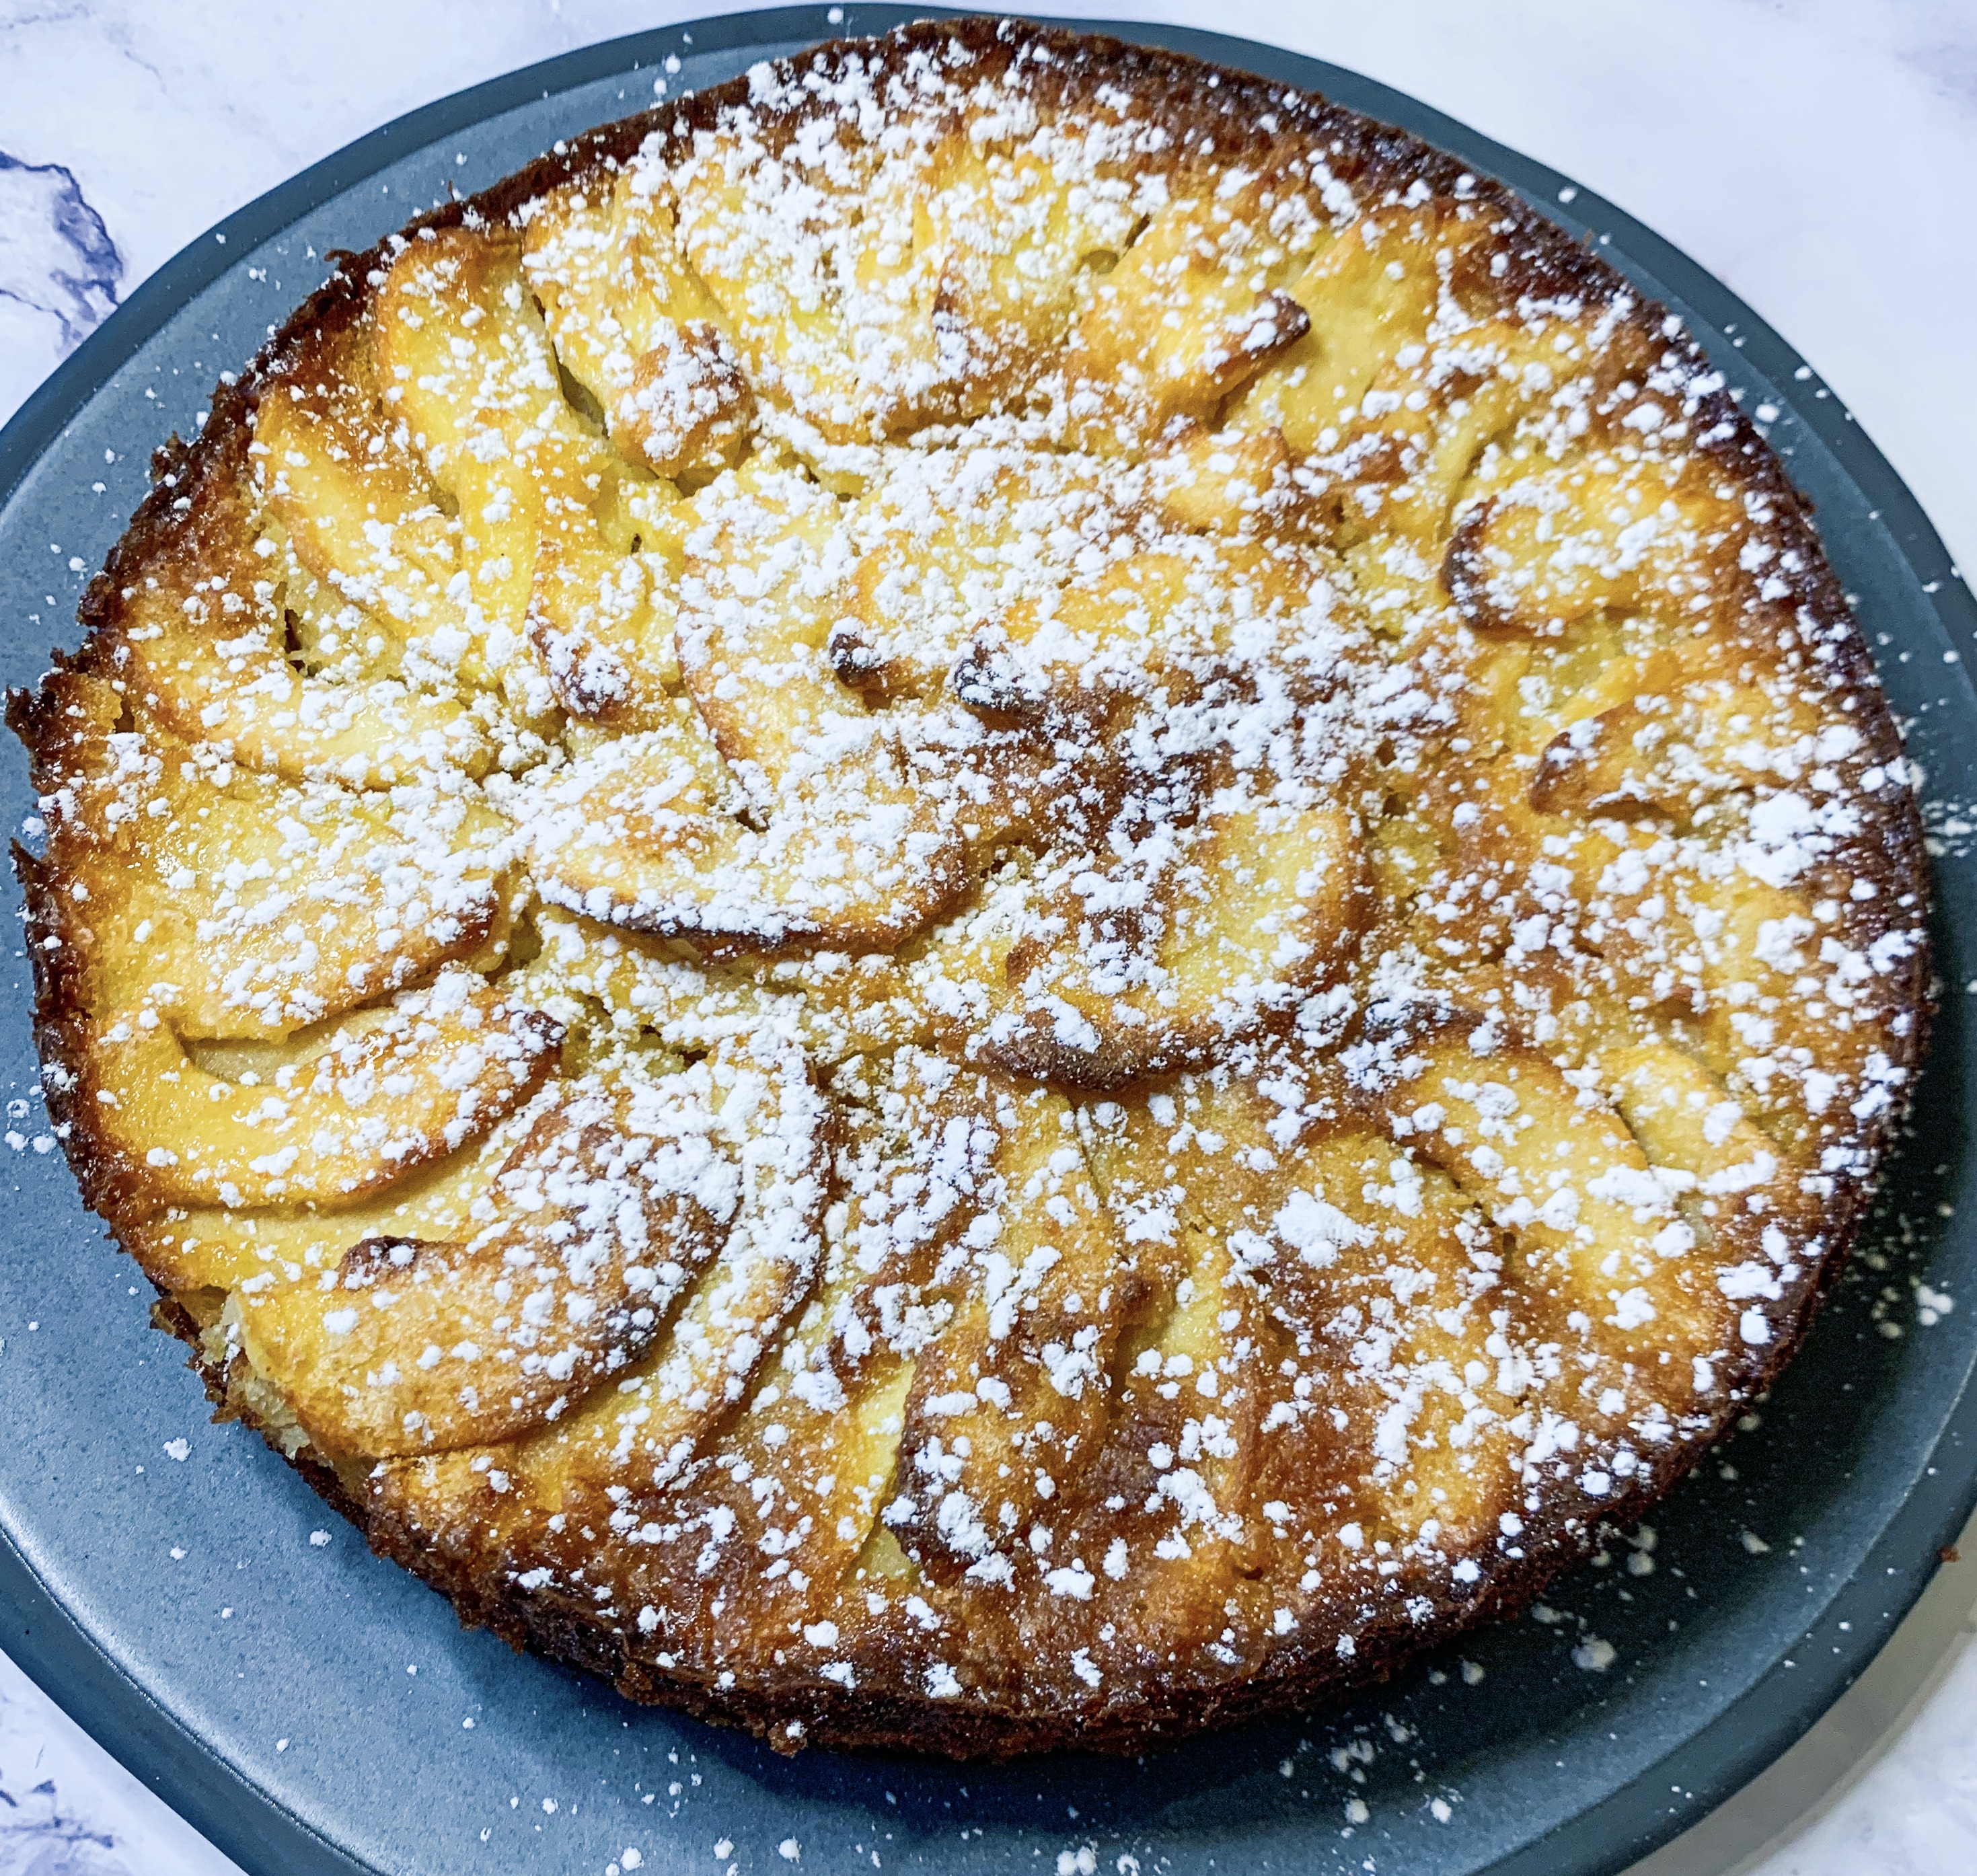
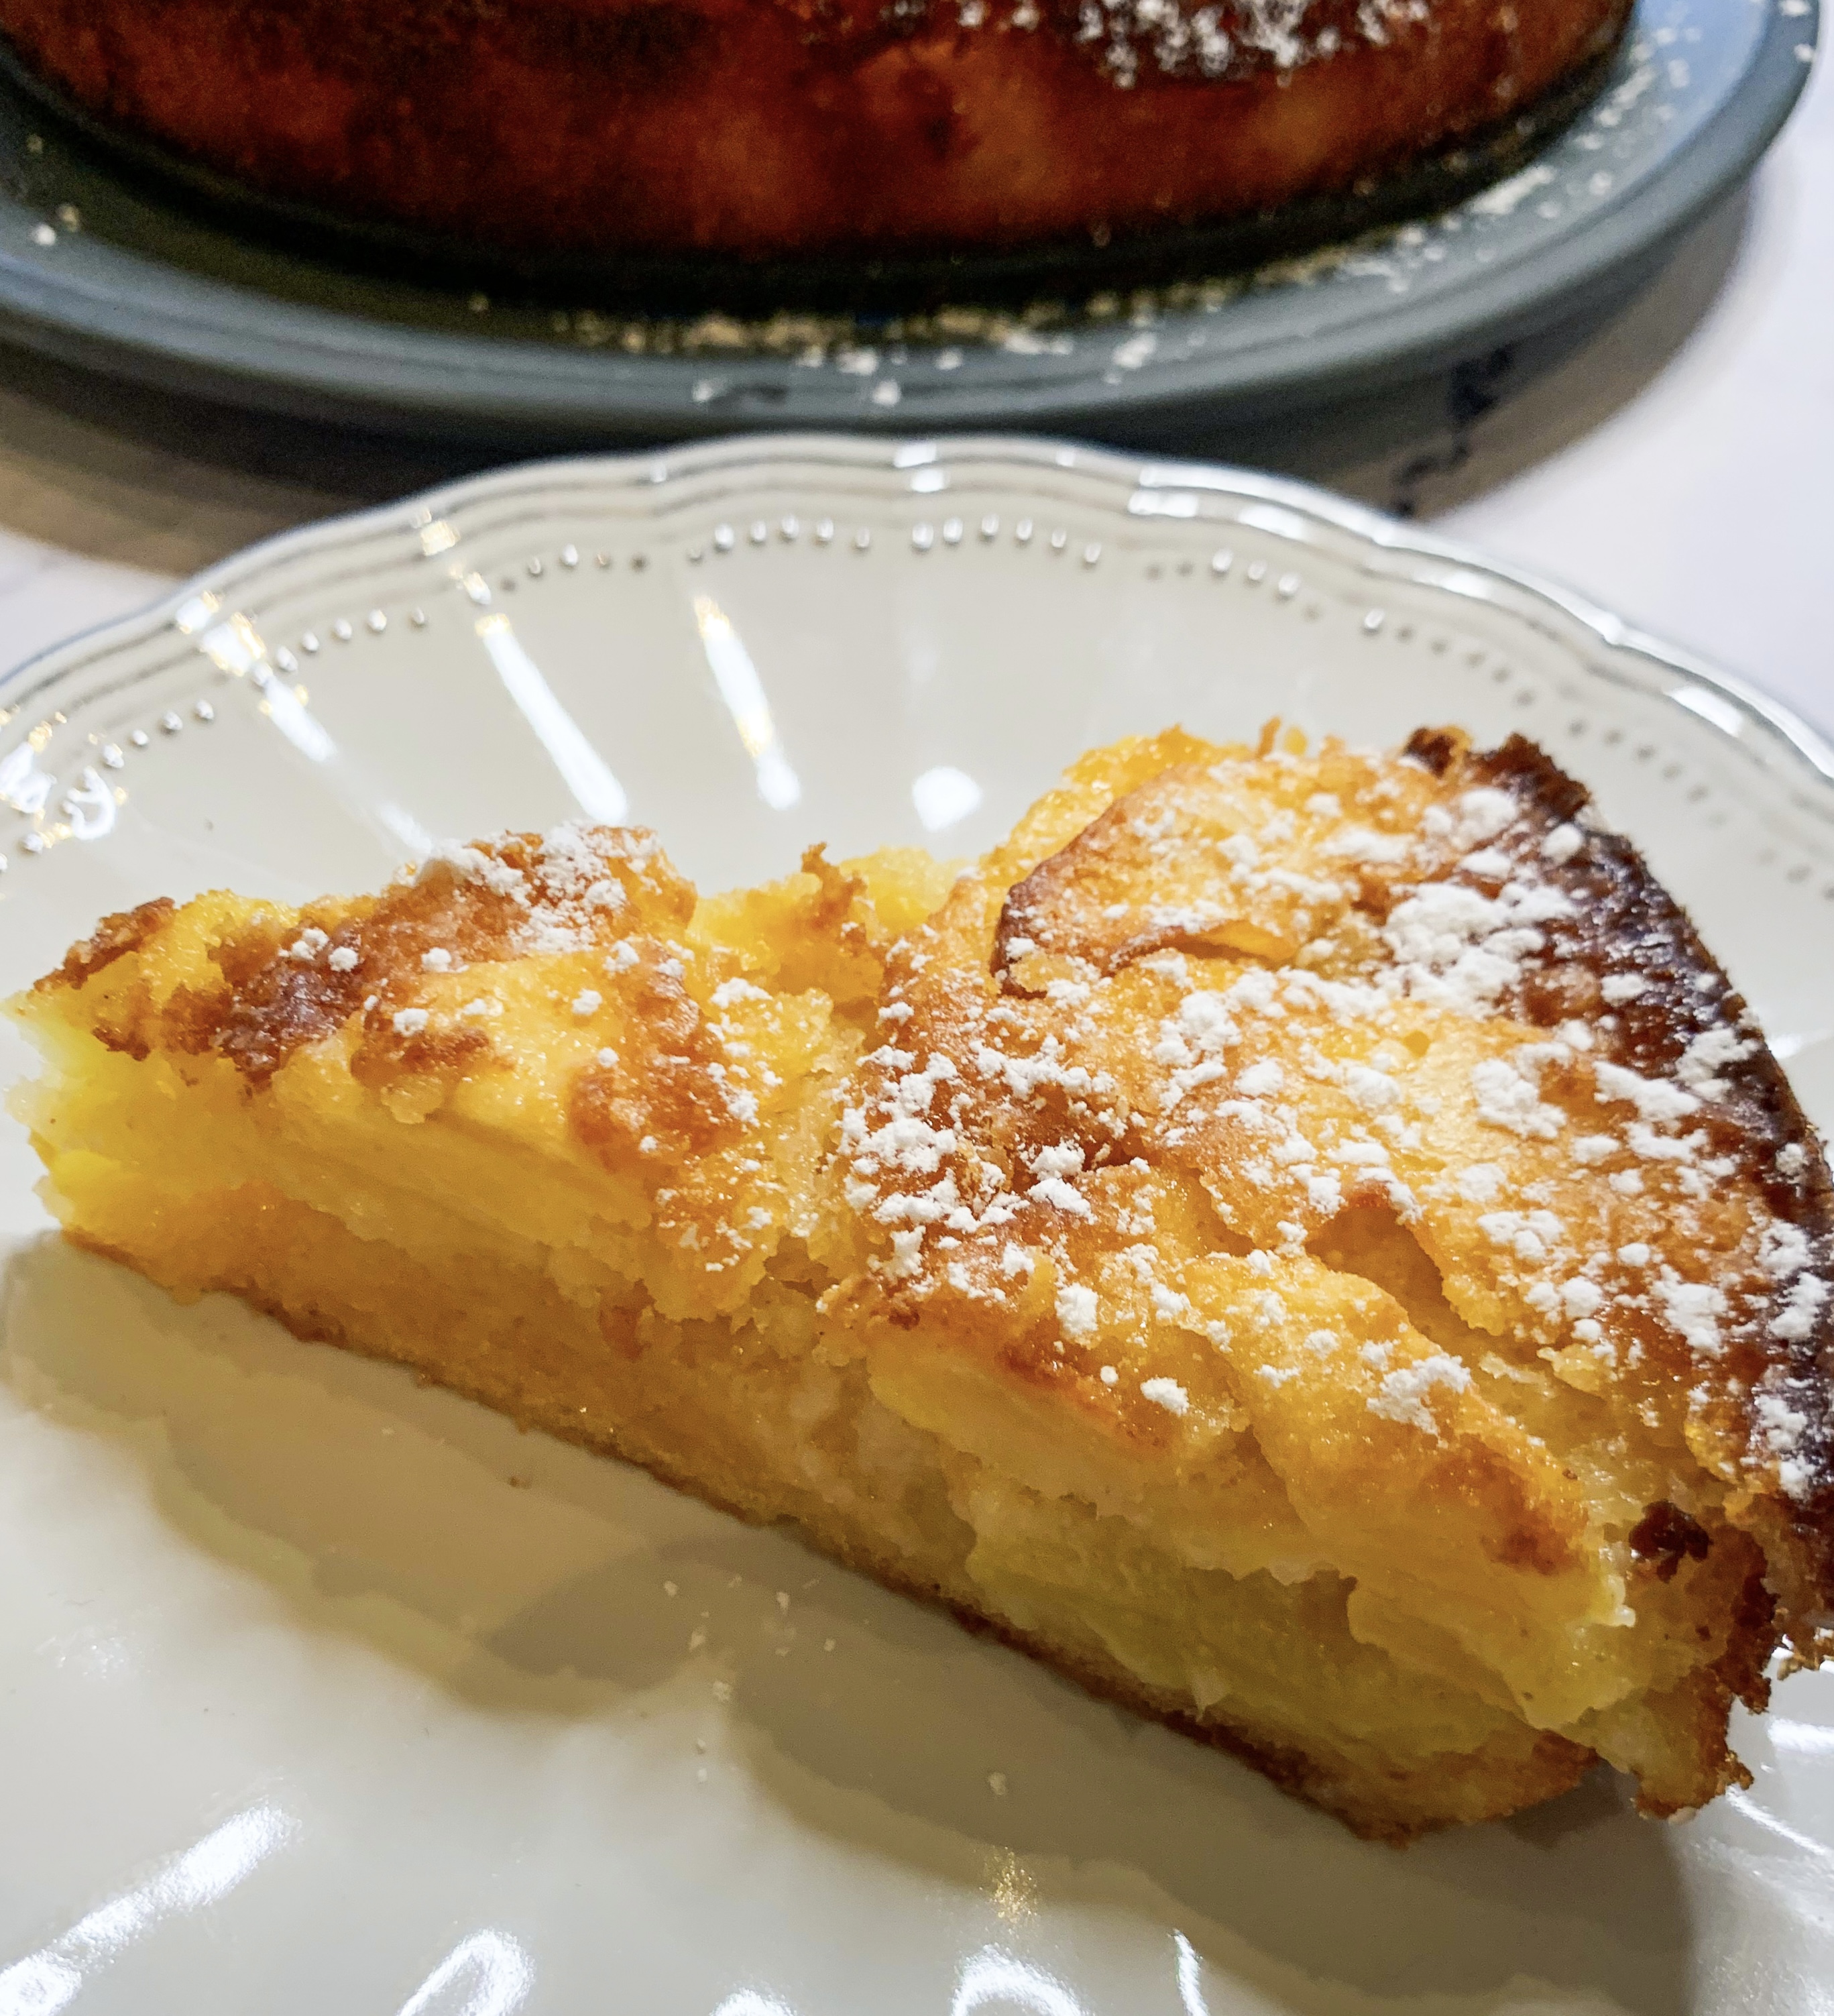
This recipe for apple tart doesn’t use pastry which makes it one of the lightest apple tarts you’re likely to taste. This decidedly fruity tart is from the cookbook ‘Brutto’. It’s delicious for breakfast, tea and/ or dinner… it’s wonderful!
4 apples, any sweet, crisp variety
2 large eggs
200g caster sugar
1 teaspoon vanilla extract
70g plain flour (gluten-free if required)
1 heaped teaspoon baking powder
A pinch of salt
65ml milk
100g butter, very soft, plus a small knob for lining
1 tablespoon icing sugar, for dusting
- Butter a 20cm cake tin and line with greaseproof paper. Peel and core the apples, halve and slice thinly.
- Put the eggs, sugar and vanilla extract into a large bowl and whisk until doubled in size. Add the flour, baking powder and salt and combine together. While still whisking, pour in the milk and add the softened butter until smooth and consistent.
- Put the sliced apples into the mix and carefully coat them all over. Layer the apples flat in circles, starting from the edge and working inwards. Pour a thin layer of the remaining mixture on top.
- Place in a preheated oven, 200’c fan and cook for 10 minutes, then turn the temperature down to 180’c for 40 minutes. Remove the golden brown tart and allow to cool in the tin for at least 30 minutes before transferring to a serving plate. Dust the top with icing sugar.
- Serve at room temperature in slices, perhaps with a scoop of vanilla ice cream or a drizzle of cream, but to be honest is delicious simply on its own!
Rhubarb Almond Pudding
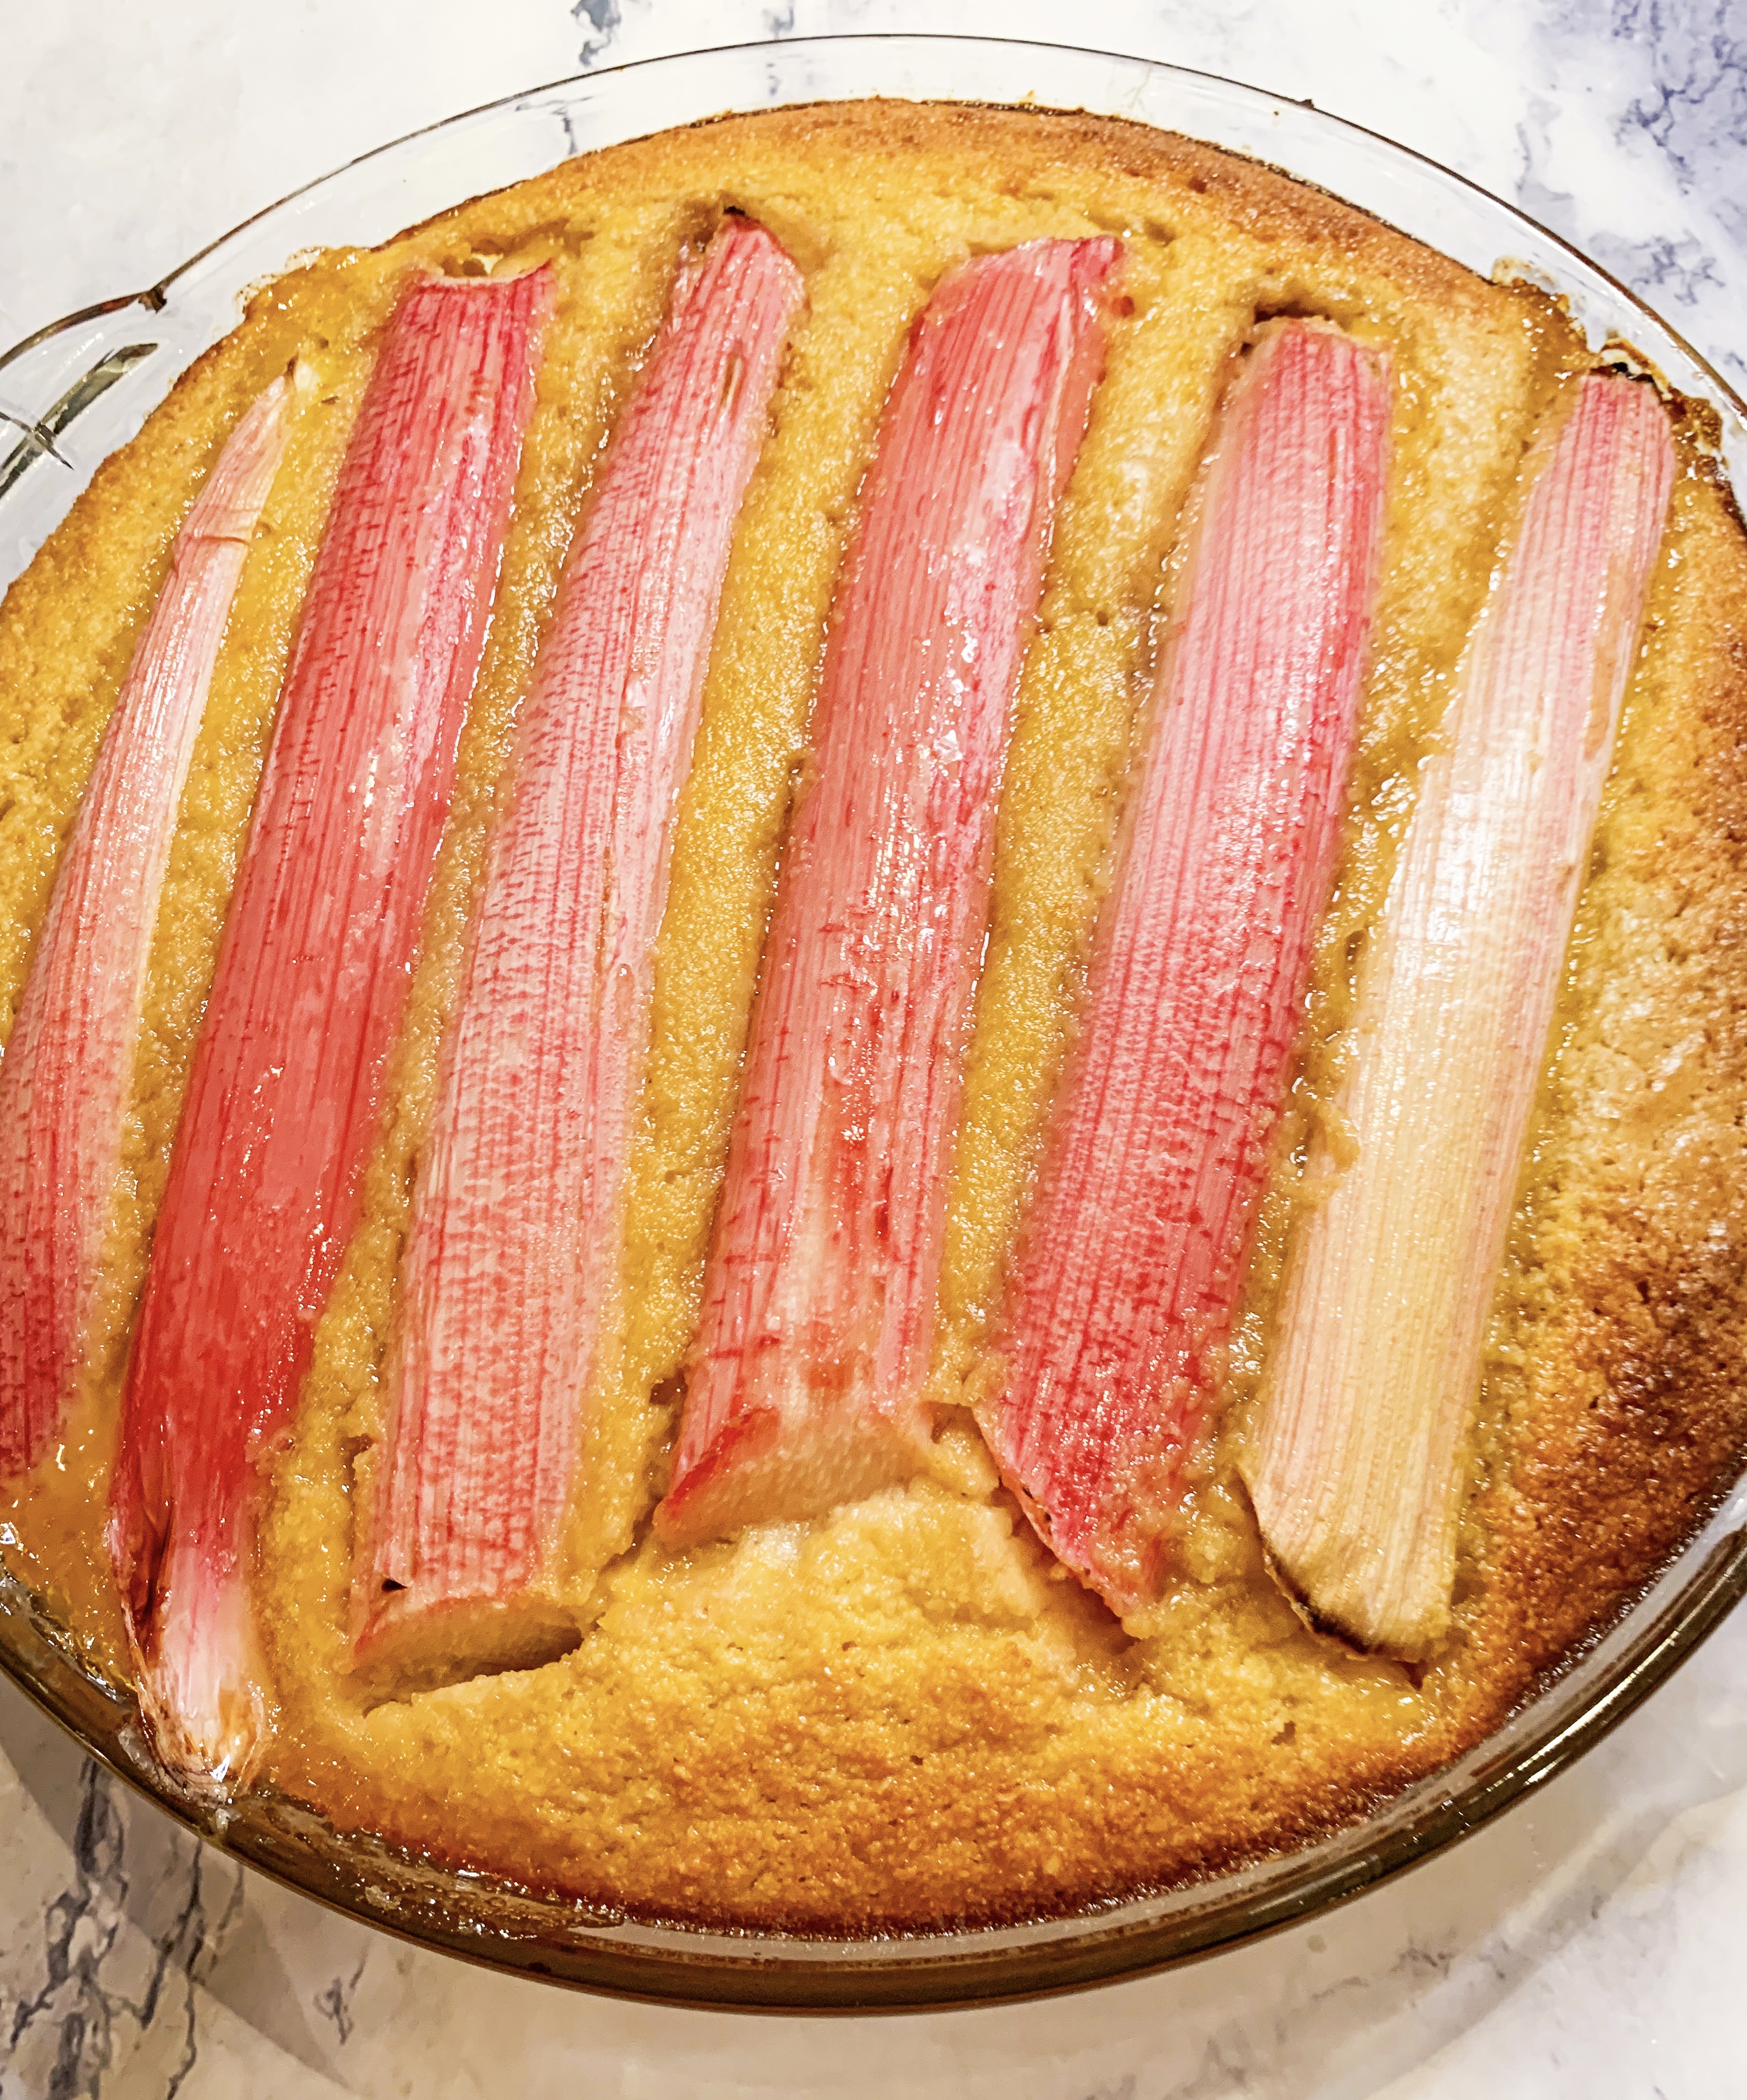
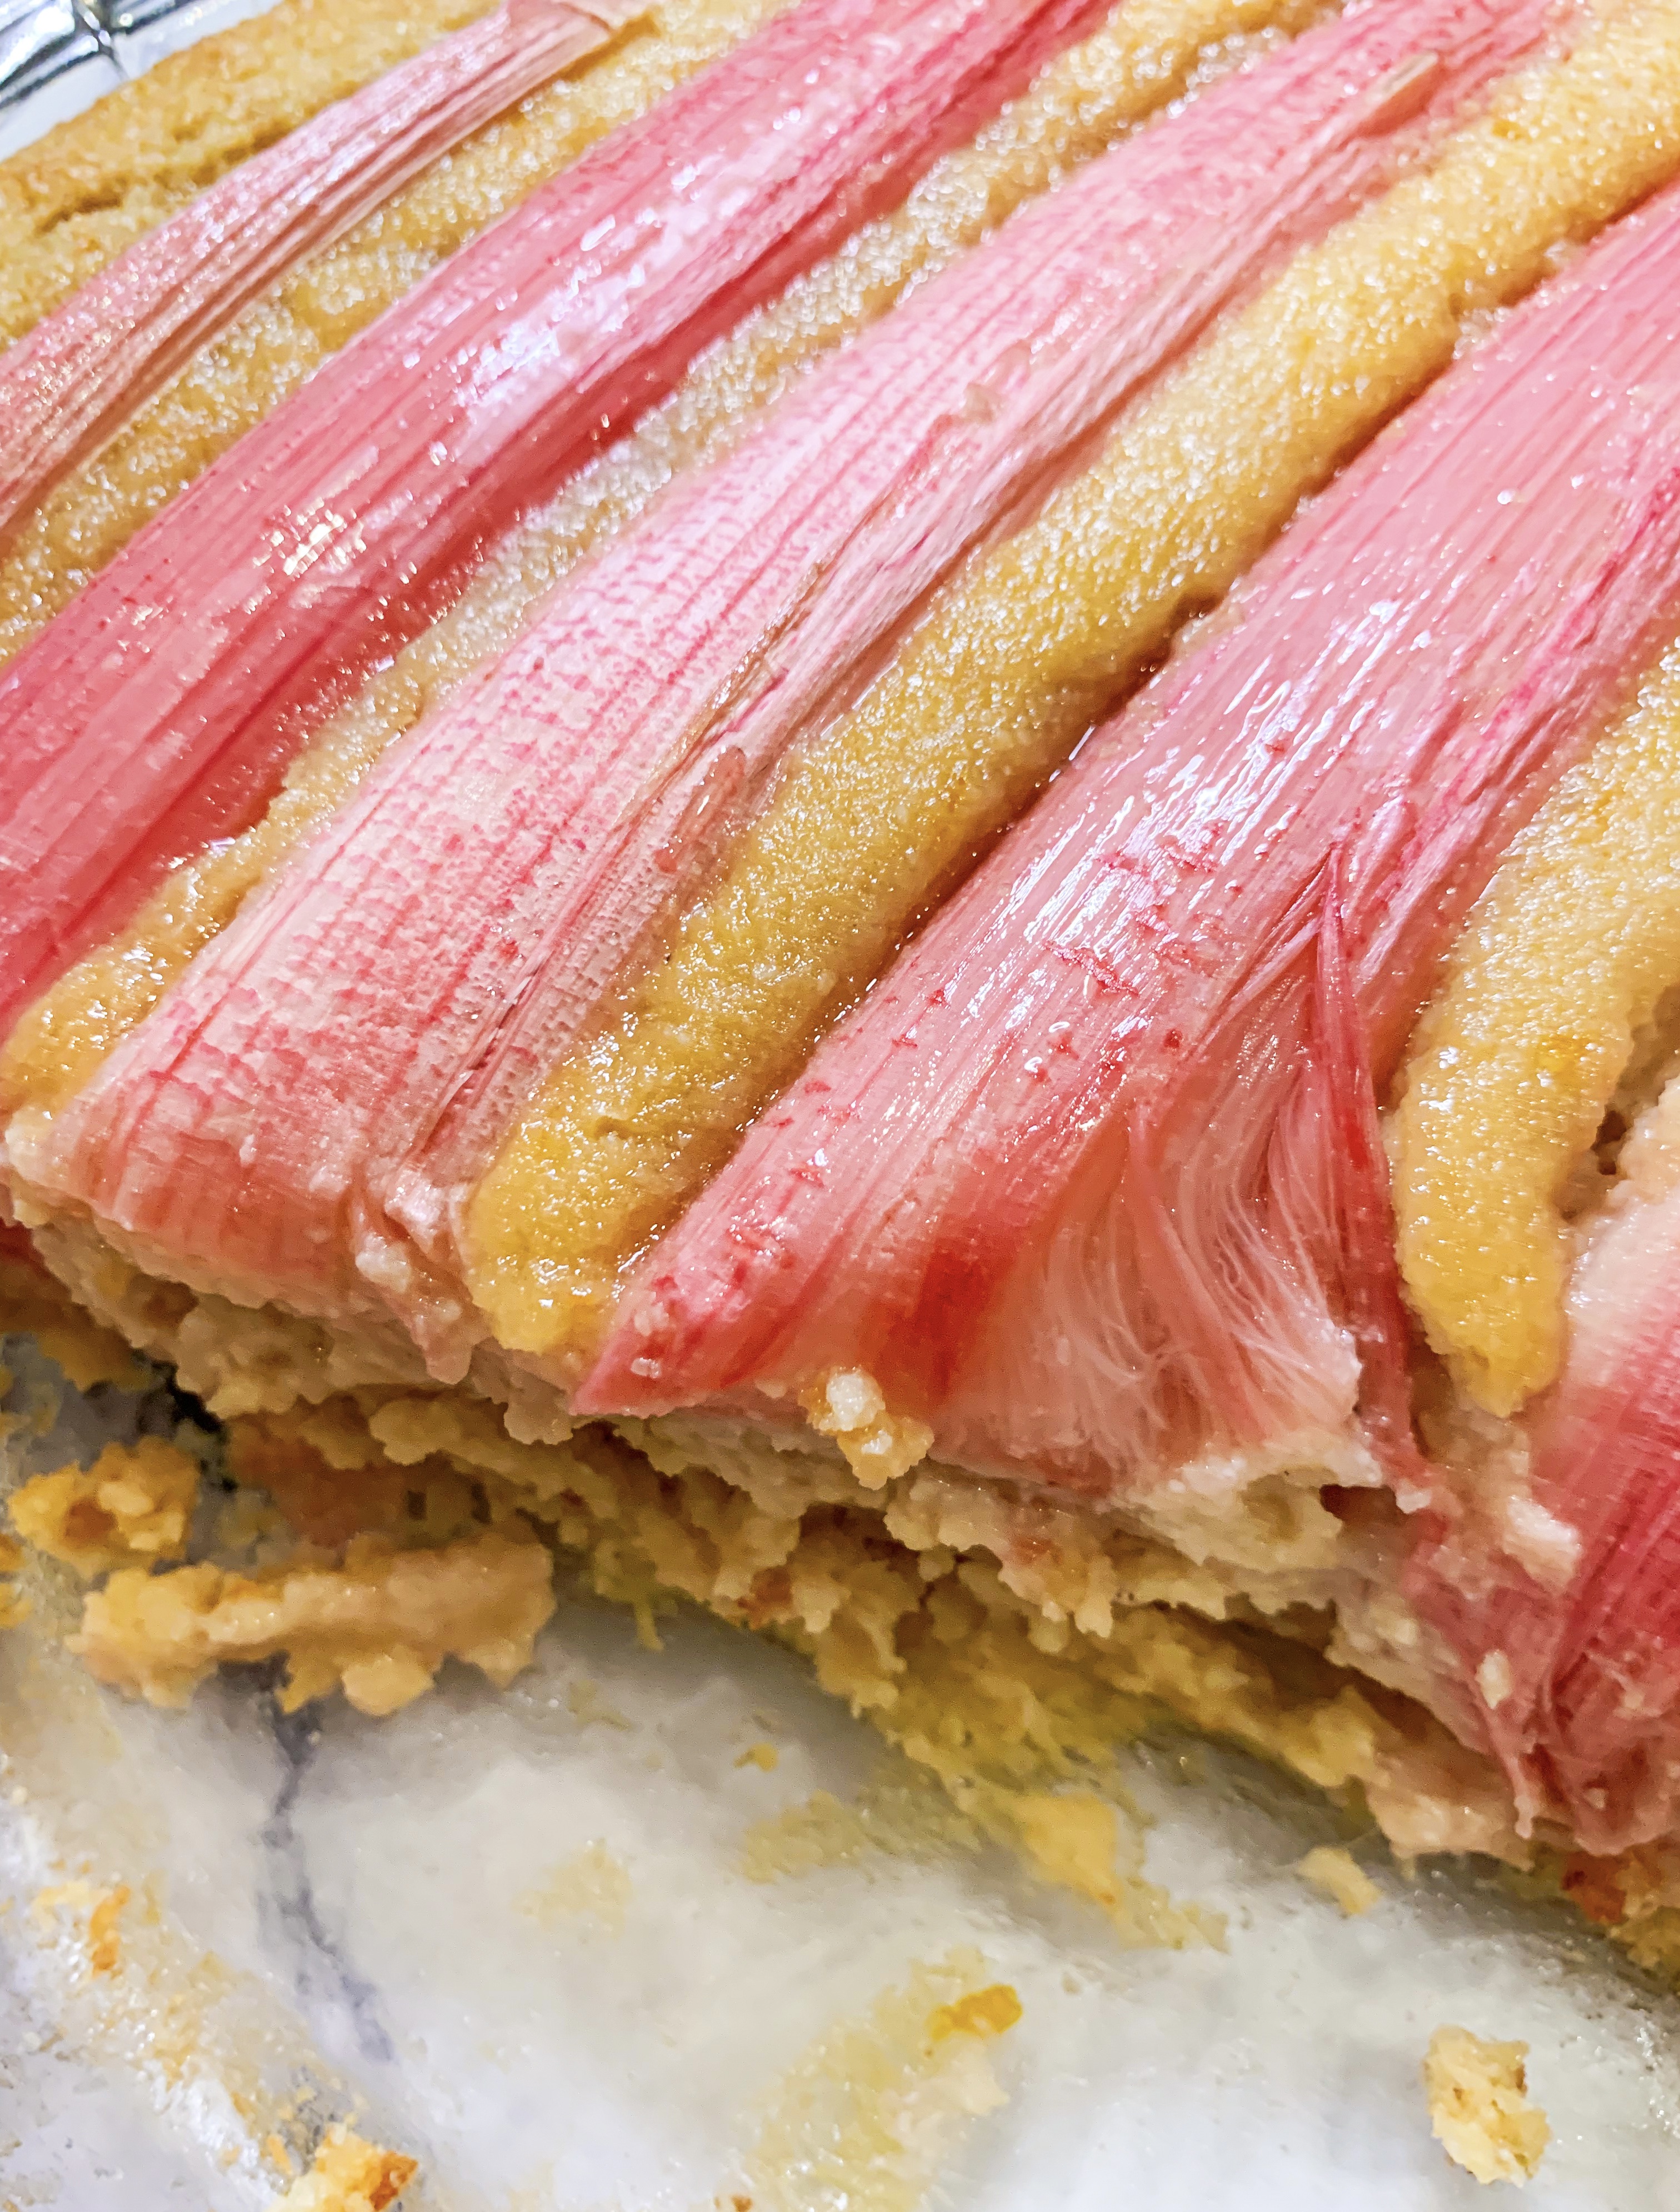
I adore the tart flavour of rhubarb, so much so that as soon as I see it in the shops – either the forced variety which is available at the beginning of the year or the field grown from April to September – I’m keen to find a recipe to enjoy it with. This is one of those recipes which fits the bill perfectly. It’s simple and easy to throw together, even on a weekday evening, and gives instant pleasure. It’s not a particularly refined dessert; it’s quite a heavy, almost ‘stodgy’ pudding but the wonderful flavour of the rhubarb makes it an all-round pleaser. The recipe is from Donna Hay’s cookbook, ‘One Pan Perfect’ – and it absolutely is!
4 eggs
1 teaspoon vanilla extract
1 teaspoon rosewater
360ml buttermilk
1 tablespoon finely grated orange rind
300g ground almonds
2 tablespoons cornflour
165g unrefined caster sugar, plus extra
3 – 5 stalks rhubarb (depending on the size), halved and trimmed to fit the dish
1 tablespoon pure maple syrup
- Place the eggs, vanilla, rosewater, buttermilk and orange rind into a jug and whisk together.
- Place the ground almonds, cornflour and sugar into a bowl and stir. Then add the buttermilk mixture and mix to combine.
- Pour the mixture into a deep 25cm round baking dish (capacity 1.5 litres). Top with the rhubarb then brush well with the maple syrup and sprinkle with a little extra sugar.
- Bake in a preheated oven, 180’c fan, for 40 minutes or until firm and the rhubarb is soft. Serve with double cream or fresh custard!
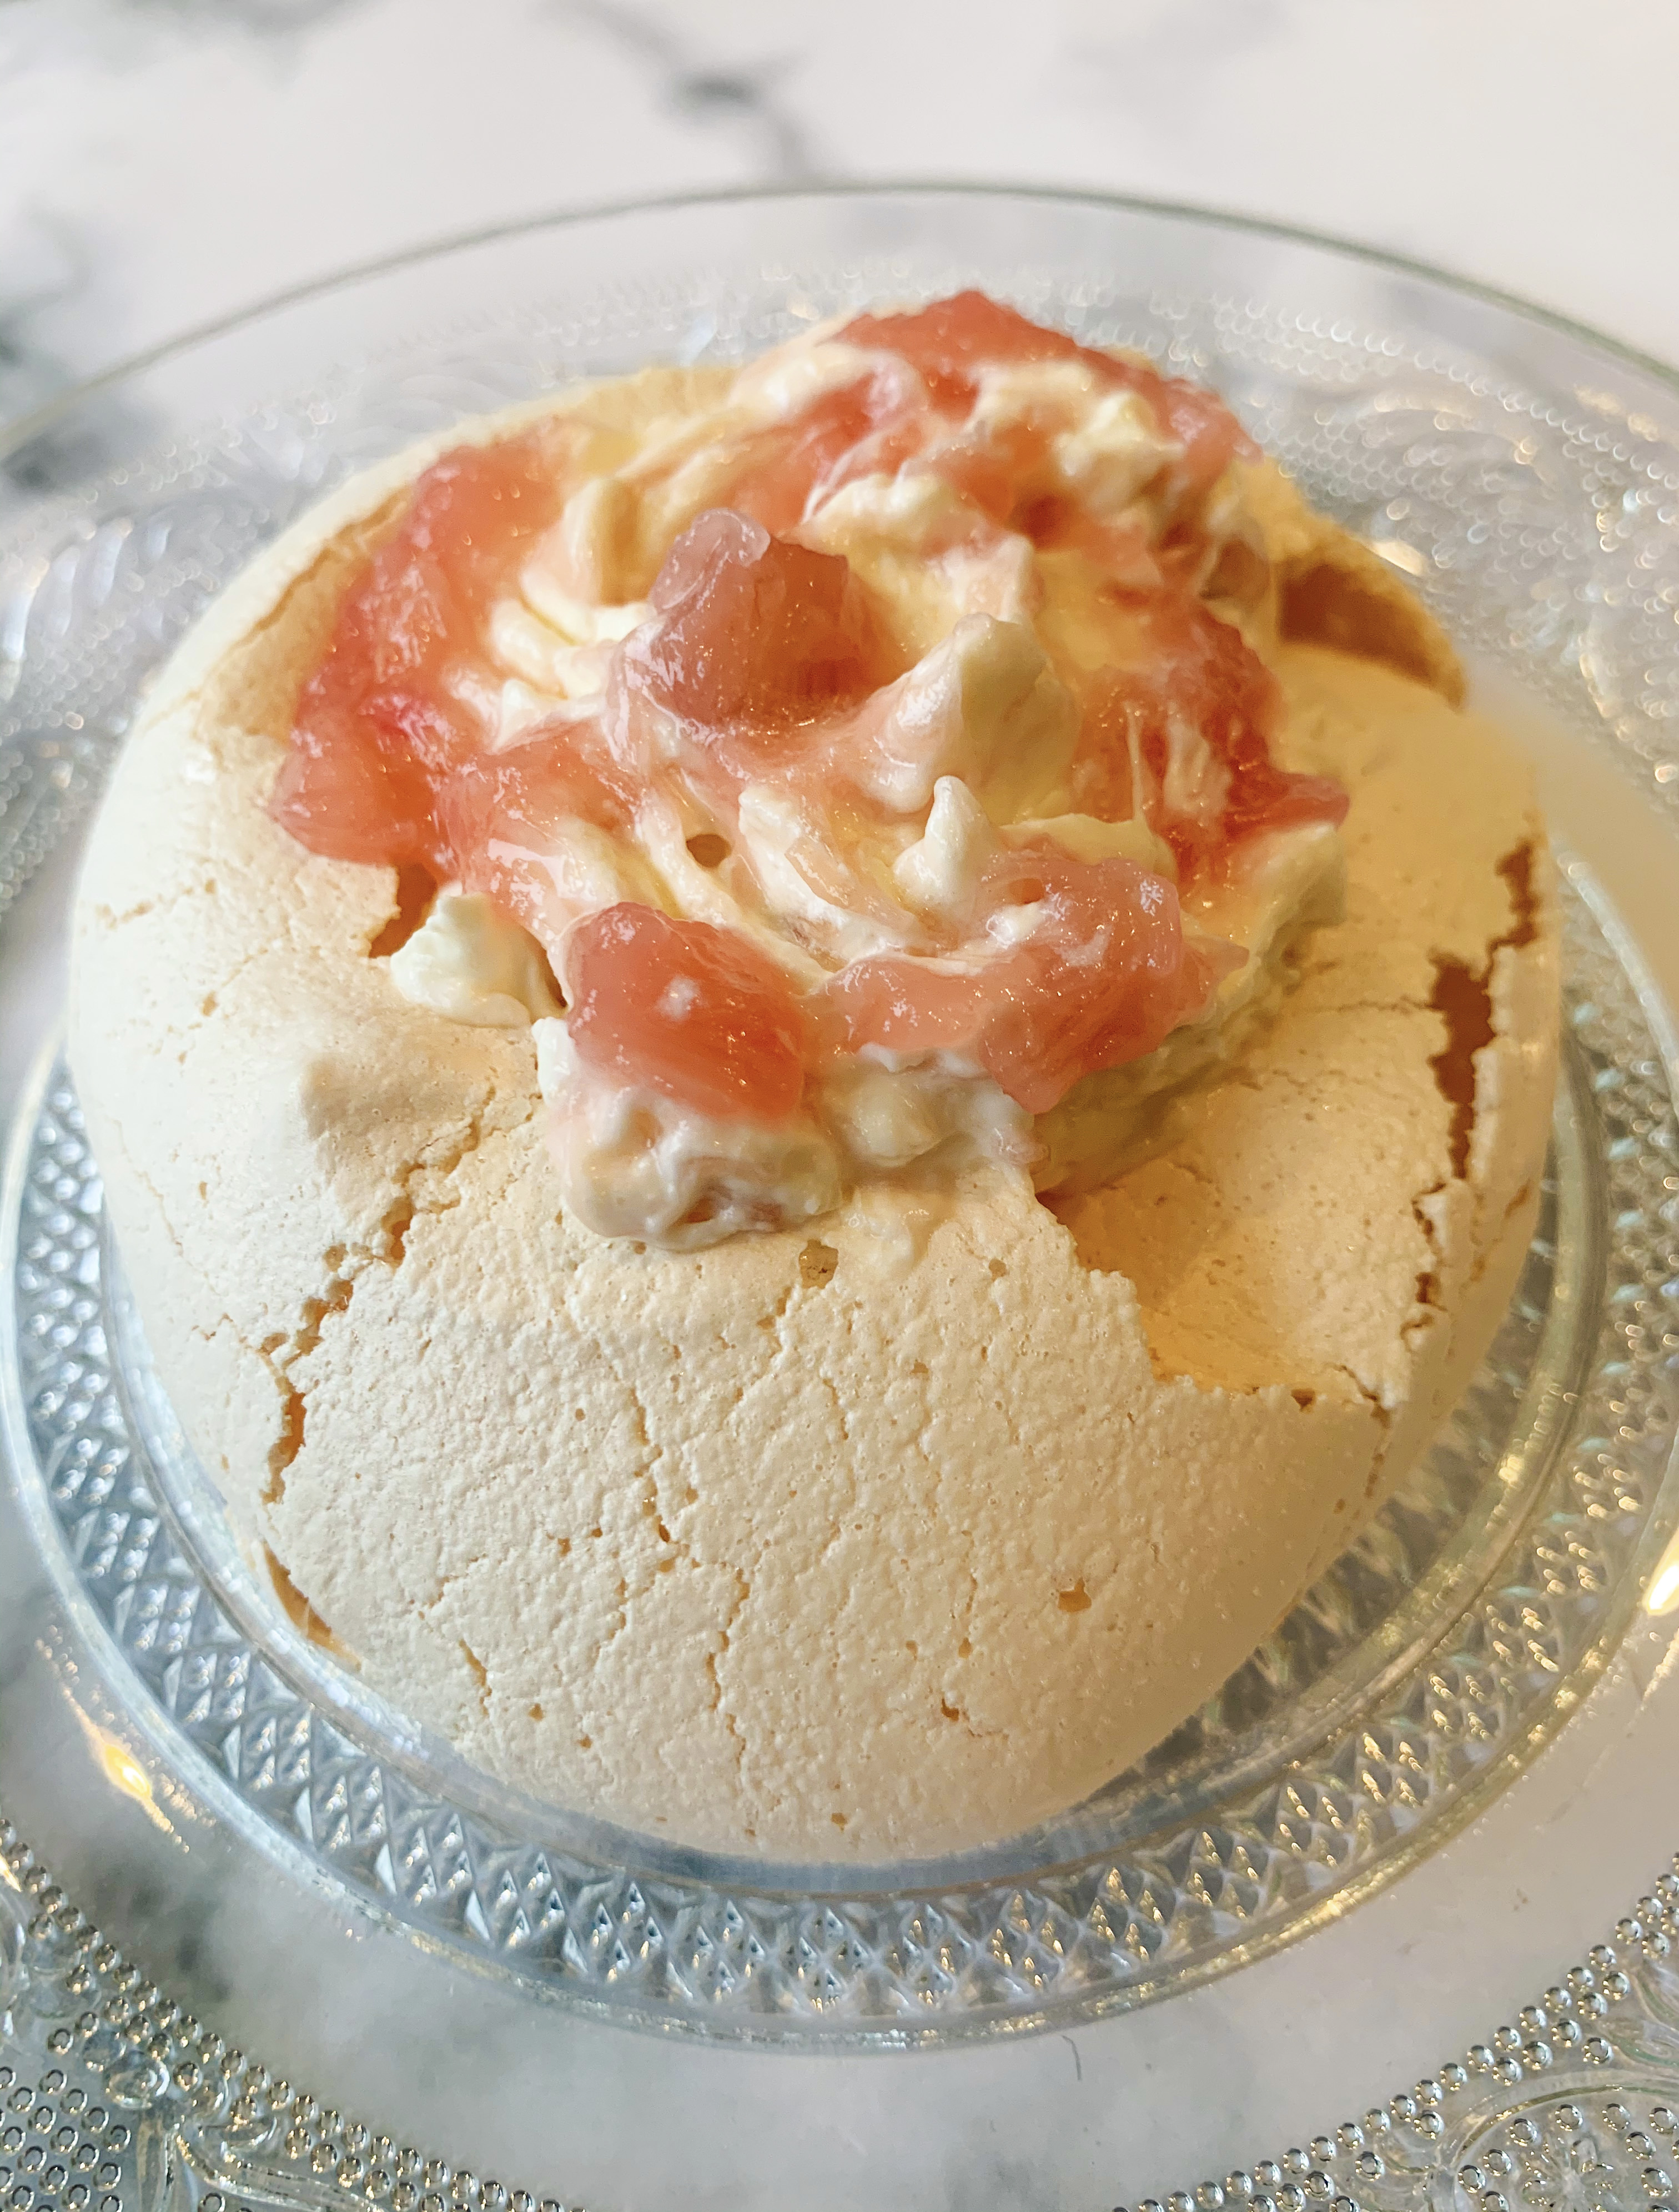
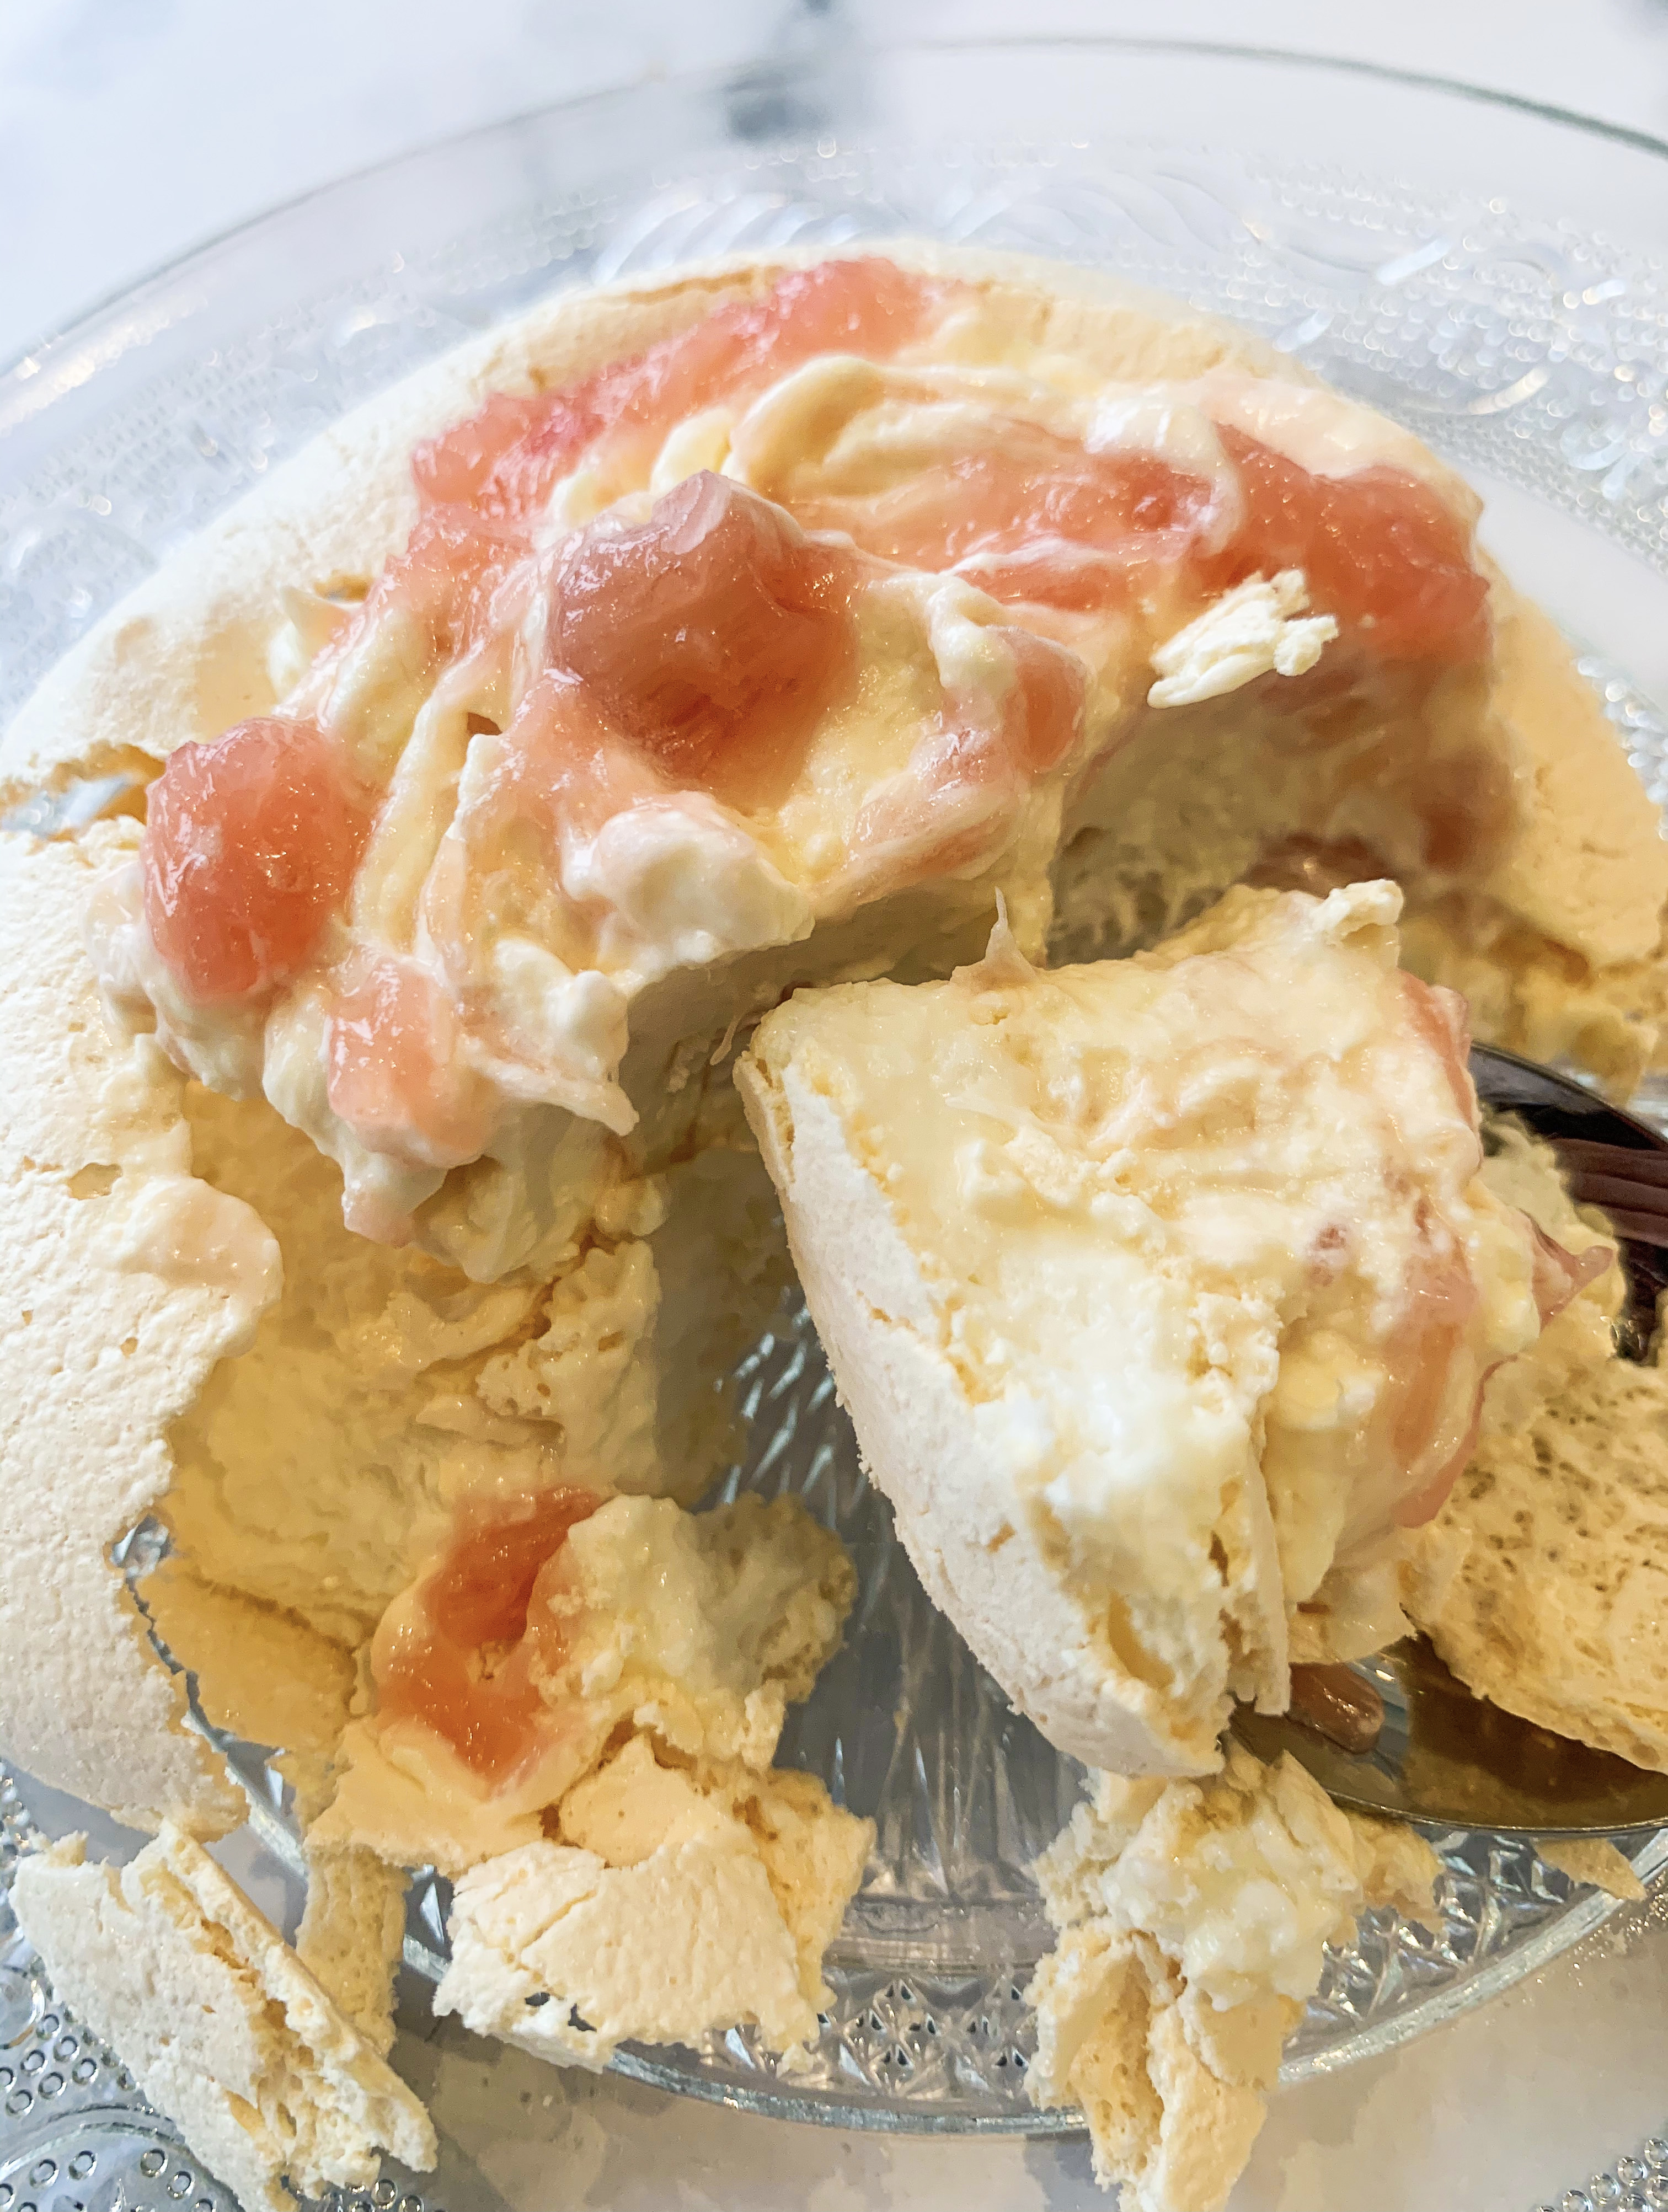
Brown Sugar Pavlova with Strawberries and Rhubarb (Serve 6)
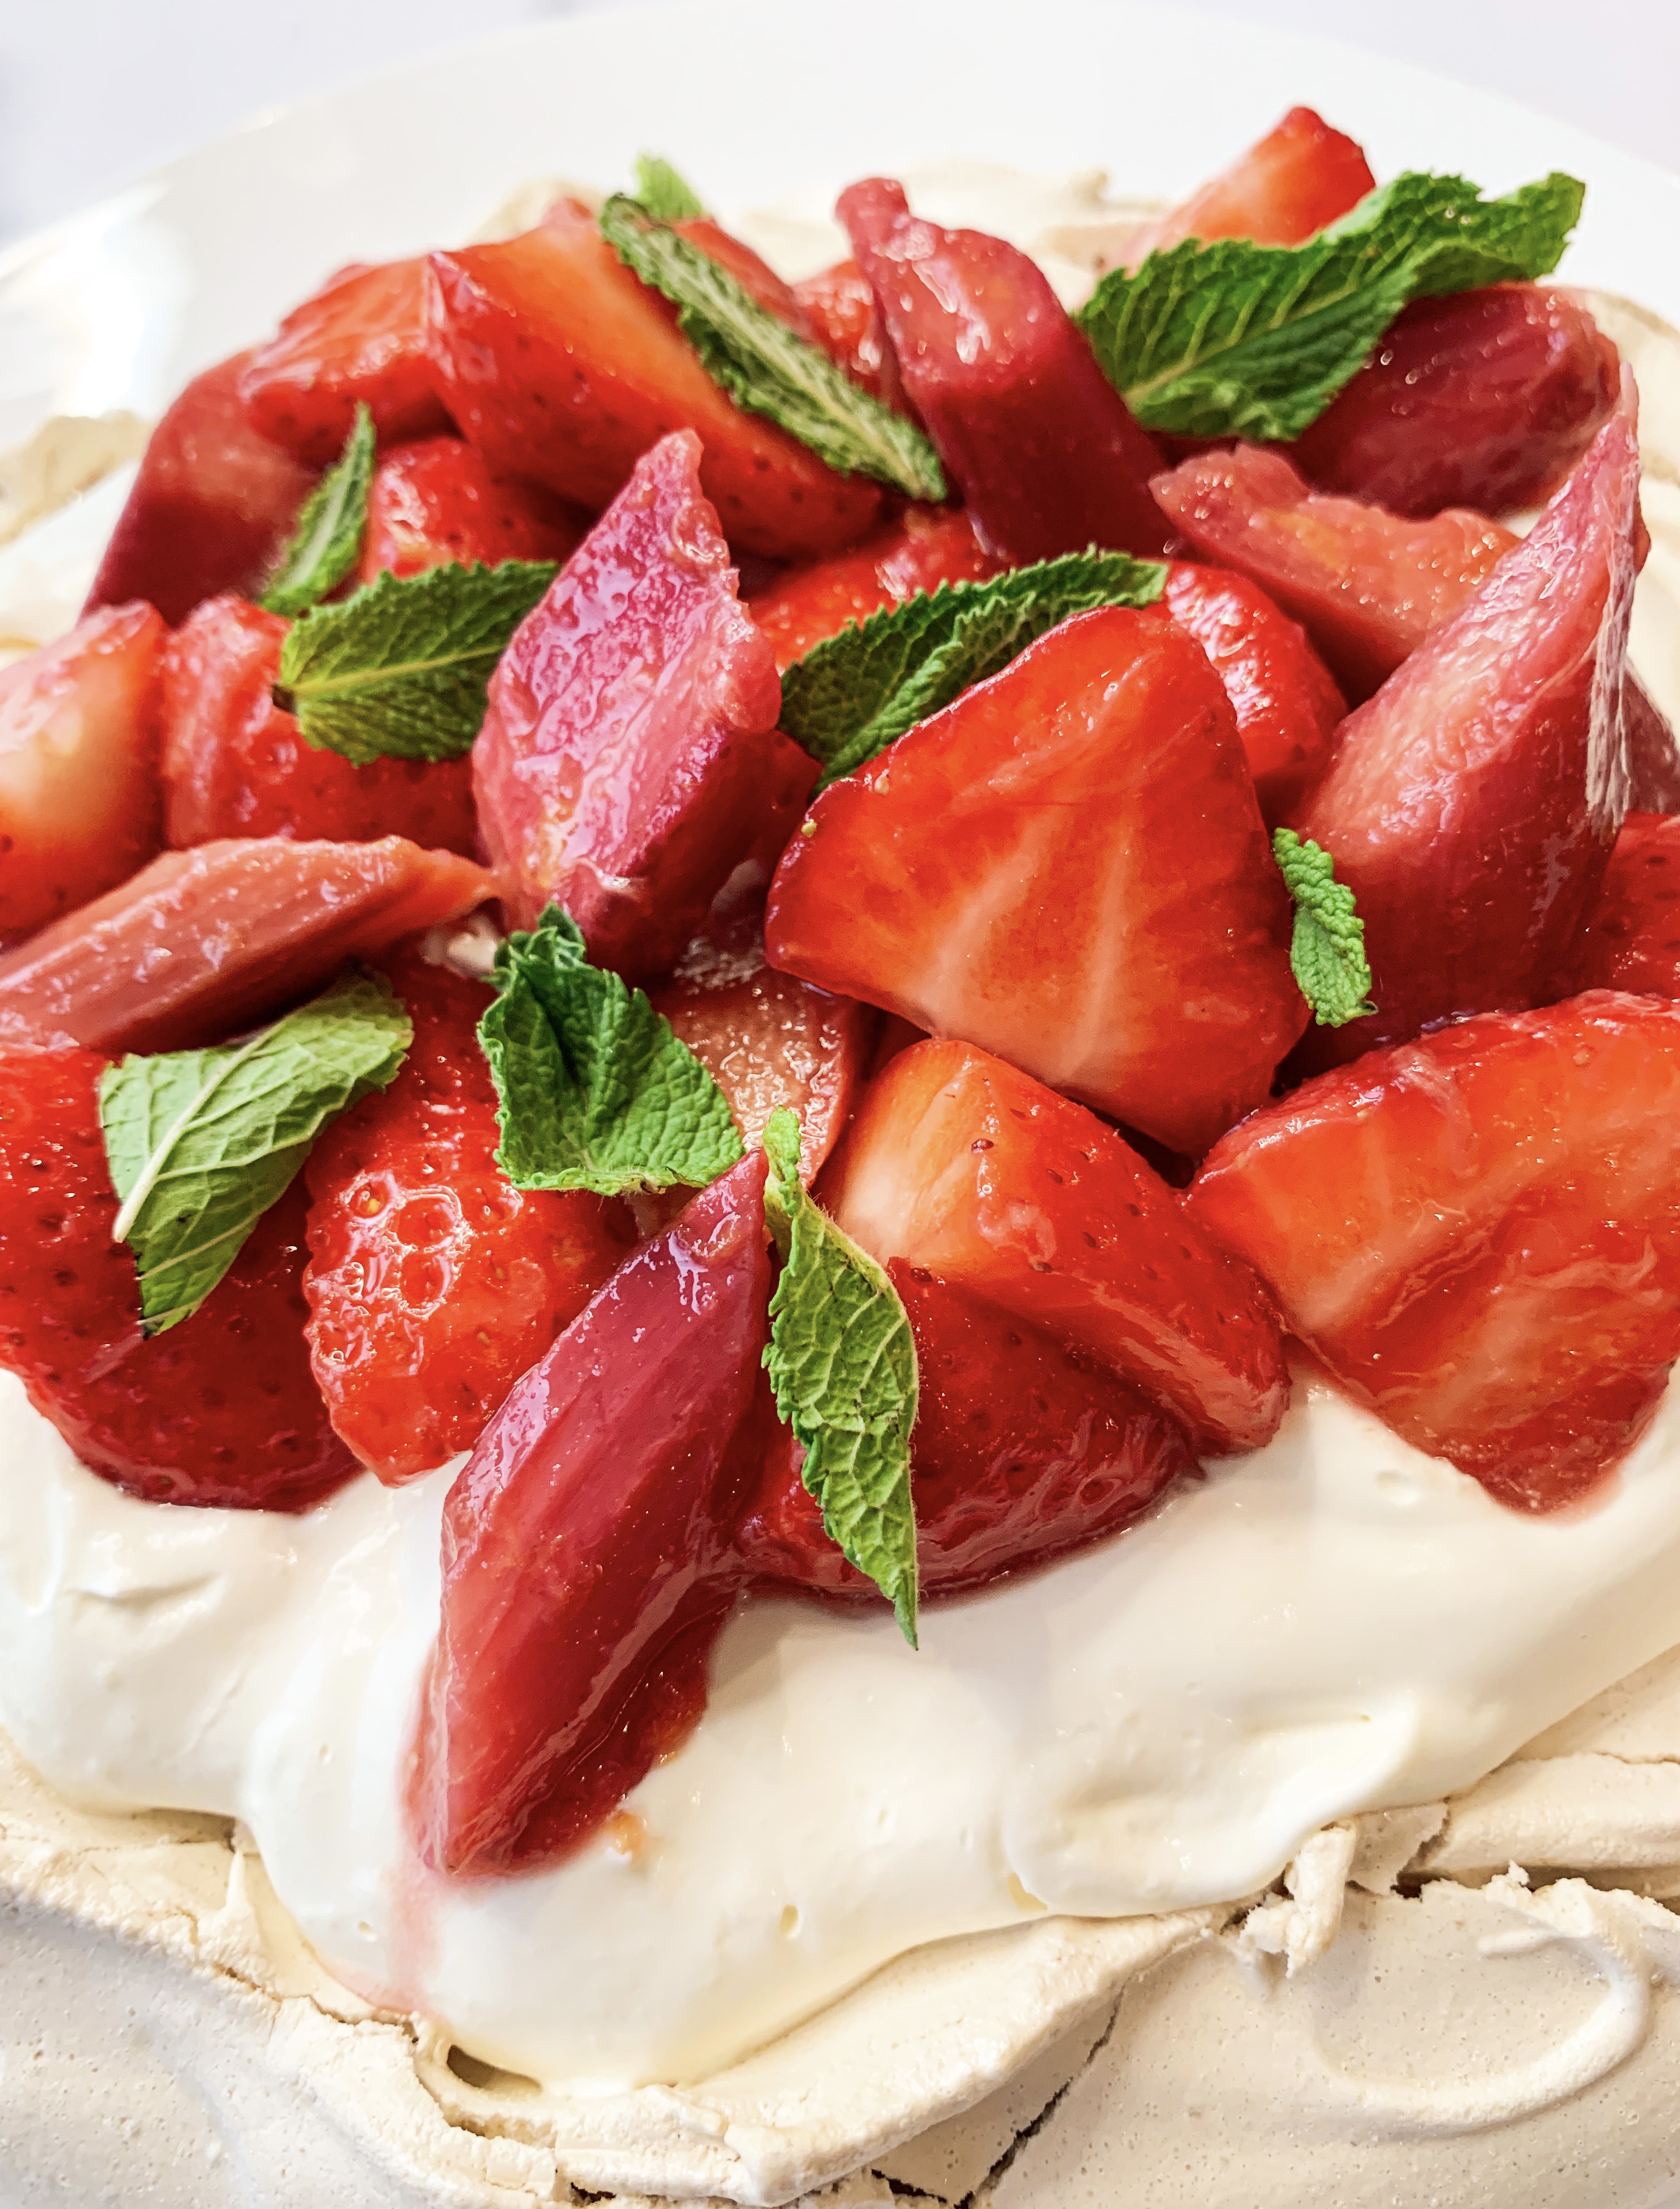
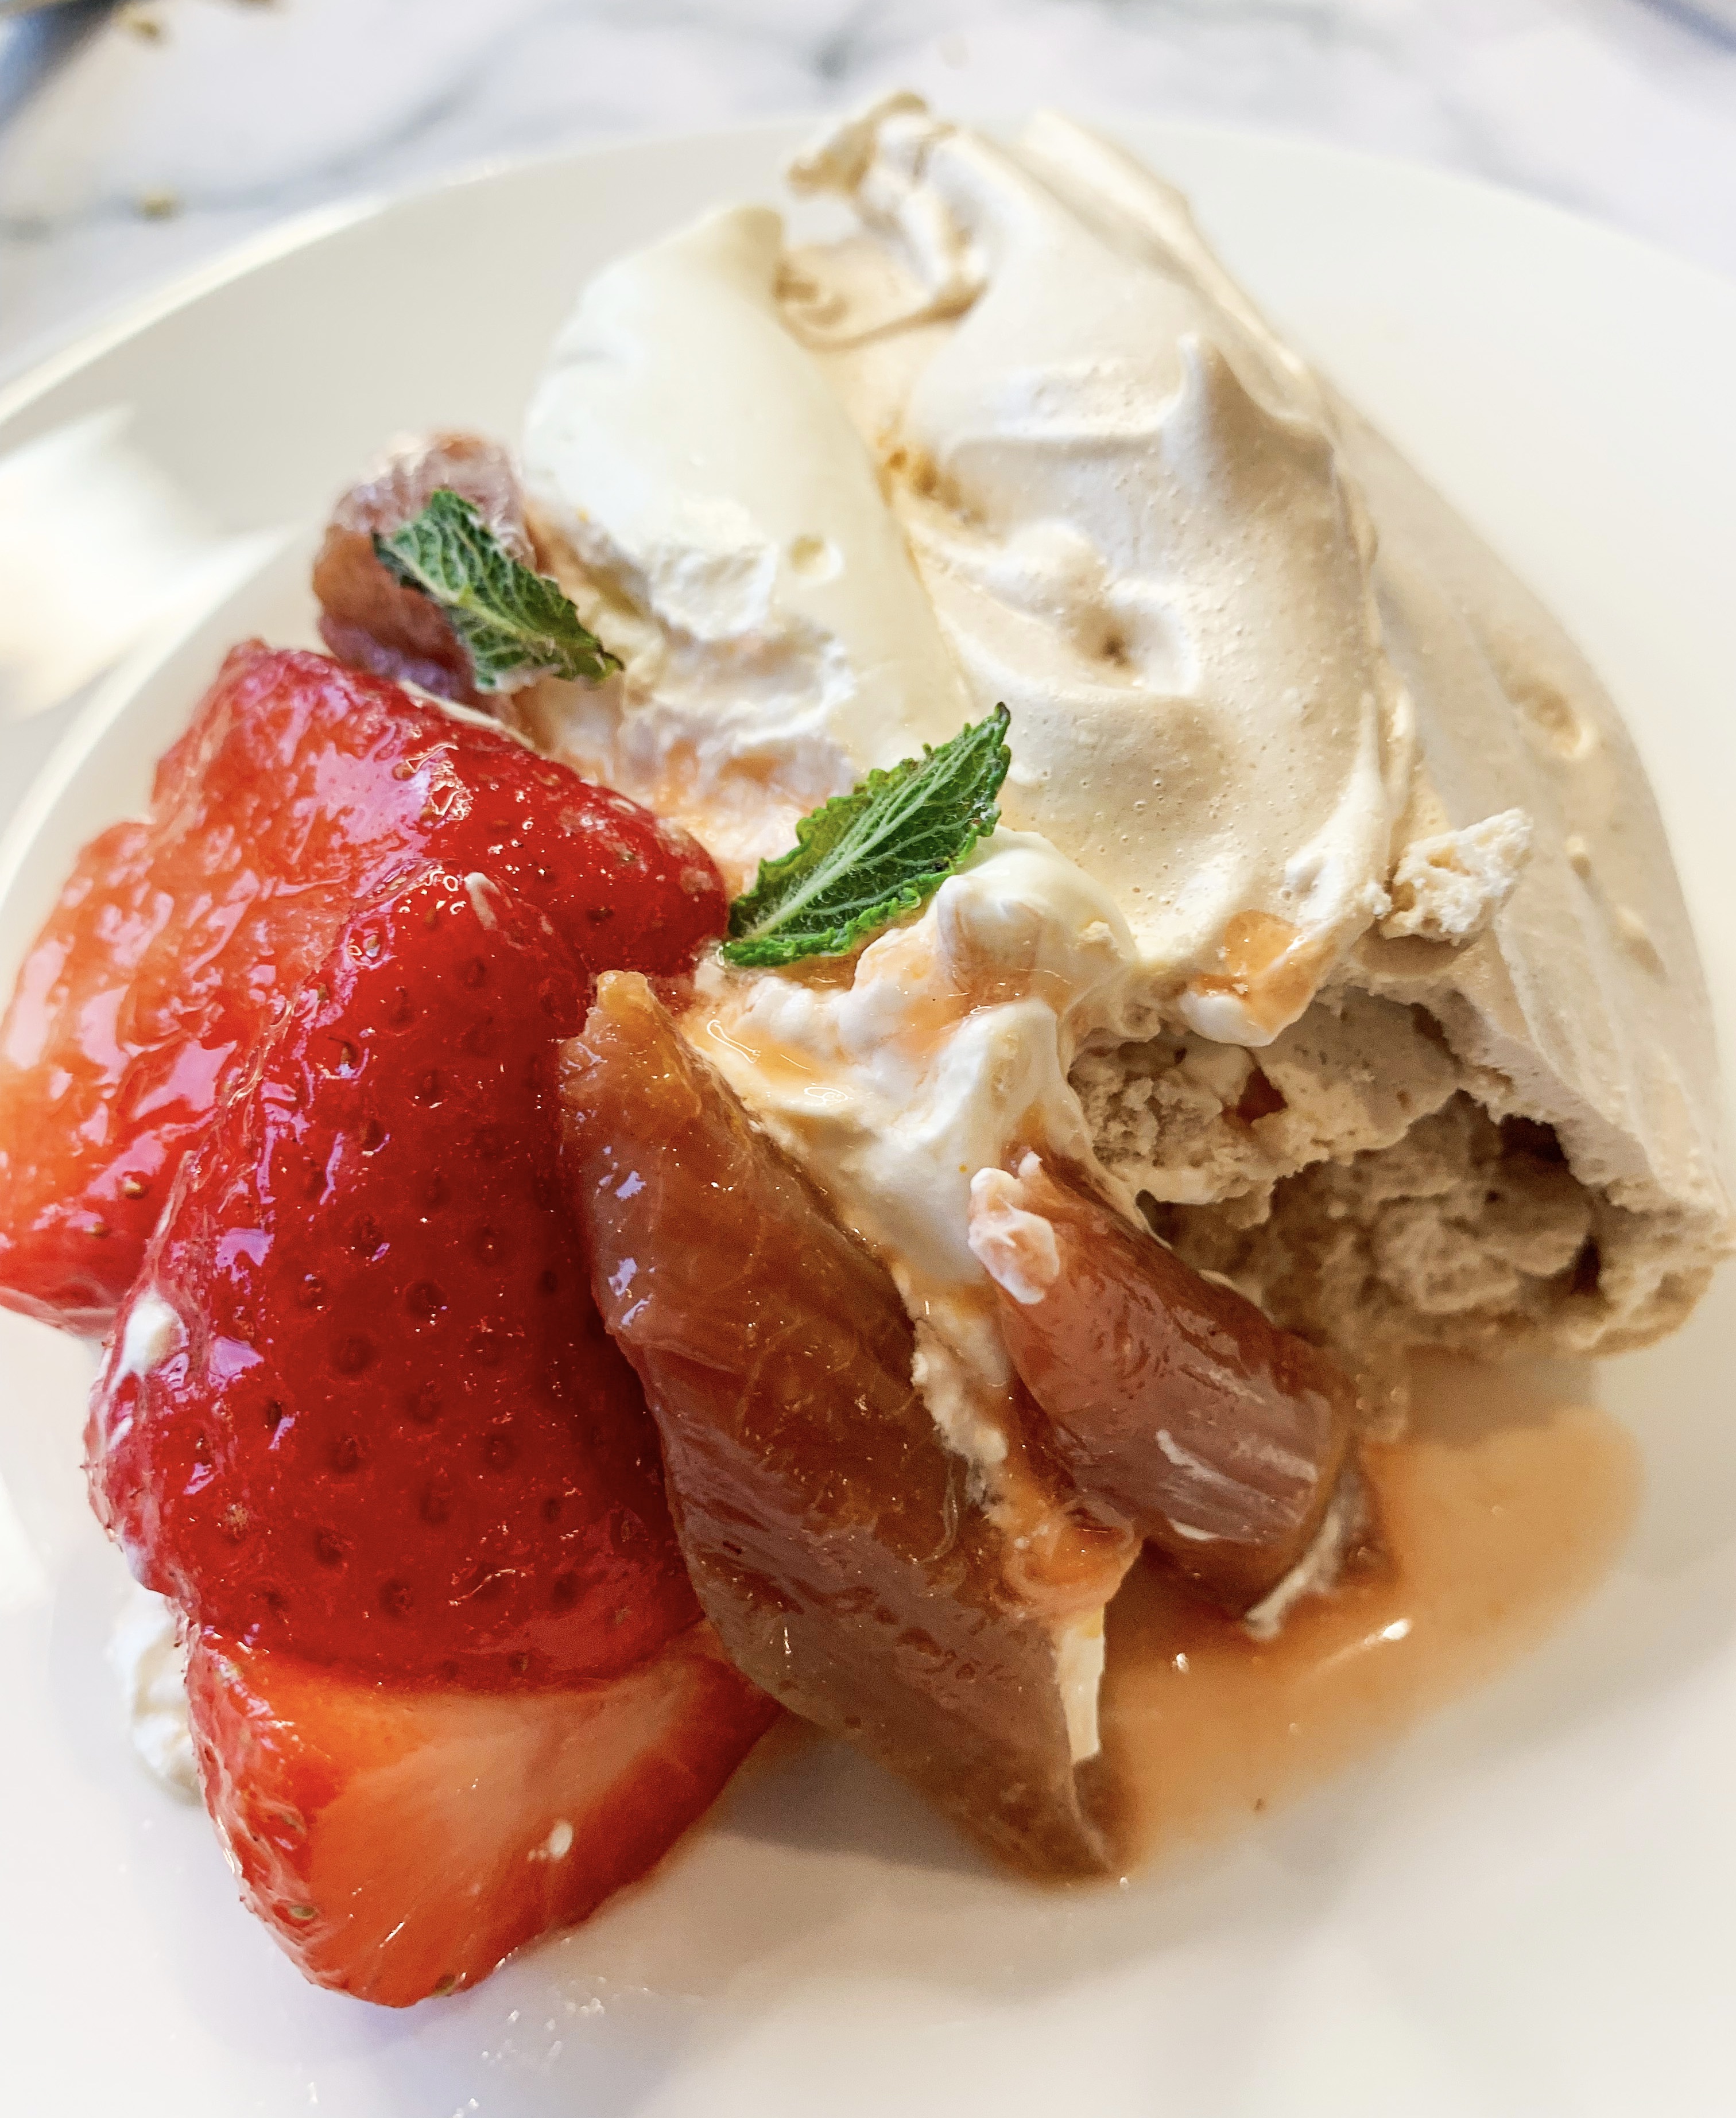
I adore Pavlova and this recipe for ‘Brown Sugar Pavlova’ is a new favourite. I discovered it just recently in Sally Clarke’s cookbook , ‘First Put on Your Apron’. The brown sugar gives the meringue a subtle caramel flavour and a sweetness that cuts the tart rhubarb beautifully. It doesn’t like to sit around, so assemble it at the last minute in order to keep the meringue as crisp as possible. Having said that, in the past I’ve keep the leftovers in the fridge and enjoyed them the following day; even if the meringue is a little ‘soggy’ it’s still delicious!..
4 egg whites
Pinch of salt
160g caster sugar
90g brown sugar
4 drops of vanilla essence
For the Rhubarb and Strawberry topping:
400g rhubarb stalks
1 orange, juiced
1 tablespoon caster sugar
400g strawberries
500g Double cream, stiffly whipped
Mint leaves to decorate
- Using an electric whisk, whisk the whites with the salt until they are stiff. Add the caster sugar and whisk for a further minute or two until the meringue is glossy and very stiff. Carefully fold in the brown sugar and vanilla essence until smooth.
- Line a baking sheet with baking parchment, draw a circle, roughly 22cm in diameter – you can draw around a plate. Scoop the meringue mixture onto the circle, spreading it out to create a crater by making the sides a little higher than the middle.
- Place in a preheated oven, 120’c fan, for 1 hour 10 minutes, then turn off the oven and allow to cool completely in the oven or overnight.
- Meanwhile, trim the rhubarb and cut the stalks slightly at an angle into 2 cm lengths and place in a wide-based saucepan, ideally in one layer. Add the orange juice and caster sugar, cover with a lid and bring slowly to a simmer and cook until barely soft, approximately 3 minutes. Check often as you don’t want the rhubarb to overcook, you want it to be a little ‘al dente’ so that it keeps its shape. Remove from the heat and allow to cool down in the covered pan.
- About an hour before you are ready to serve the pavlova, hull the strawberries and cut each into 2 or 3 depending on the size and place in a bowl. Carefully pour over the cooled rhubarb and its juices. Do not mix the fruit together at this stage as the rhubarb is very delicate. Leave for up to an hour in the fridge to macerate.
- To serve, spoon the whipped cream into the well of the pavlova and carefully arrange the rhubarb and strawberries, without the juices, on top and decorate with sprigs of mint. Serve the juices in a small jug to go alongside.
Lemon Mousse Cake (Serves 4-6)
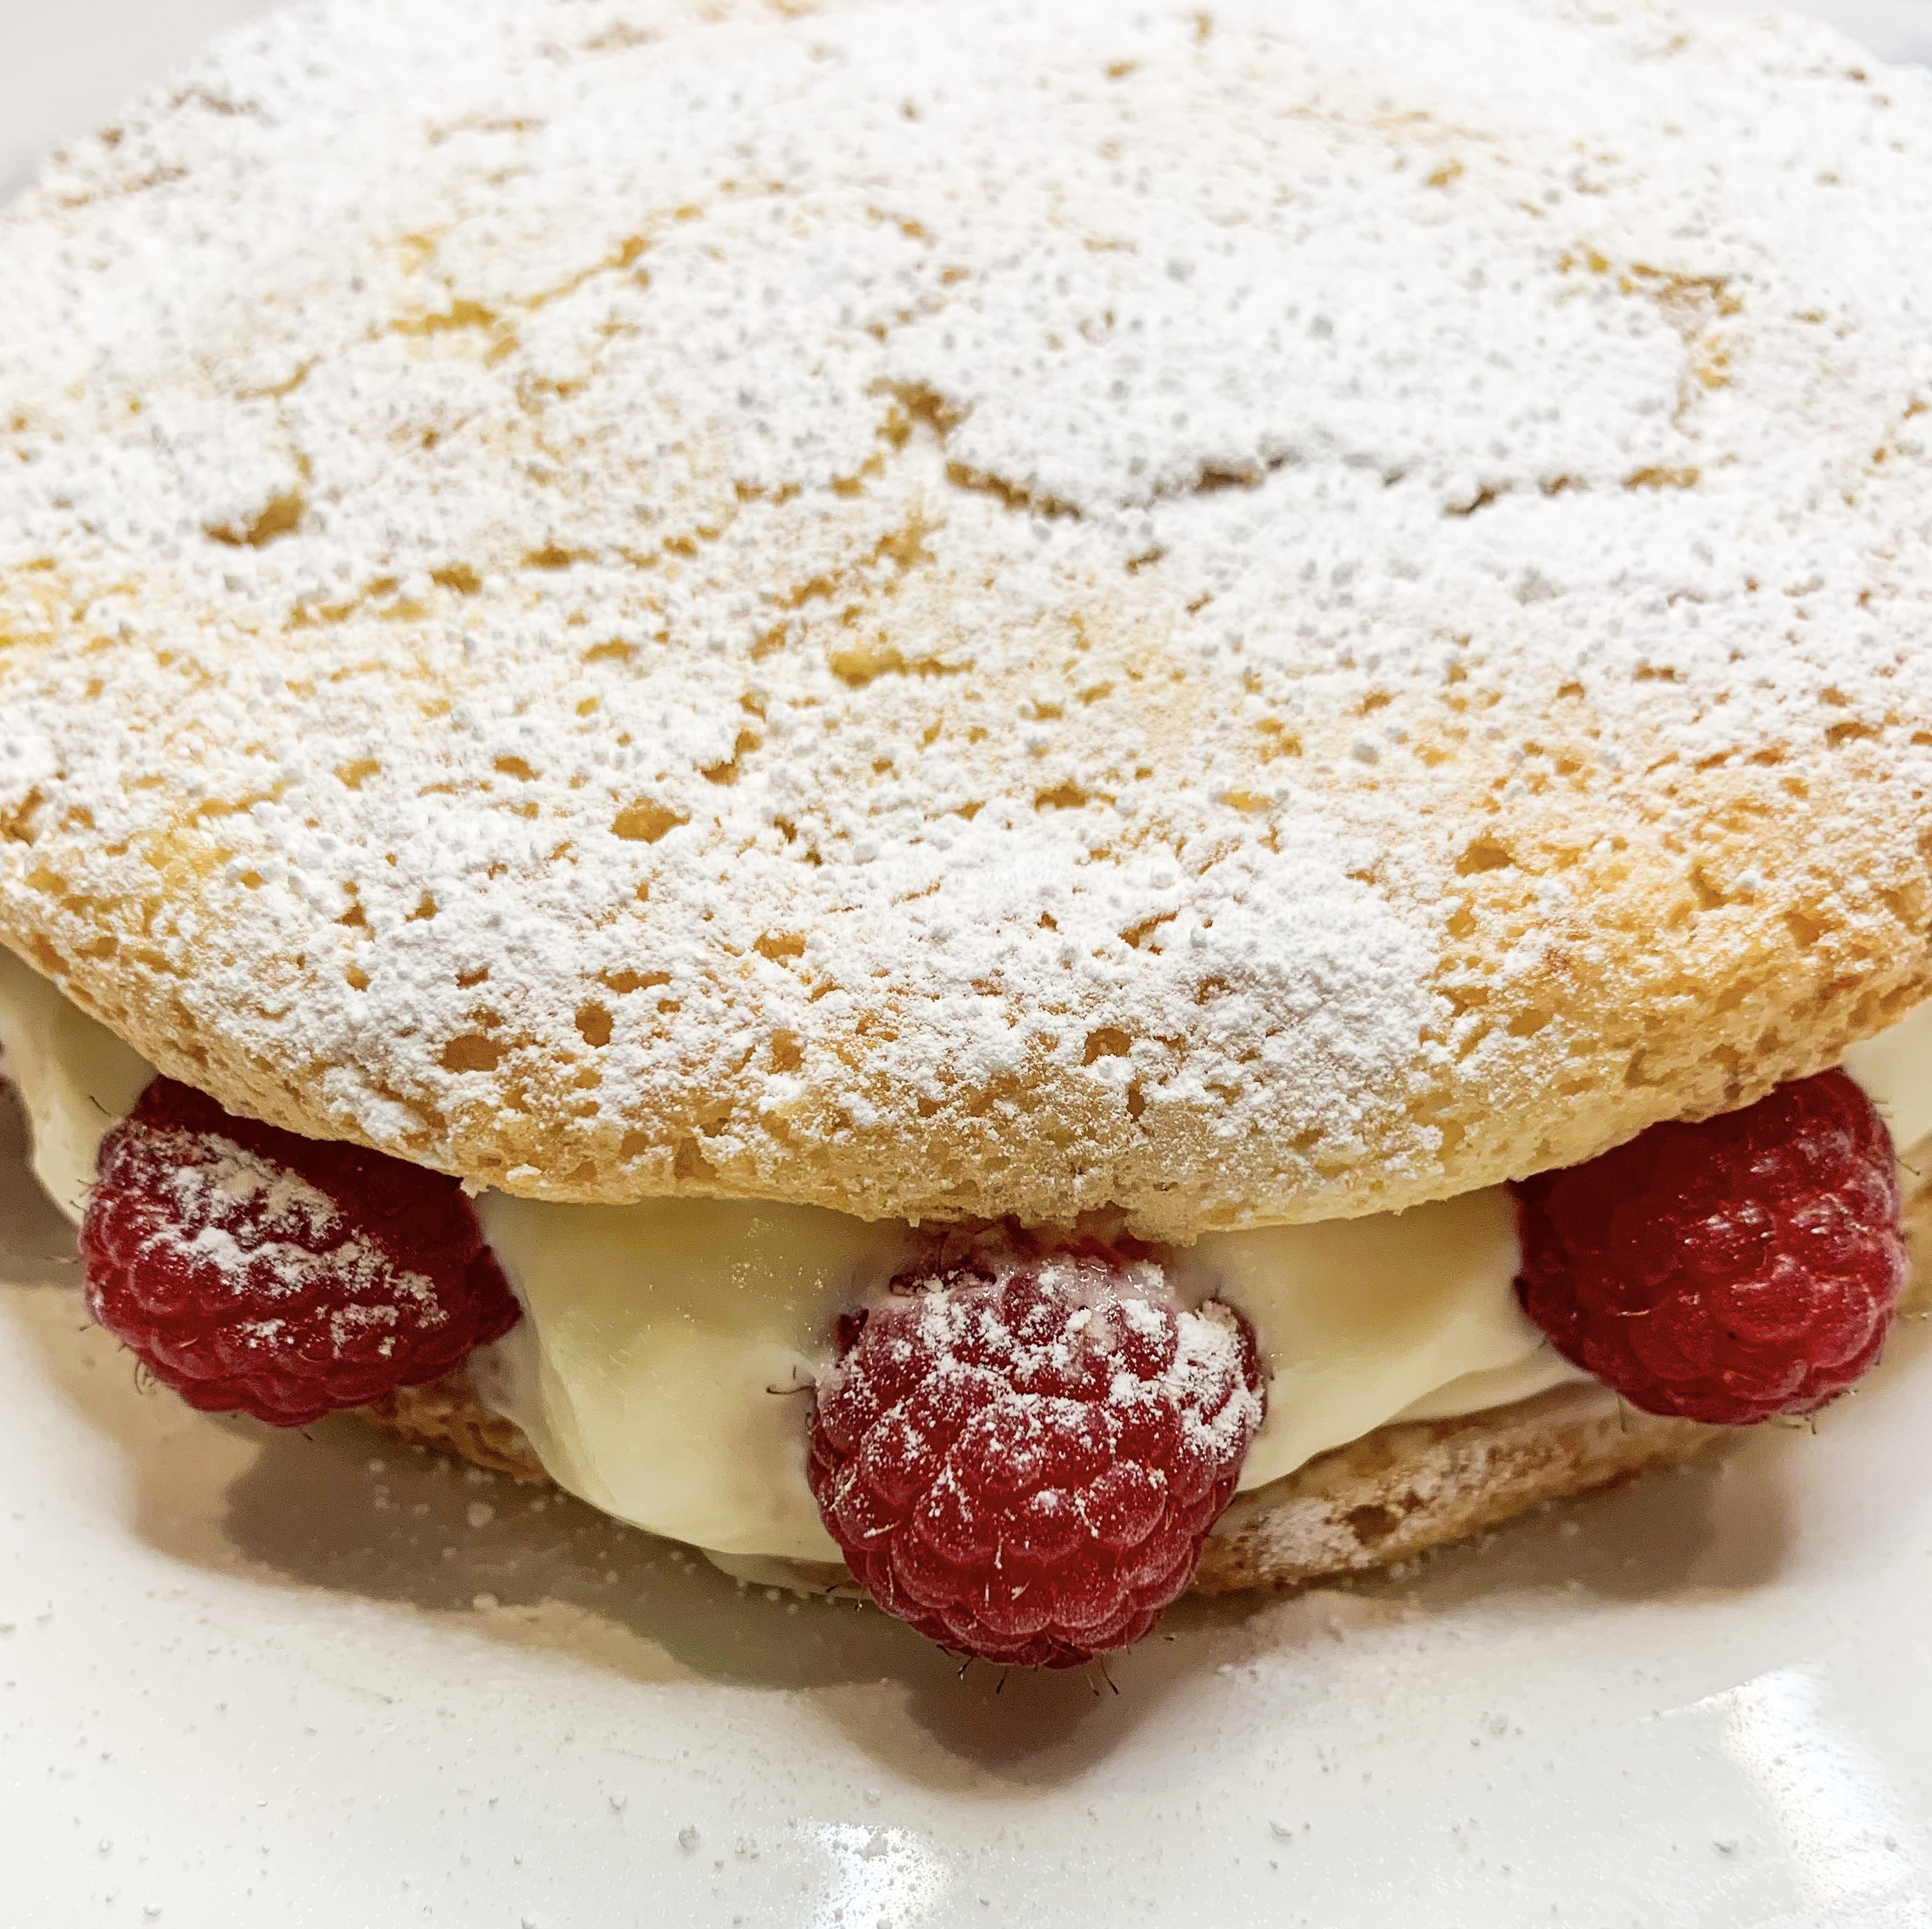
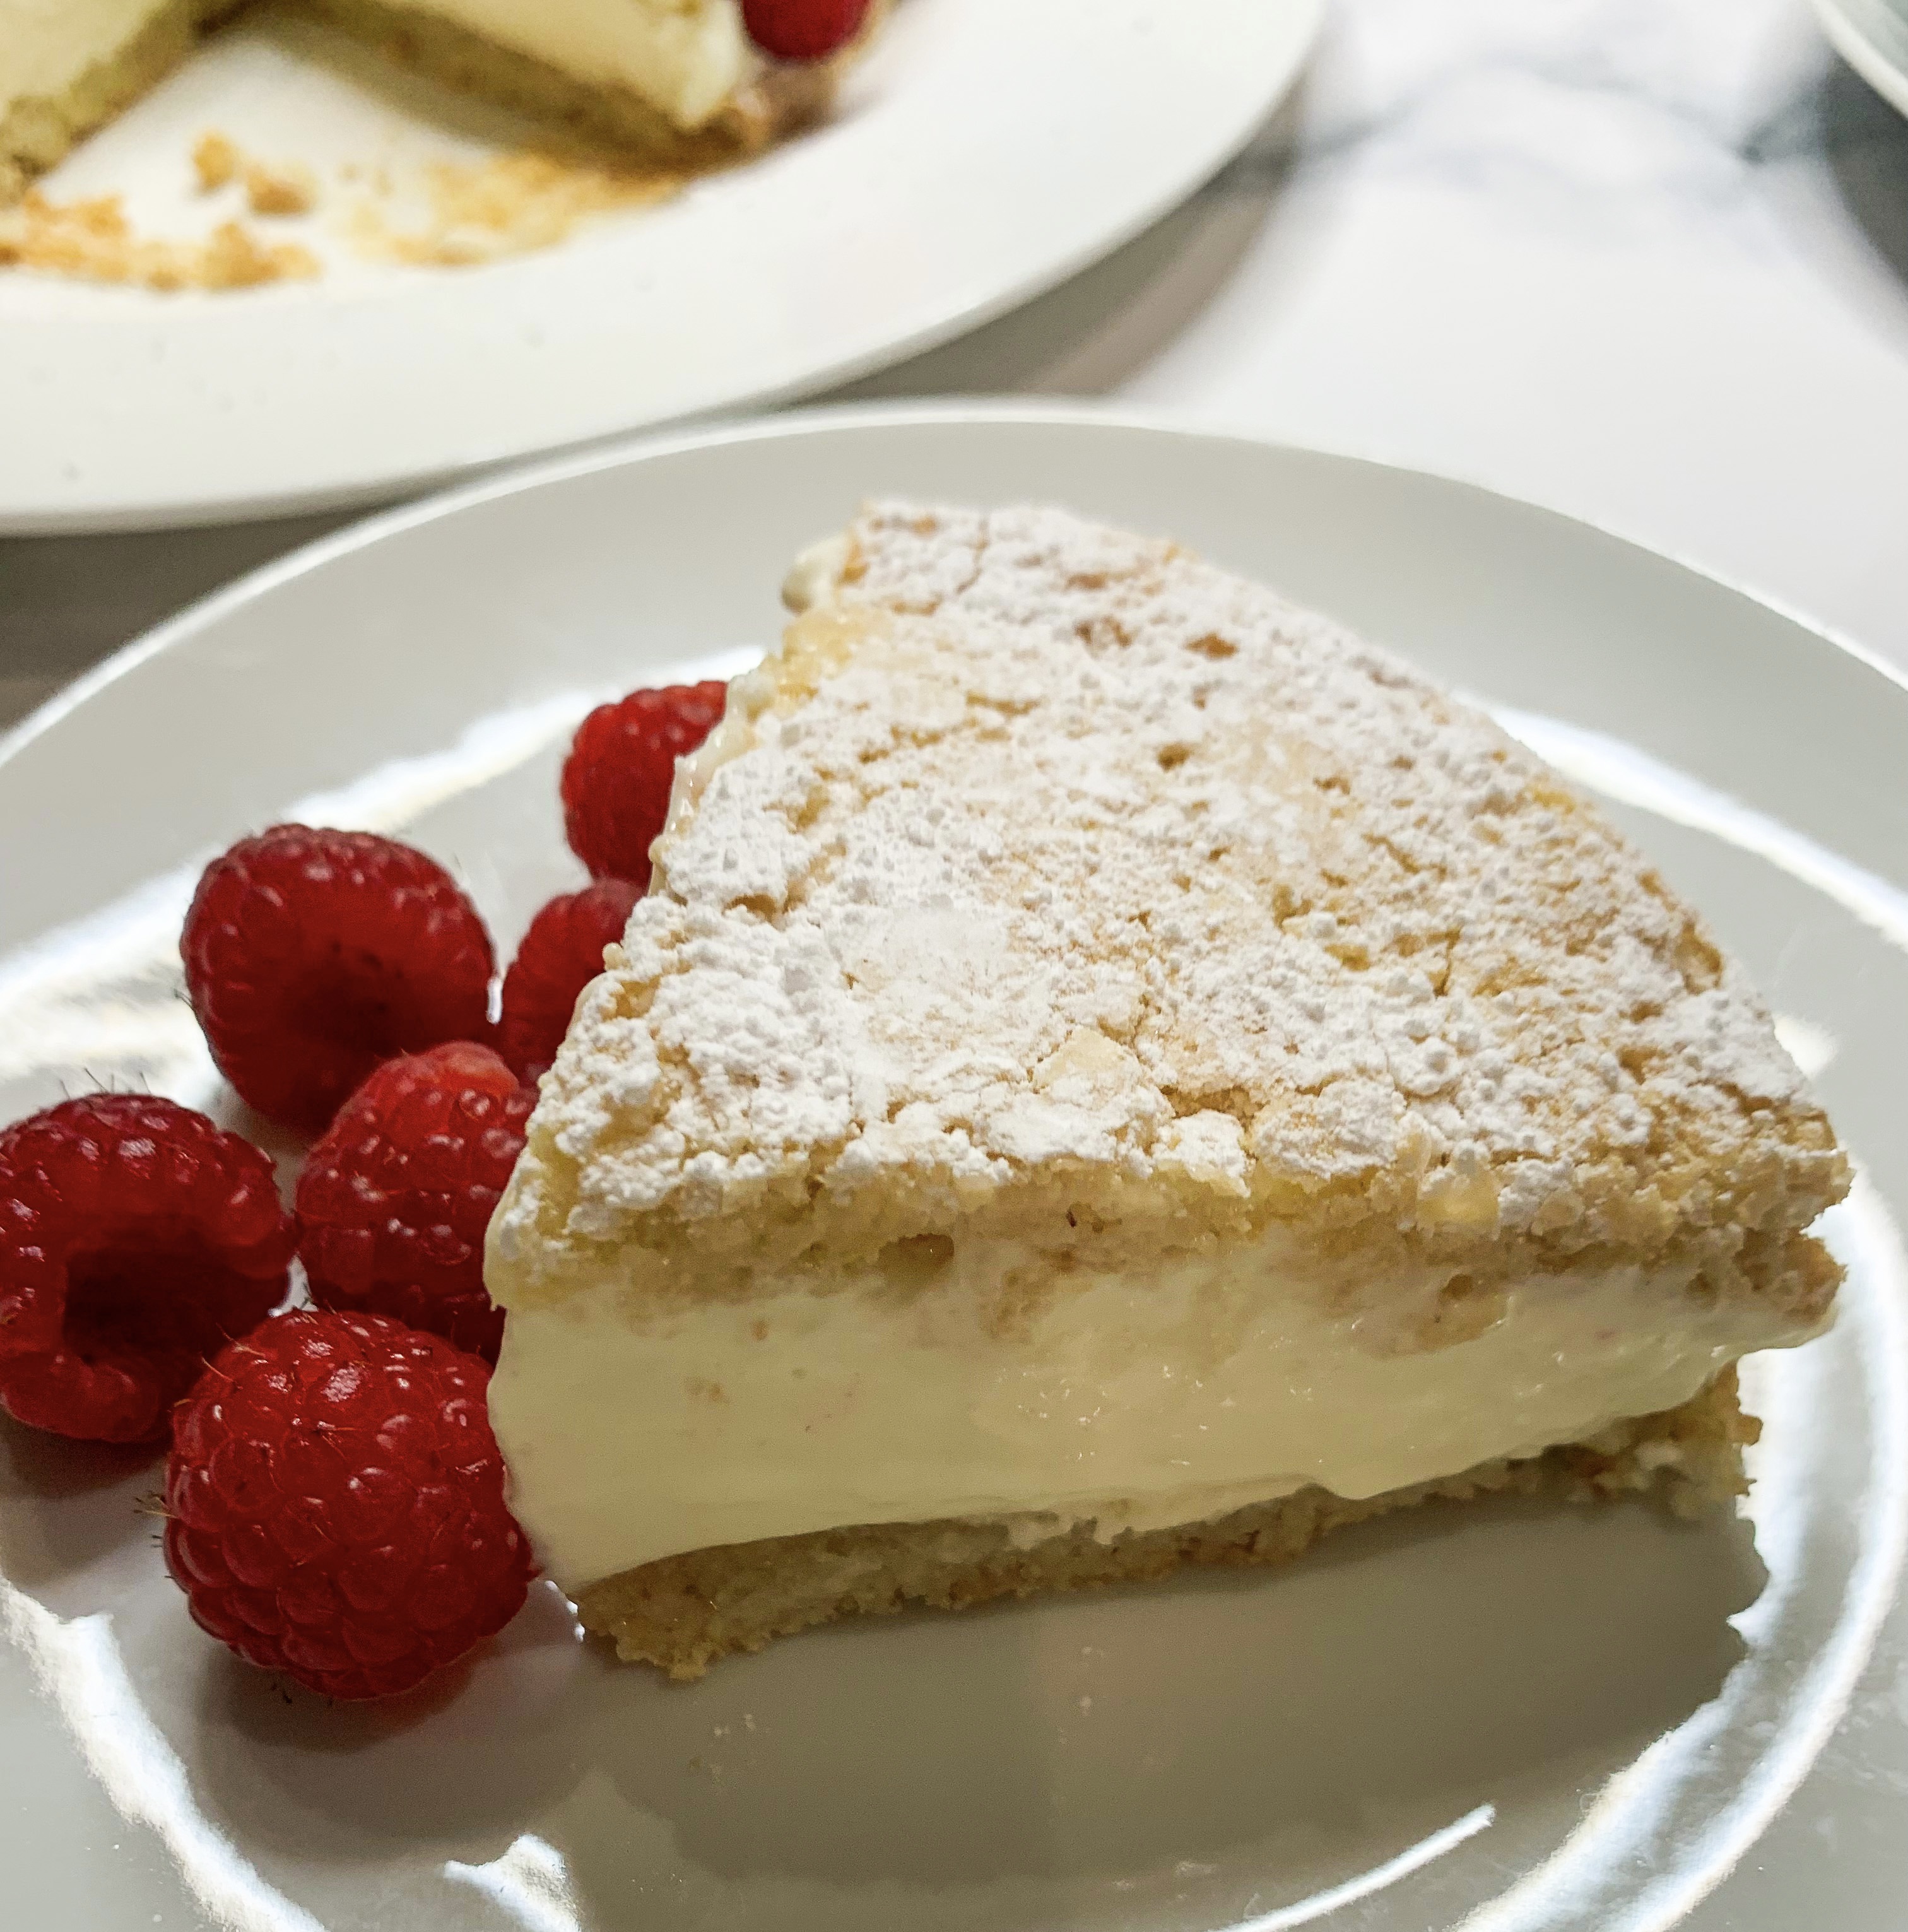
This lemon mousse cake has just the right balance of sweet and sour. It’s rather like a ‘lemon posset’ sandwiched between two chewy almond biscuits (macronades) – wonderful! The recipe is from Simon Hopkinson’s cookbook ‘Roast Chicken and Other Stories’, he suggests that it serves 4, but although I’m greedy, I found it could easily serve 6, as it is rich.
For the macaronades:
2 egg whites
125g icing sugar
50g ground almonds
Grated zest of 1 lemon
For the mousse:
2½ leaves of gelatine, pre-soaked in cold water until softened
200ml lemon juice
250ml double cream
100g caster sugar
A handful of fresh raspberries, plus more to serve
Icing sugar to sift over
*Baking parchment
- Draw two circles 12cm in diameter on a piece of baking parchment and place on a baking tray.
- Beat the egg whites to soft peaks. Sift the icing sugar and almonds together, gently fold them into the egg whites, together with the lemon zest.
- Spread the mixture onto the circles on the baking parchment.
- Bake in a preheated oven, 200’c fan, for 10 minutes, until pale golden. Remove, leave to cool for 5 minutes before carefully lifting from the paper to dry on a cooling rack.
- Melt the gelatine with a couple of tablespoons of the lemon juice over a low heat. Add the rest of the lemon juice and place the bowl over ice to chill stirring occasionally until just beginning to gel.
- Whip the cream with the sugar until thick then slowly incorporate the lemon-gelatine mixture while continuing to beat until the mixture is thick (you can thicken it more by placing it in the fridge for 30 minutes).
- To assemble, place one of the macaronades on a serving plate, smooth side up, and carefully spread the mousse right up to the edges, smoothing around the edge with a palette knife. Gently press the second marcaronade on top. To decorate place the raspberries at intervals around the edge of the mousse and sift a little icing sugar over the top of the cake. Put in the fridge to chill for up to 2 hours before serving.
Pear Almondine (Serves 6)
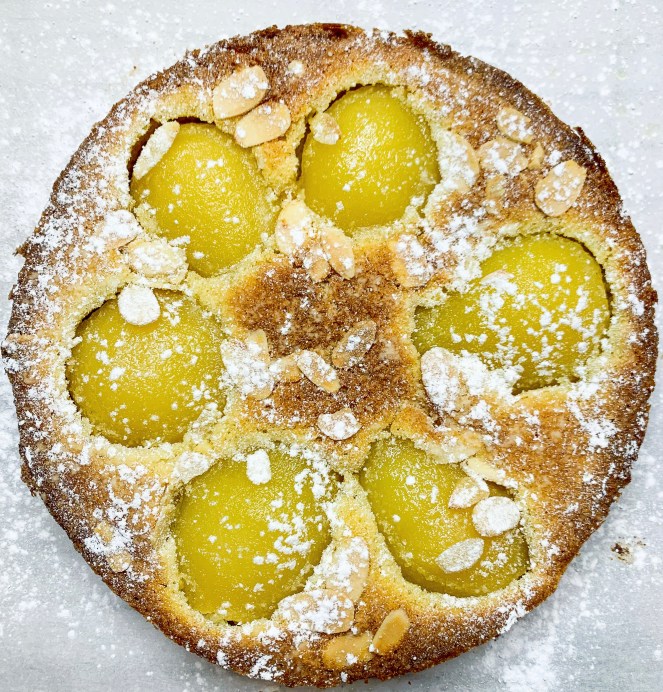
I have my sister to thank for finding this recipe, it’s from Raymond Blanc’s cookbook ‘Simply Raymond’. Although I had this cookbook I hadn’t noticed this particular recipe – I think I’d overlooked it as I presumed it would be laden with gluten, but it’s totally gluten-free! When my sister served it I was smitten. It has a lovely chewy crust, it’s wonderful warm or cold – for dessert or breakfast! It’s very straightforward to make, however, as Blanc suggests, it’s worth using a tart ring rather than a tin; if you haven’t got one it will be a good investment as I assure you – you will want to make this again and again (you can buy them on Amazon). The reason for a this ring, is that by having no base it ensures that the bottom of the Almondine is cooked to perfection. It will seem a bit precarious to slide the uncooked tart onto the heated baking tray but in fact, it’s rather easy, and worth it to get the heat directly underneath for a crisp bottom.
4-6 pear halves, tinned or jarred, drained
100g unsalted butter, at room temperature plus extra for brushing the ring
100g caster sugar
100g ground almonds
1 teaspoon cornflour
1 teaspoon vanilla bean paste
1 egg
A handful of flaked almonds (lightly toasted in a dry pan)
Icing sugar for dusting
*A 18cm x 2cm tart ring and two baking trays
- First butter the tart ring, then cut a strip of greaseproof paper to line the inside of the buttered tart ring (the butter will allow it to stick). Place the ring on a flat baking sheet lined with greaseproof paper. Place the second tray on the middle shelf of a preheated oven, 180’c fan, ready to slide the pear tart onto.
- In a large bowl, mix the softened butter and sugar. Then add the ground almonds, cornflour, vanilla bean paste and egg, and mix well. Spoon the mixture into the tart ring, spreading it evenly.
- Slice the pears in half and arrange them evenly around the outside of the tart, resting them on top of the almond sponge mixture, with the tip of each half meeting in the middle. Scatter over the almonds.
- Slide the pear tart on the greaseproof paper onto the preheated tray in the oven and bake for 25-30 minutes until golden brown.
- Leave to cool for a few minutes before removing it from the ring.
- Before serving, dust with icing sugar.
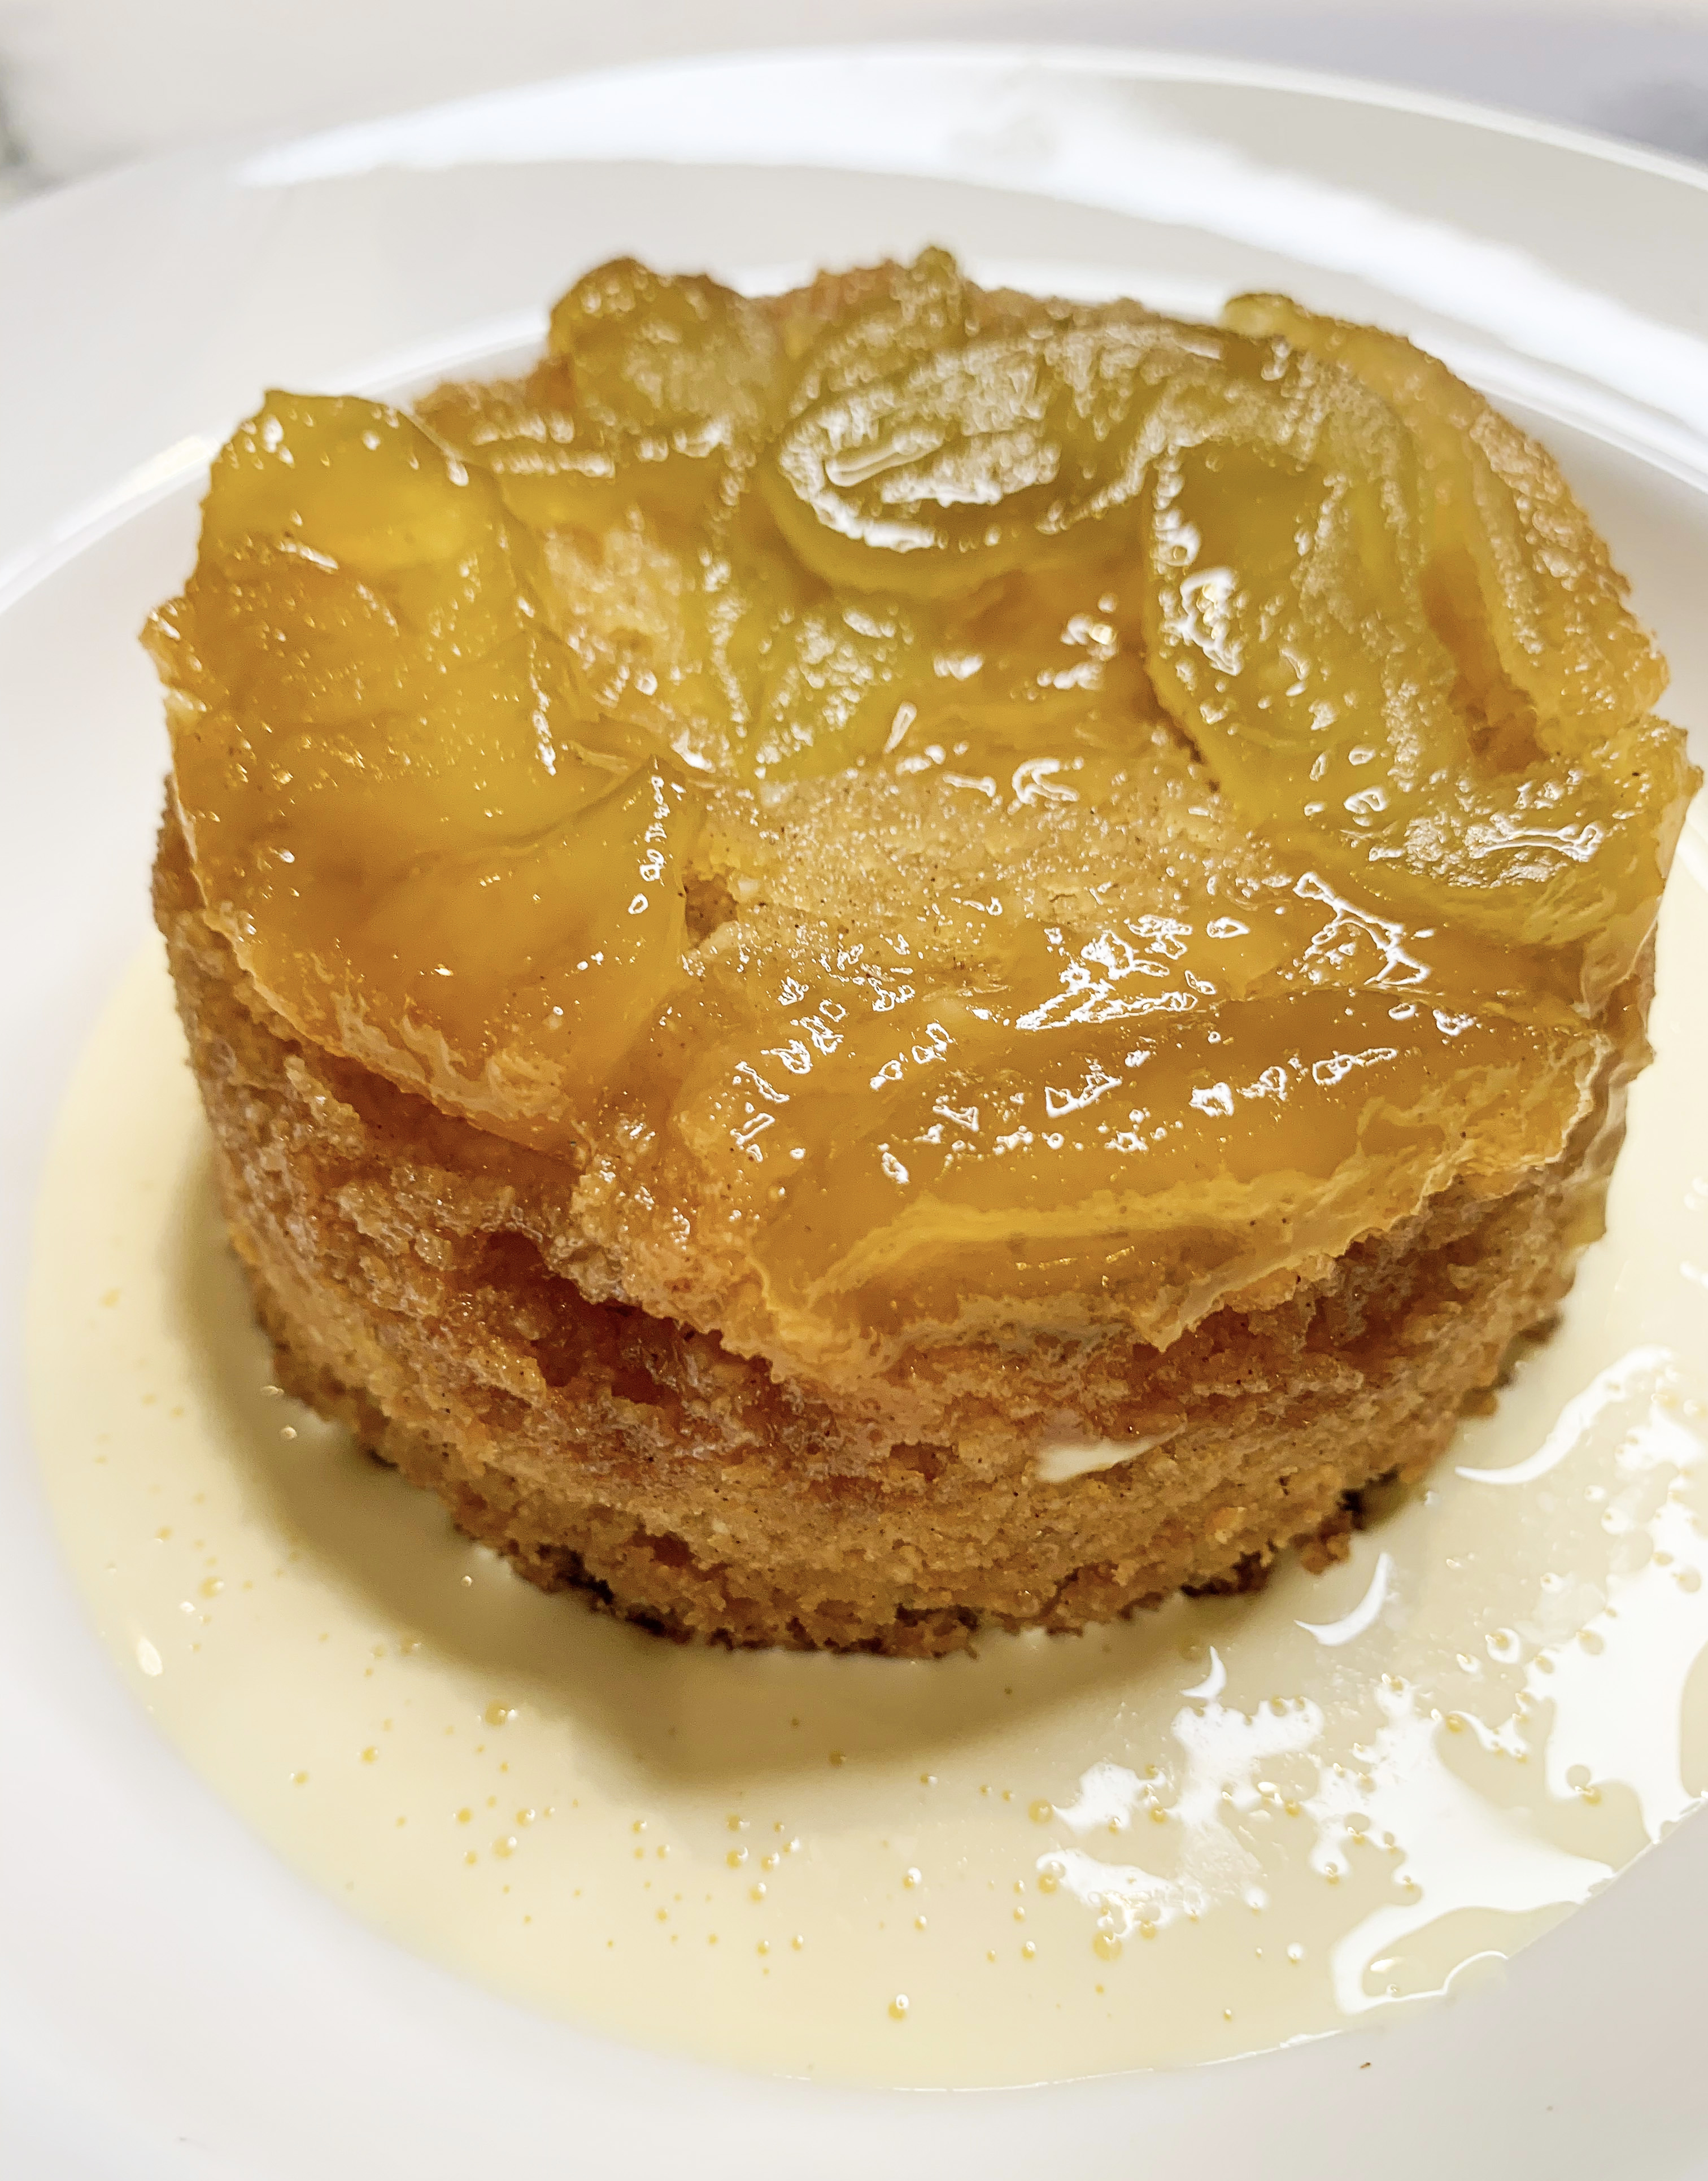
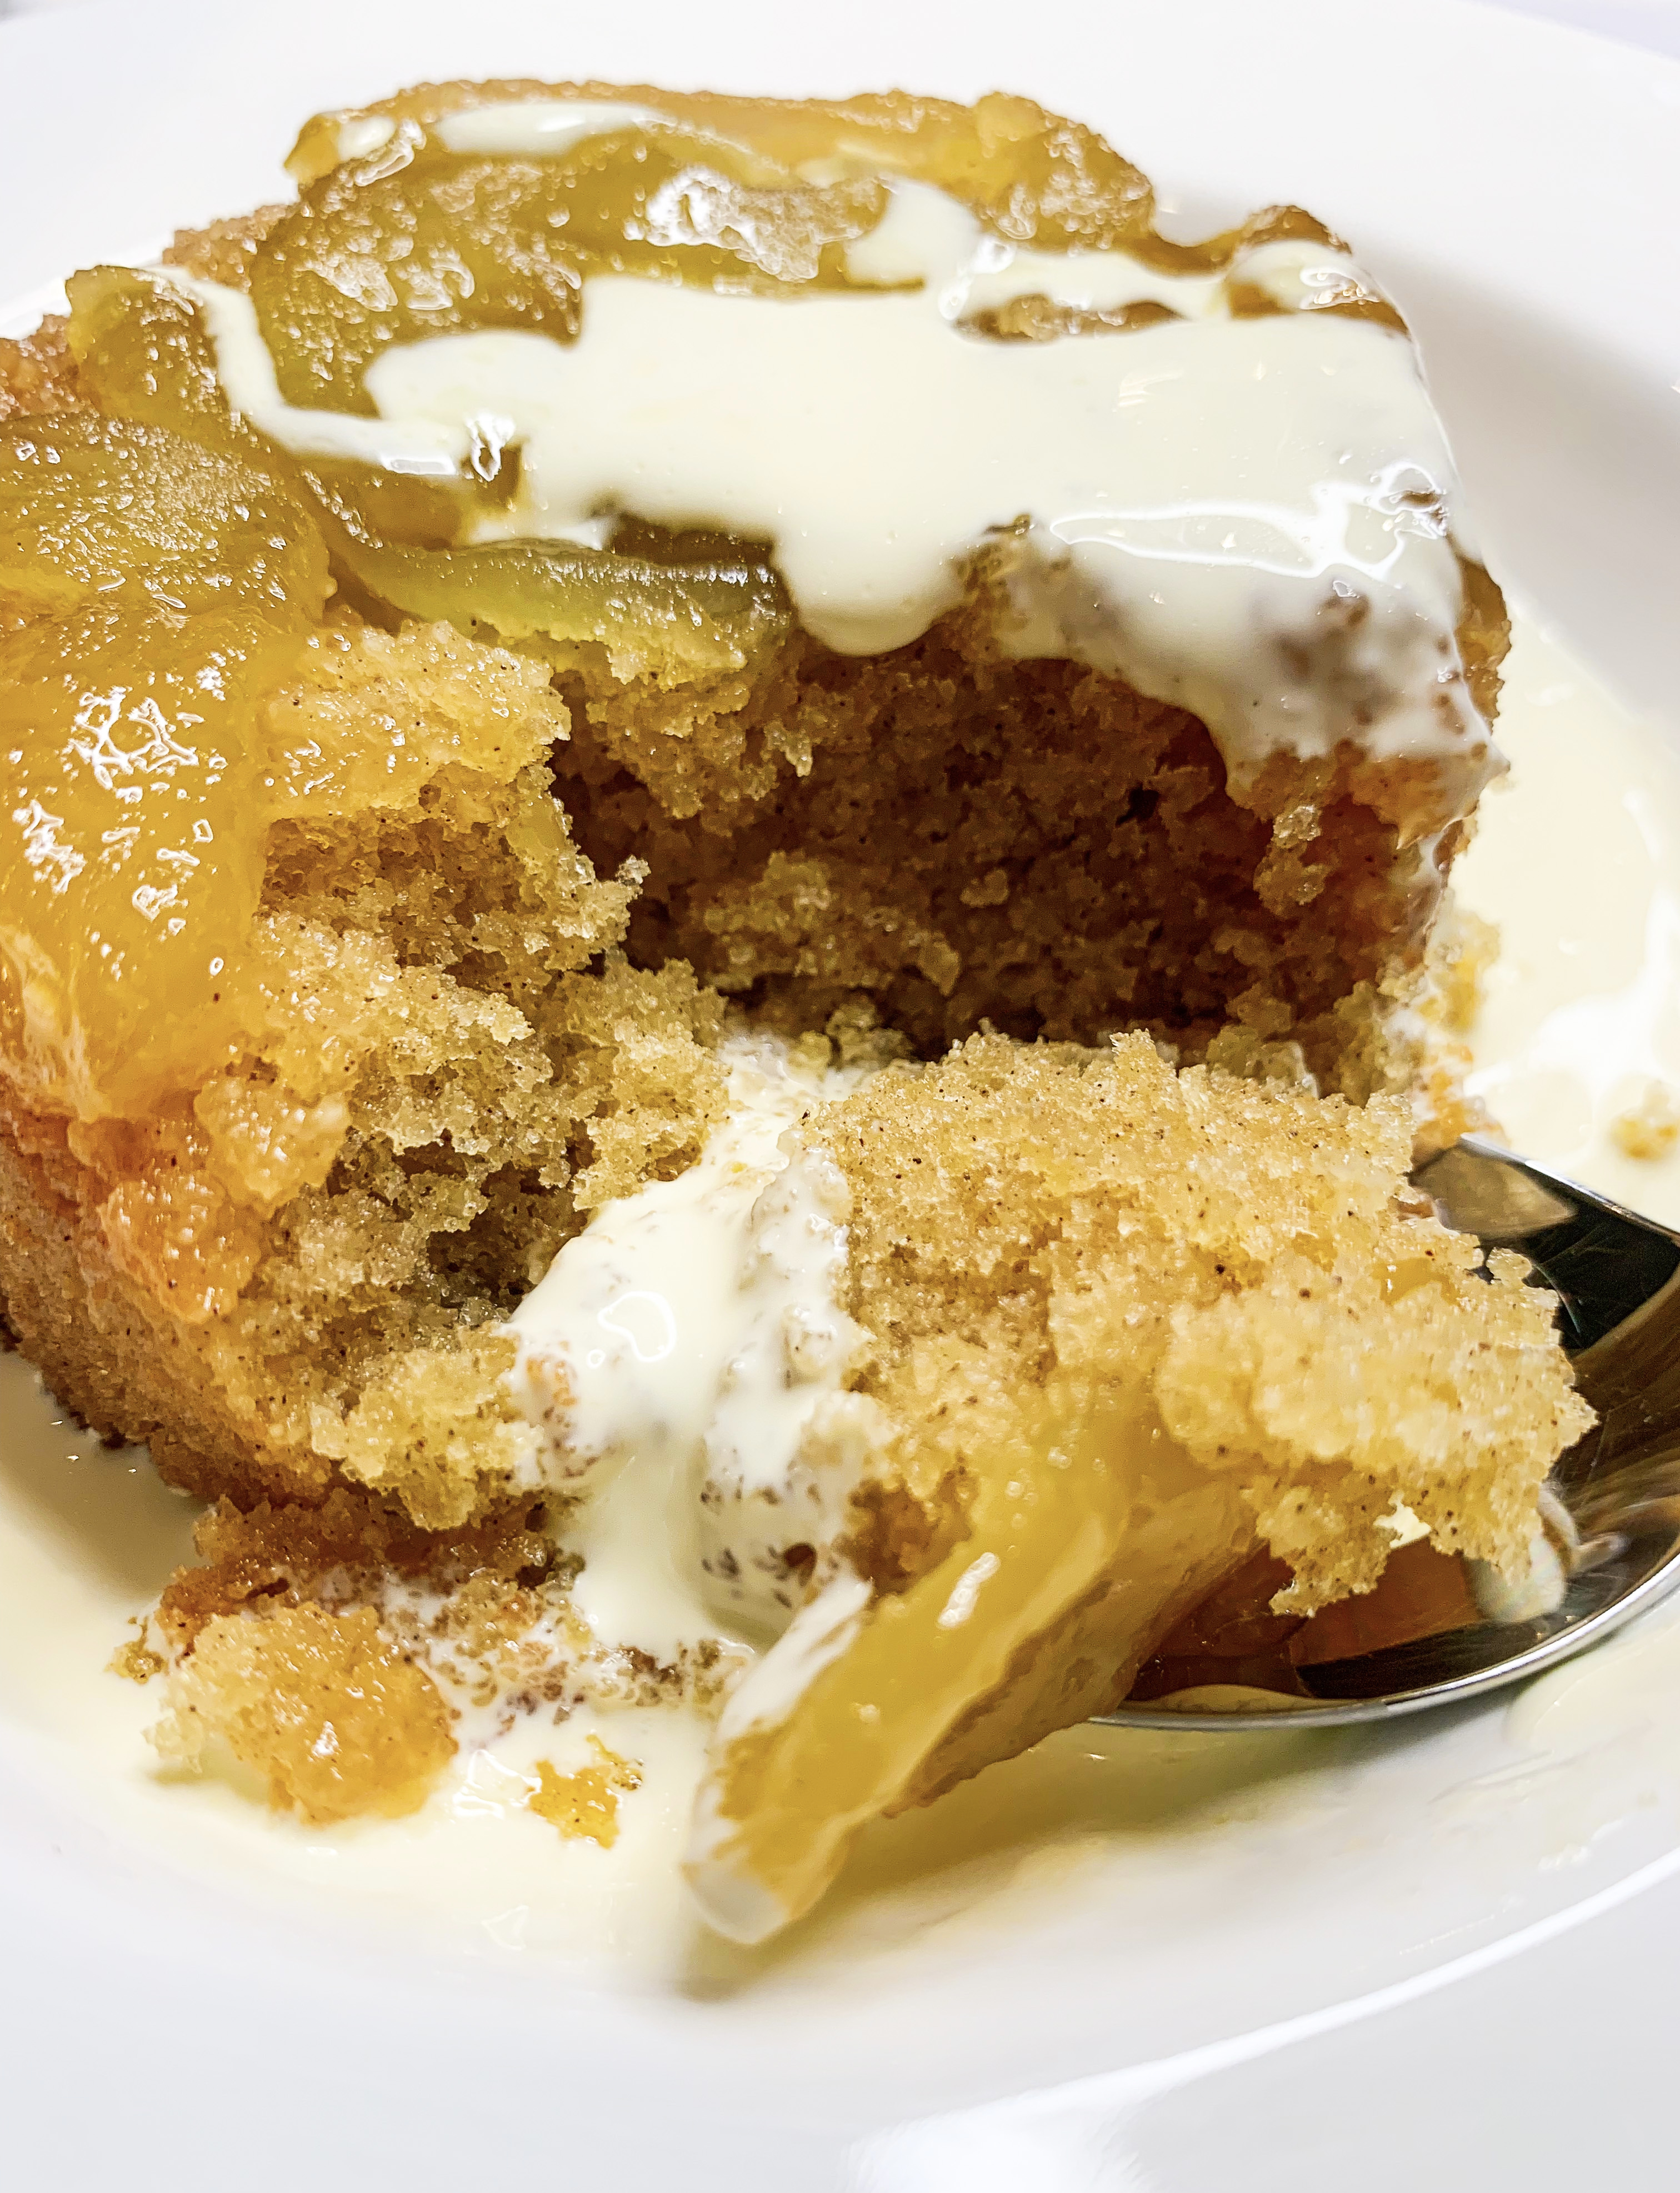
Nectarines Baked with Almonds & Marsala (Serves 6)
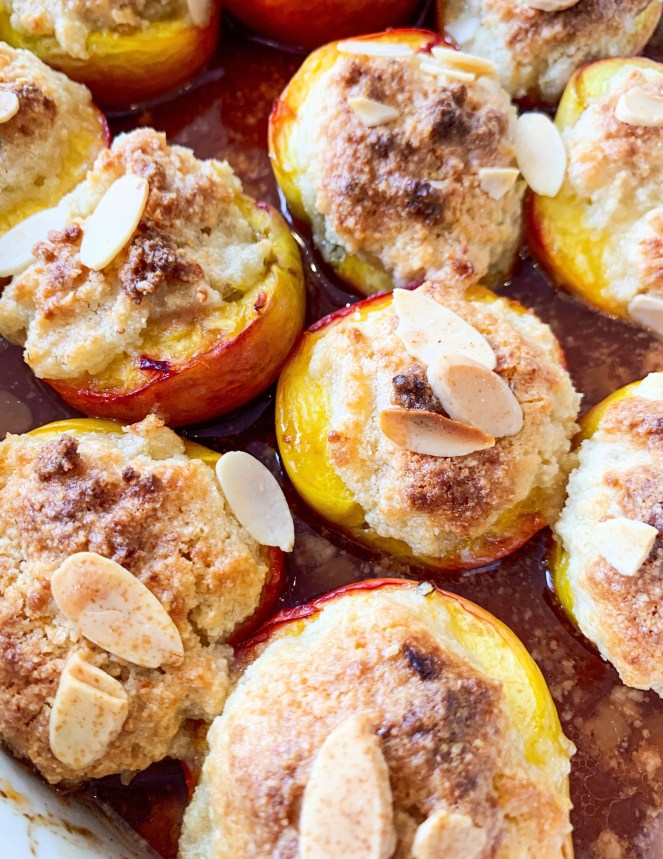
This is one of those desserts that’s been around ‘forever’! Indeed, I’ve been serving this particular recipe for many years, all seasons – it works just as well with nectarines that are out of season as they sweeten with cooking. I like to serve it with crème fraîche as it cuts the sweetness of the amaretti filling, but you could also serve it with a scoop of good quality vanilla ice-cream.
* Any leftover amaretti filling can be baked separately in a small dish for about 20 minutes in the same oven – it’s pretty good as an extra sweet treat with a cup of tea!
6 nectarines, halved and stoned
100g amaretti biscuits (gluten-free if required)
100g butter, softened
85g ground almonds
85g caster sugar
1 egg
1-2 tablespoons, flaked almonds
250ml Marsala
Crème fraîche or vanilla ice-cream to serve
- Place the nectarine halves snugly in a baking dish.
- Put the amaretti biscuits into a large bowl and using the end of a rolling pin, bash into crumbs. Add the softened butter and mix well before stirring in the almonds, caster sugar and egg, to form a thick paste.
- Push generous spoonfuls of the mixture into the cavities of the nectarines (any leftover mixture can be baked separately in a small dish – see note above). Scatter with the almonds and then carefully pour the Marsala into the dish, between the nectarines, so it doesn’t touch the topping – otherwise it will go soggy!
- Bake in a preheated oven, 160’c fan, for 40-50 minutes until golden and crisp.
- Serve warm with the juices spooned over with a dollop of crème fraiche or a scoop of vanilla ice-cream.
Lemon Angel Pie
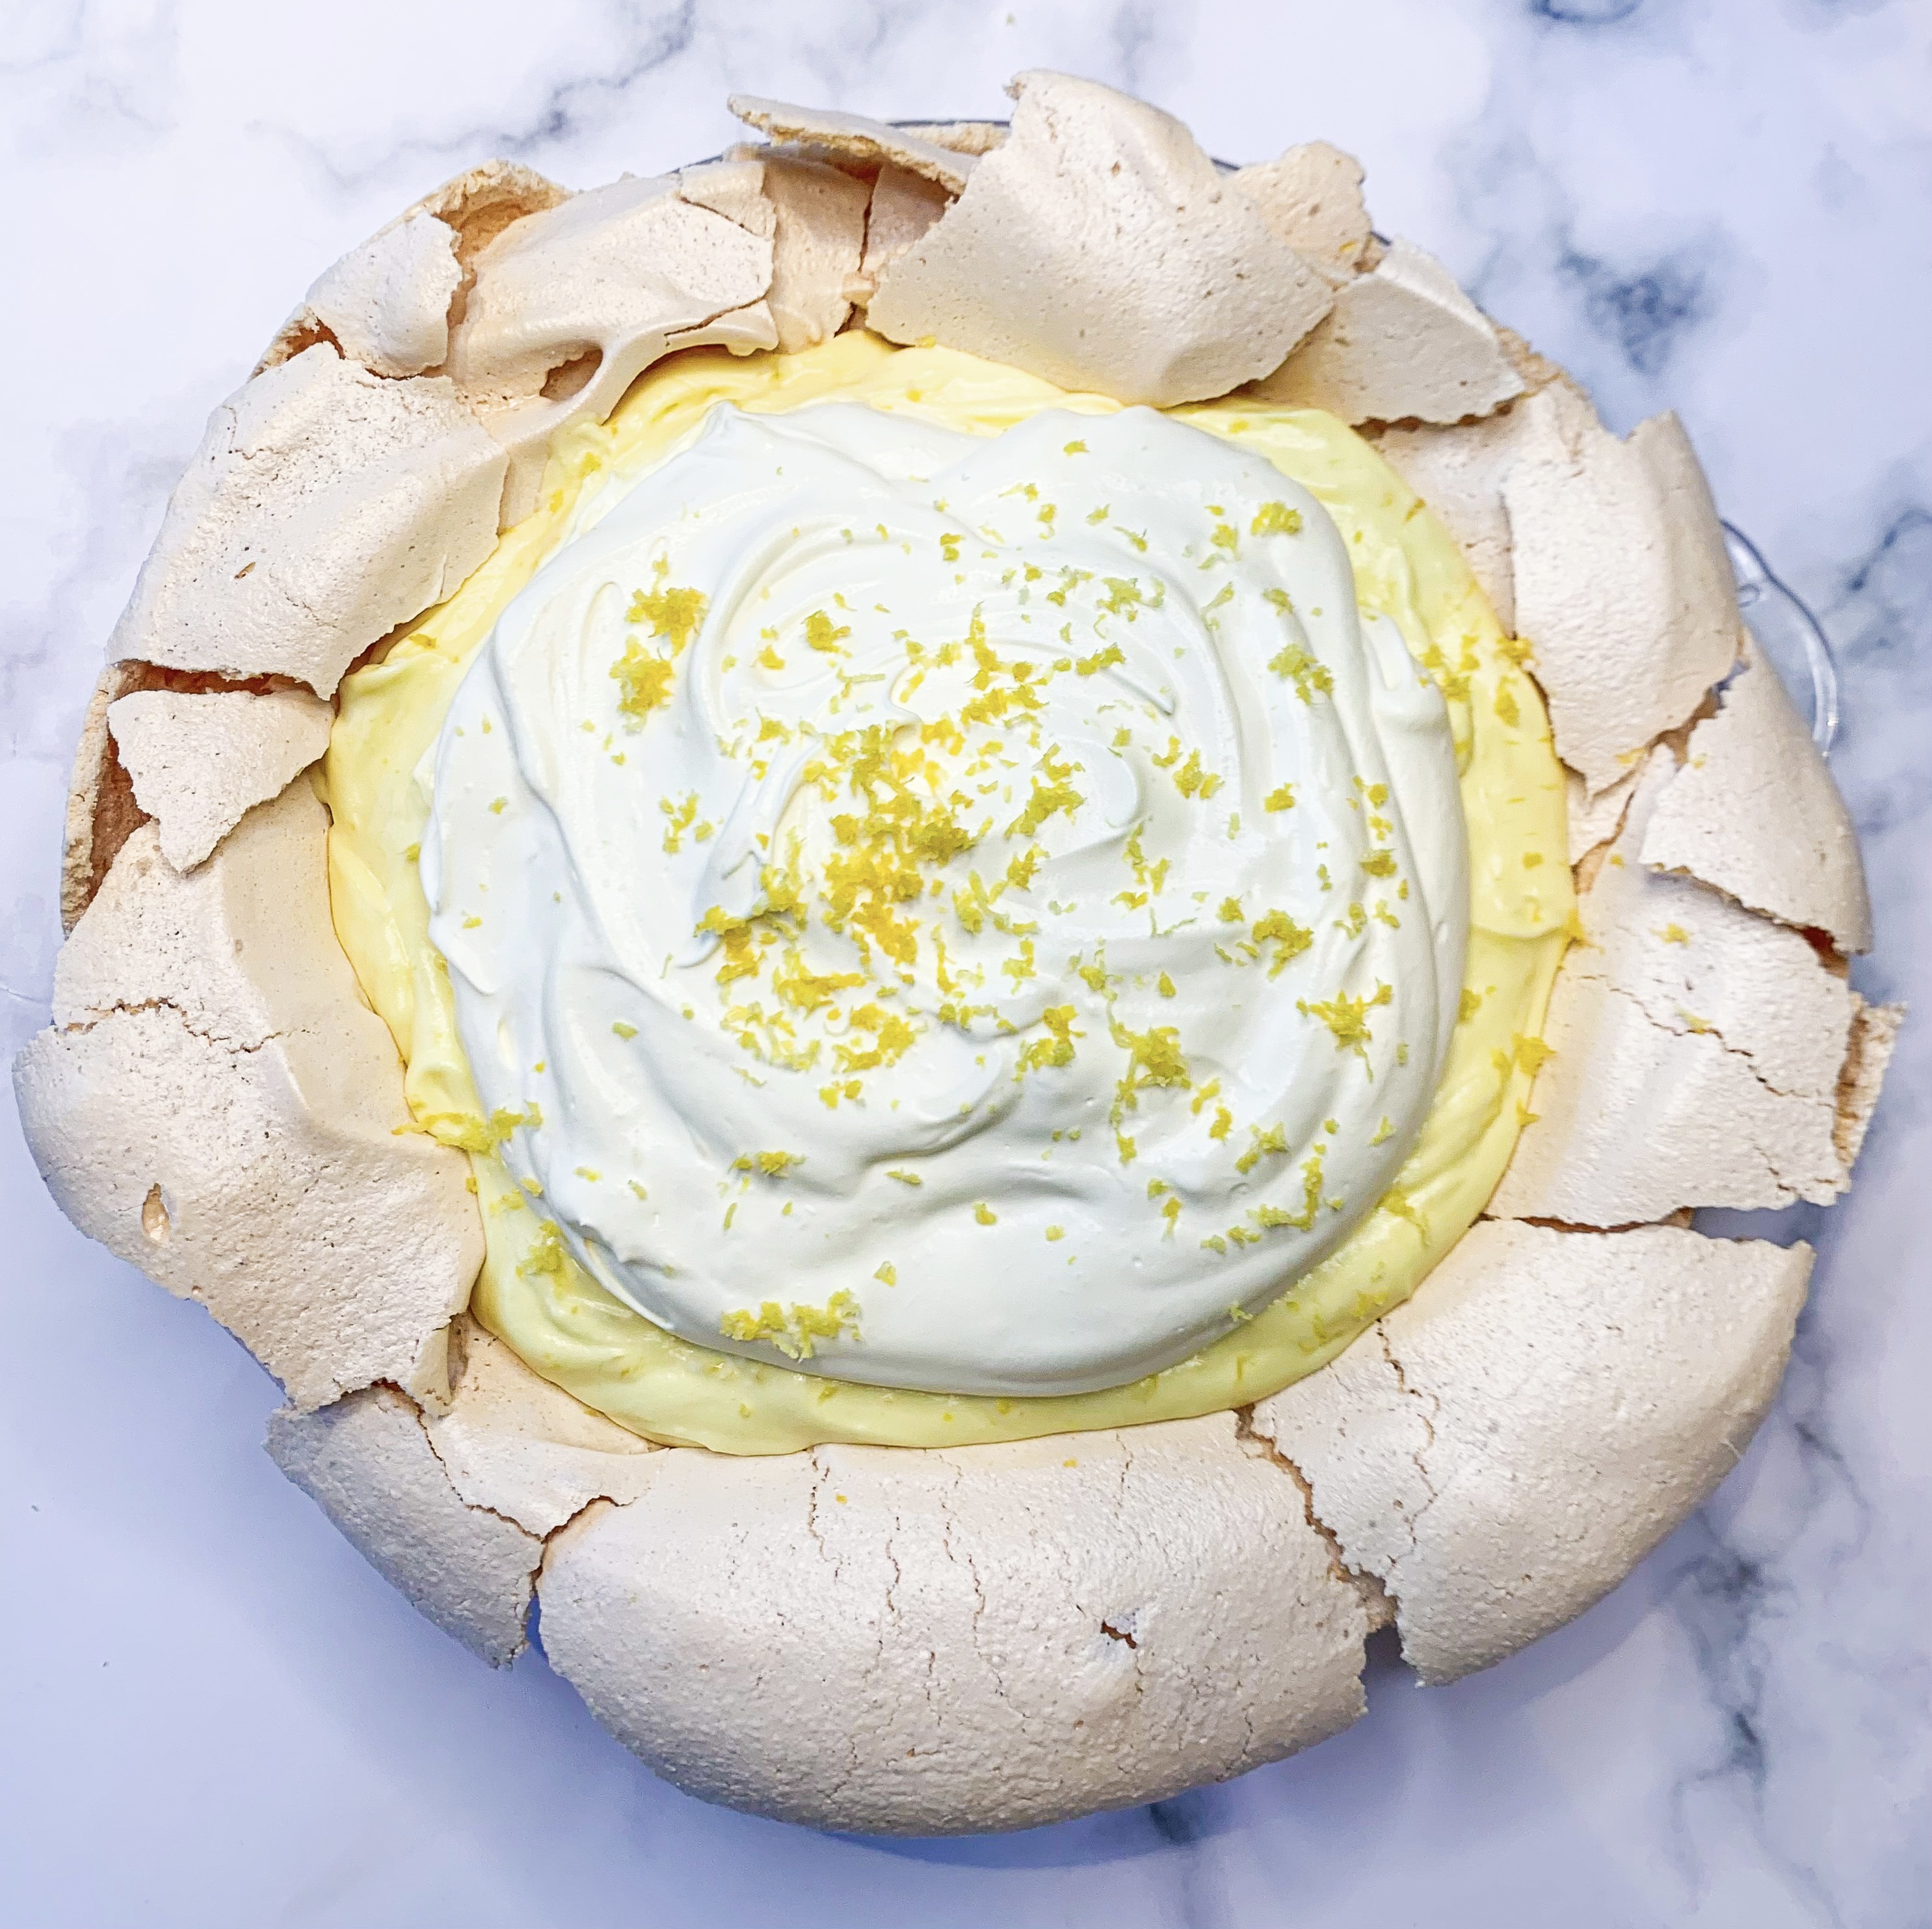

This is the most delicious dessert ever!… Ok, I admit that I’ve said this before about numerous other desserts, but seriously you ‘must’ make this, it really is a little piece of heaven! It has the wonderful flavours of its better-known relation, ‘Lemon Meringue Pie’, but is much lighter as it has no pastry thus is also much easier to make, plus of course, it’s totally gluten-free. Be warned, it’s not the prettiest of desserts – you’ll be rather dismayed when minutes after removing the meringue base from the oven it starts to sink and crack, but fear not, once you add the lemon curd and cream you cover a lot of these undesirable looking cracks. The important thing is that it tastes incredibly good!…
(I’ve found that the size of the dish really does make a difference with this recipe, use a 9” round deep pie dish – I use one which is available from amazon here)
200g caster sugar
4 eggs, separated
¼ teaspoon white wine vinegar
Butter to grease dish
For the Filling:
100g caster sugar
3 tablespoons lemon juice
Grated zest of 1 lemon
¼ teaspoon salt
500ml double cream
To Serve:
Grated zest of 1 lemon (optional)
(9” round, deep pie dish – buttered)
- Beat the egg whites until white and fluffy. Add the sugar and white wine vinegar and beat until stiff and glossy.
- Pour into a buttered pie dish, using the back of a spoon push the meringue up the sides of the dish so it looks a little like a pastry case and will hold the filling after it’s baked.
- Bake in a preheated oven, 150’c, for 50 minutes until puffed and lightly browned. Remove from the oven and allow to cool – don’t be dismayed when the meringue sinks and starts to crack, the filling will cover the multitude of sins!
- Meanwhile, make the lemon curd by placing the egg yolks in a bowl and beating lightly. Stir in the sugar, lemon juice, grated lemon zest and salt. Then put the bowl over a saucepan of gently simmering water (don’t allow the base of the bowl to touch the water) and continue to stir until thickened into a ‘curd’, this can take up to 10 minutes. Allow to cool.
- Whip the cream until stiff.
- Gently fold the lemon curd into half of the whipped cream, pour this lemon curd mixture into the meringue pie shell. Top the pie with the remaining whipped cream and sprinkle with the grated lemon zest.
- Chill in the fridge before serving – serve cold.
Rhubarb Crème Brûlêe (Serves 6)
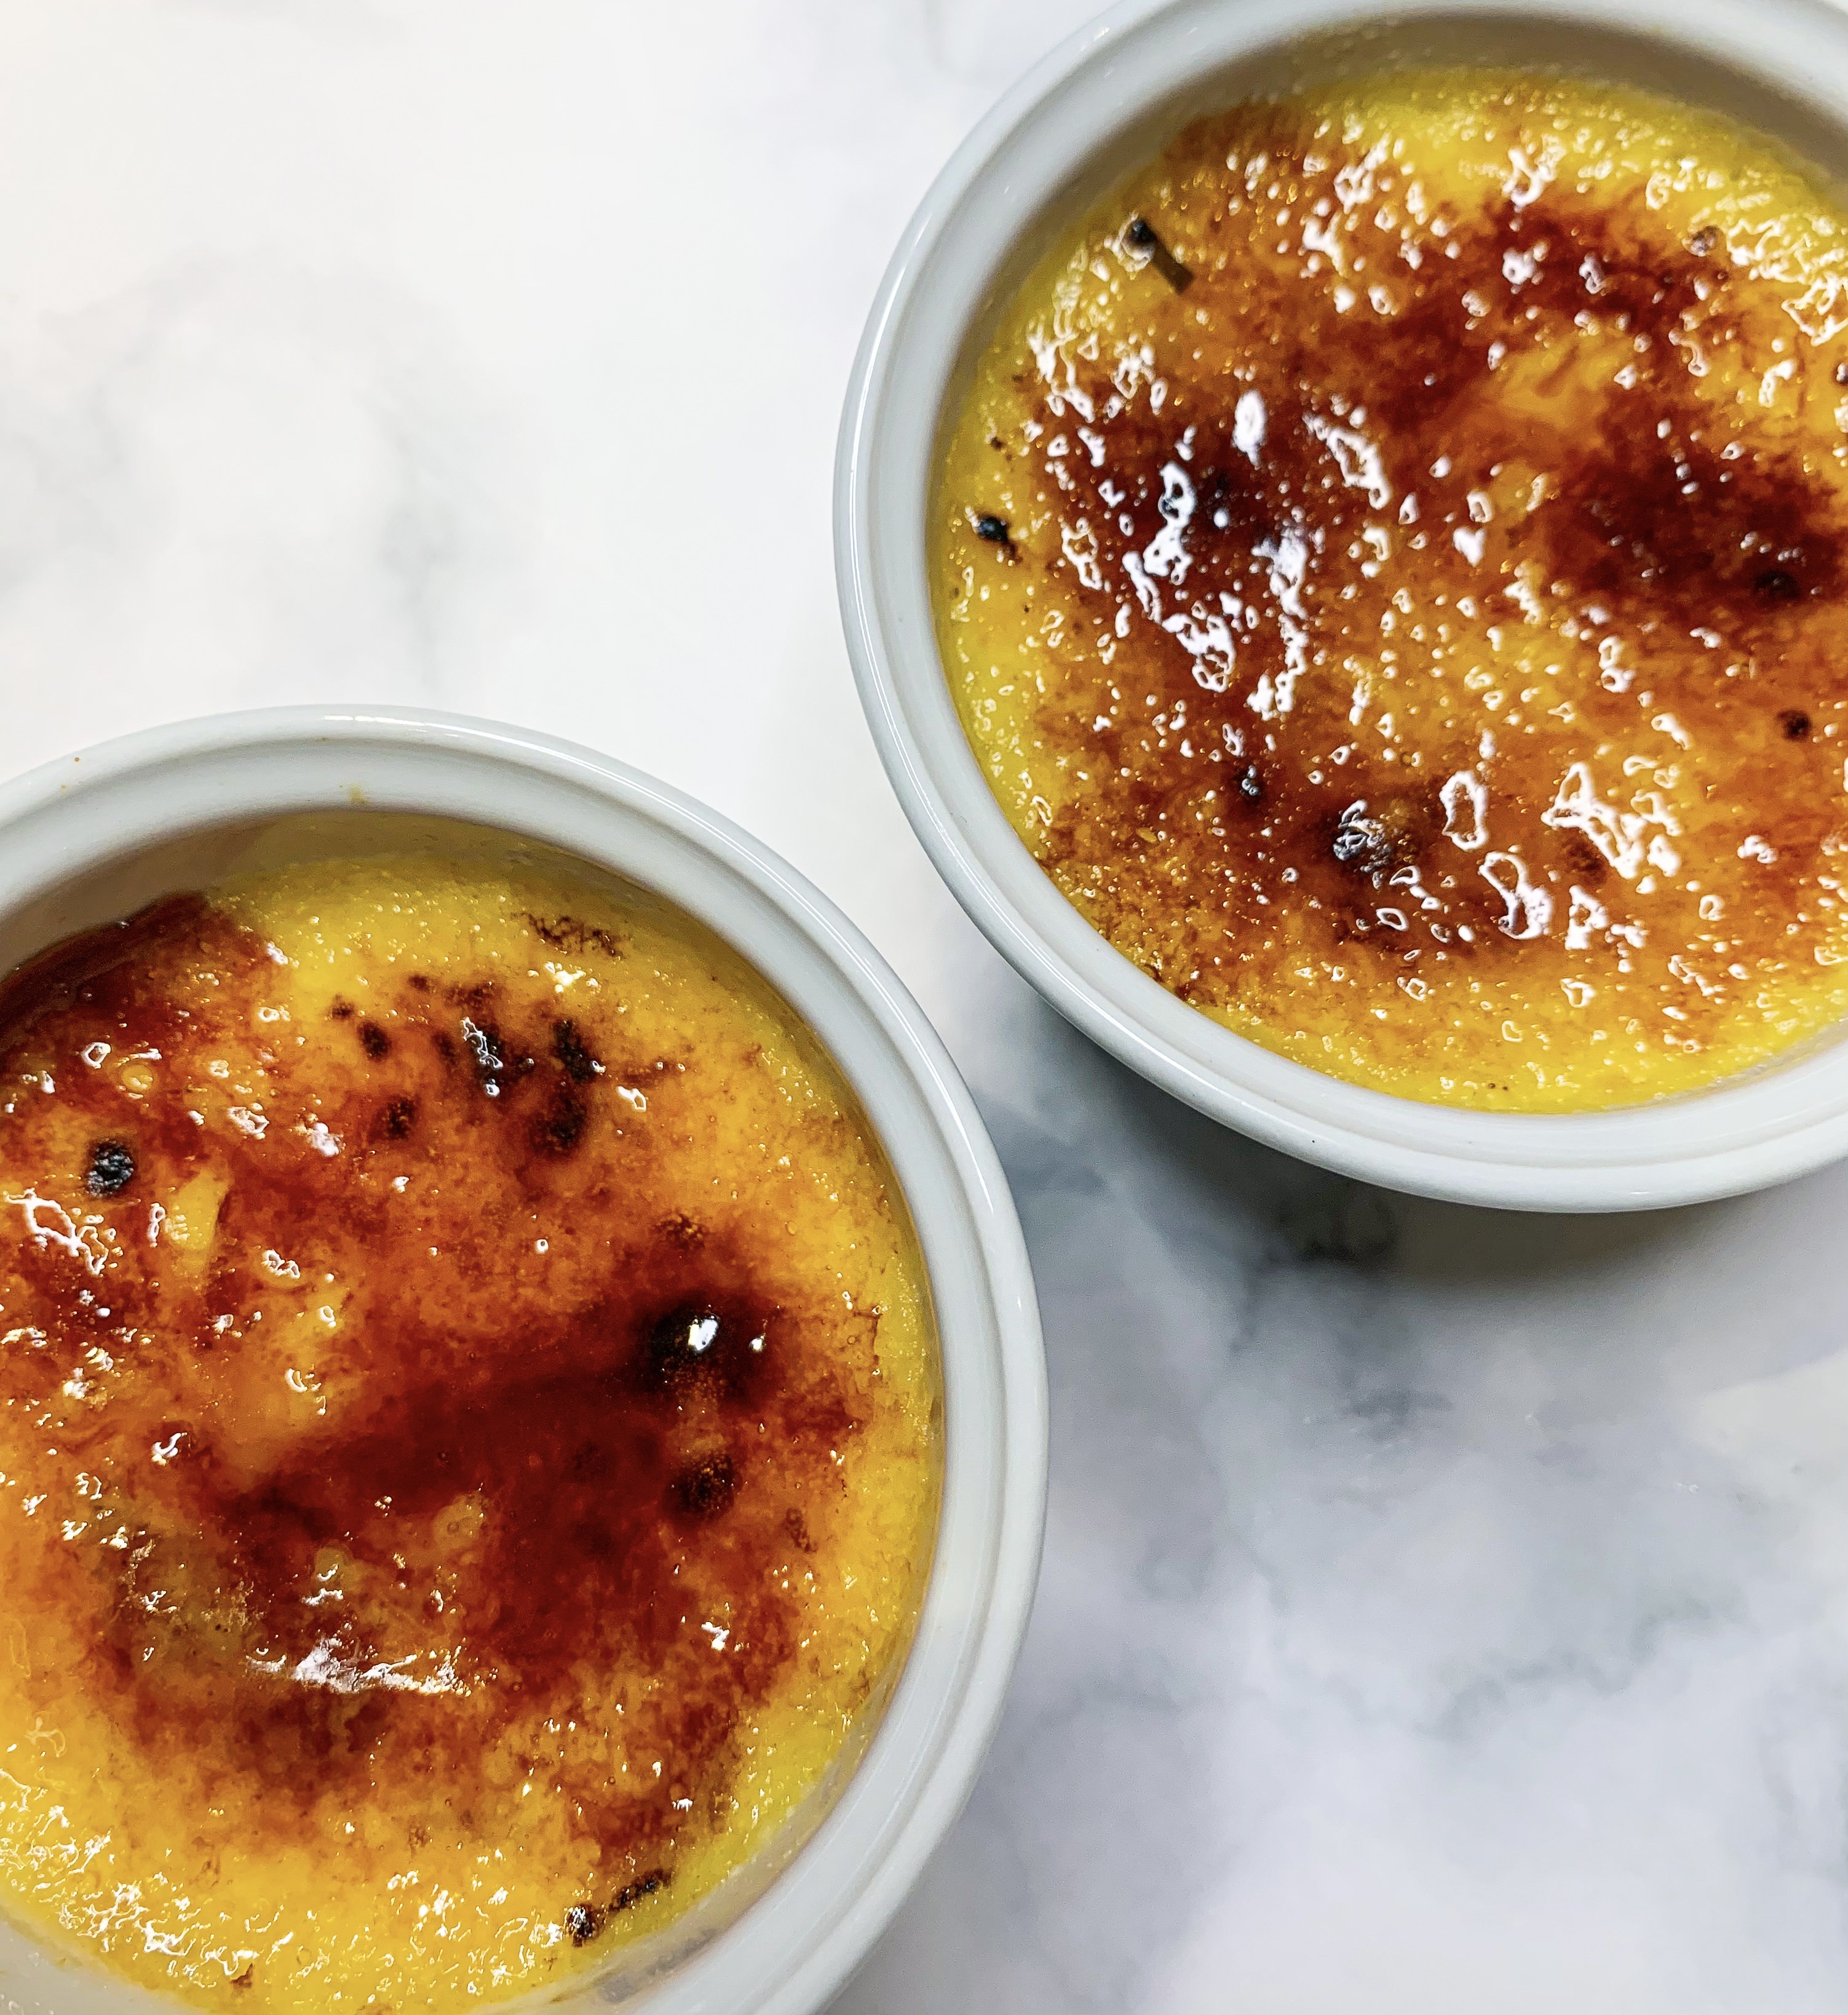
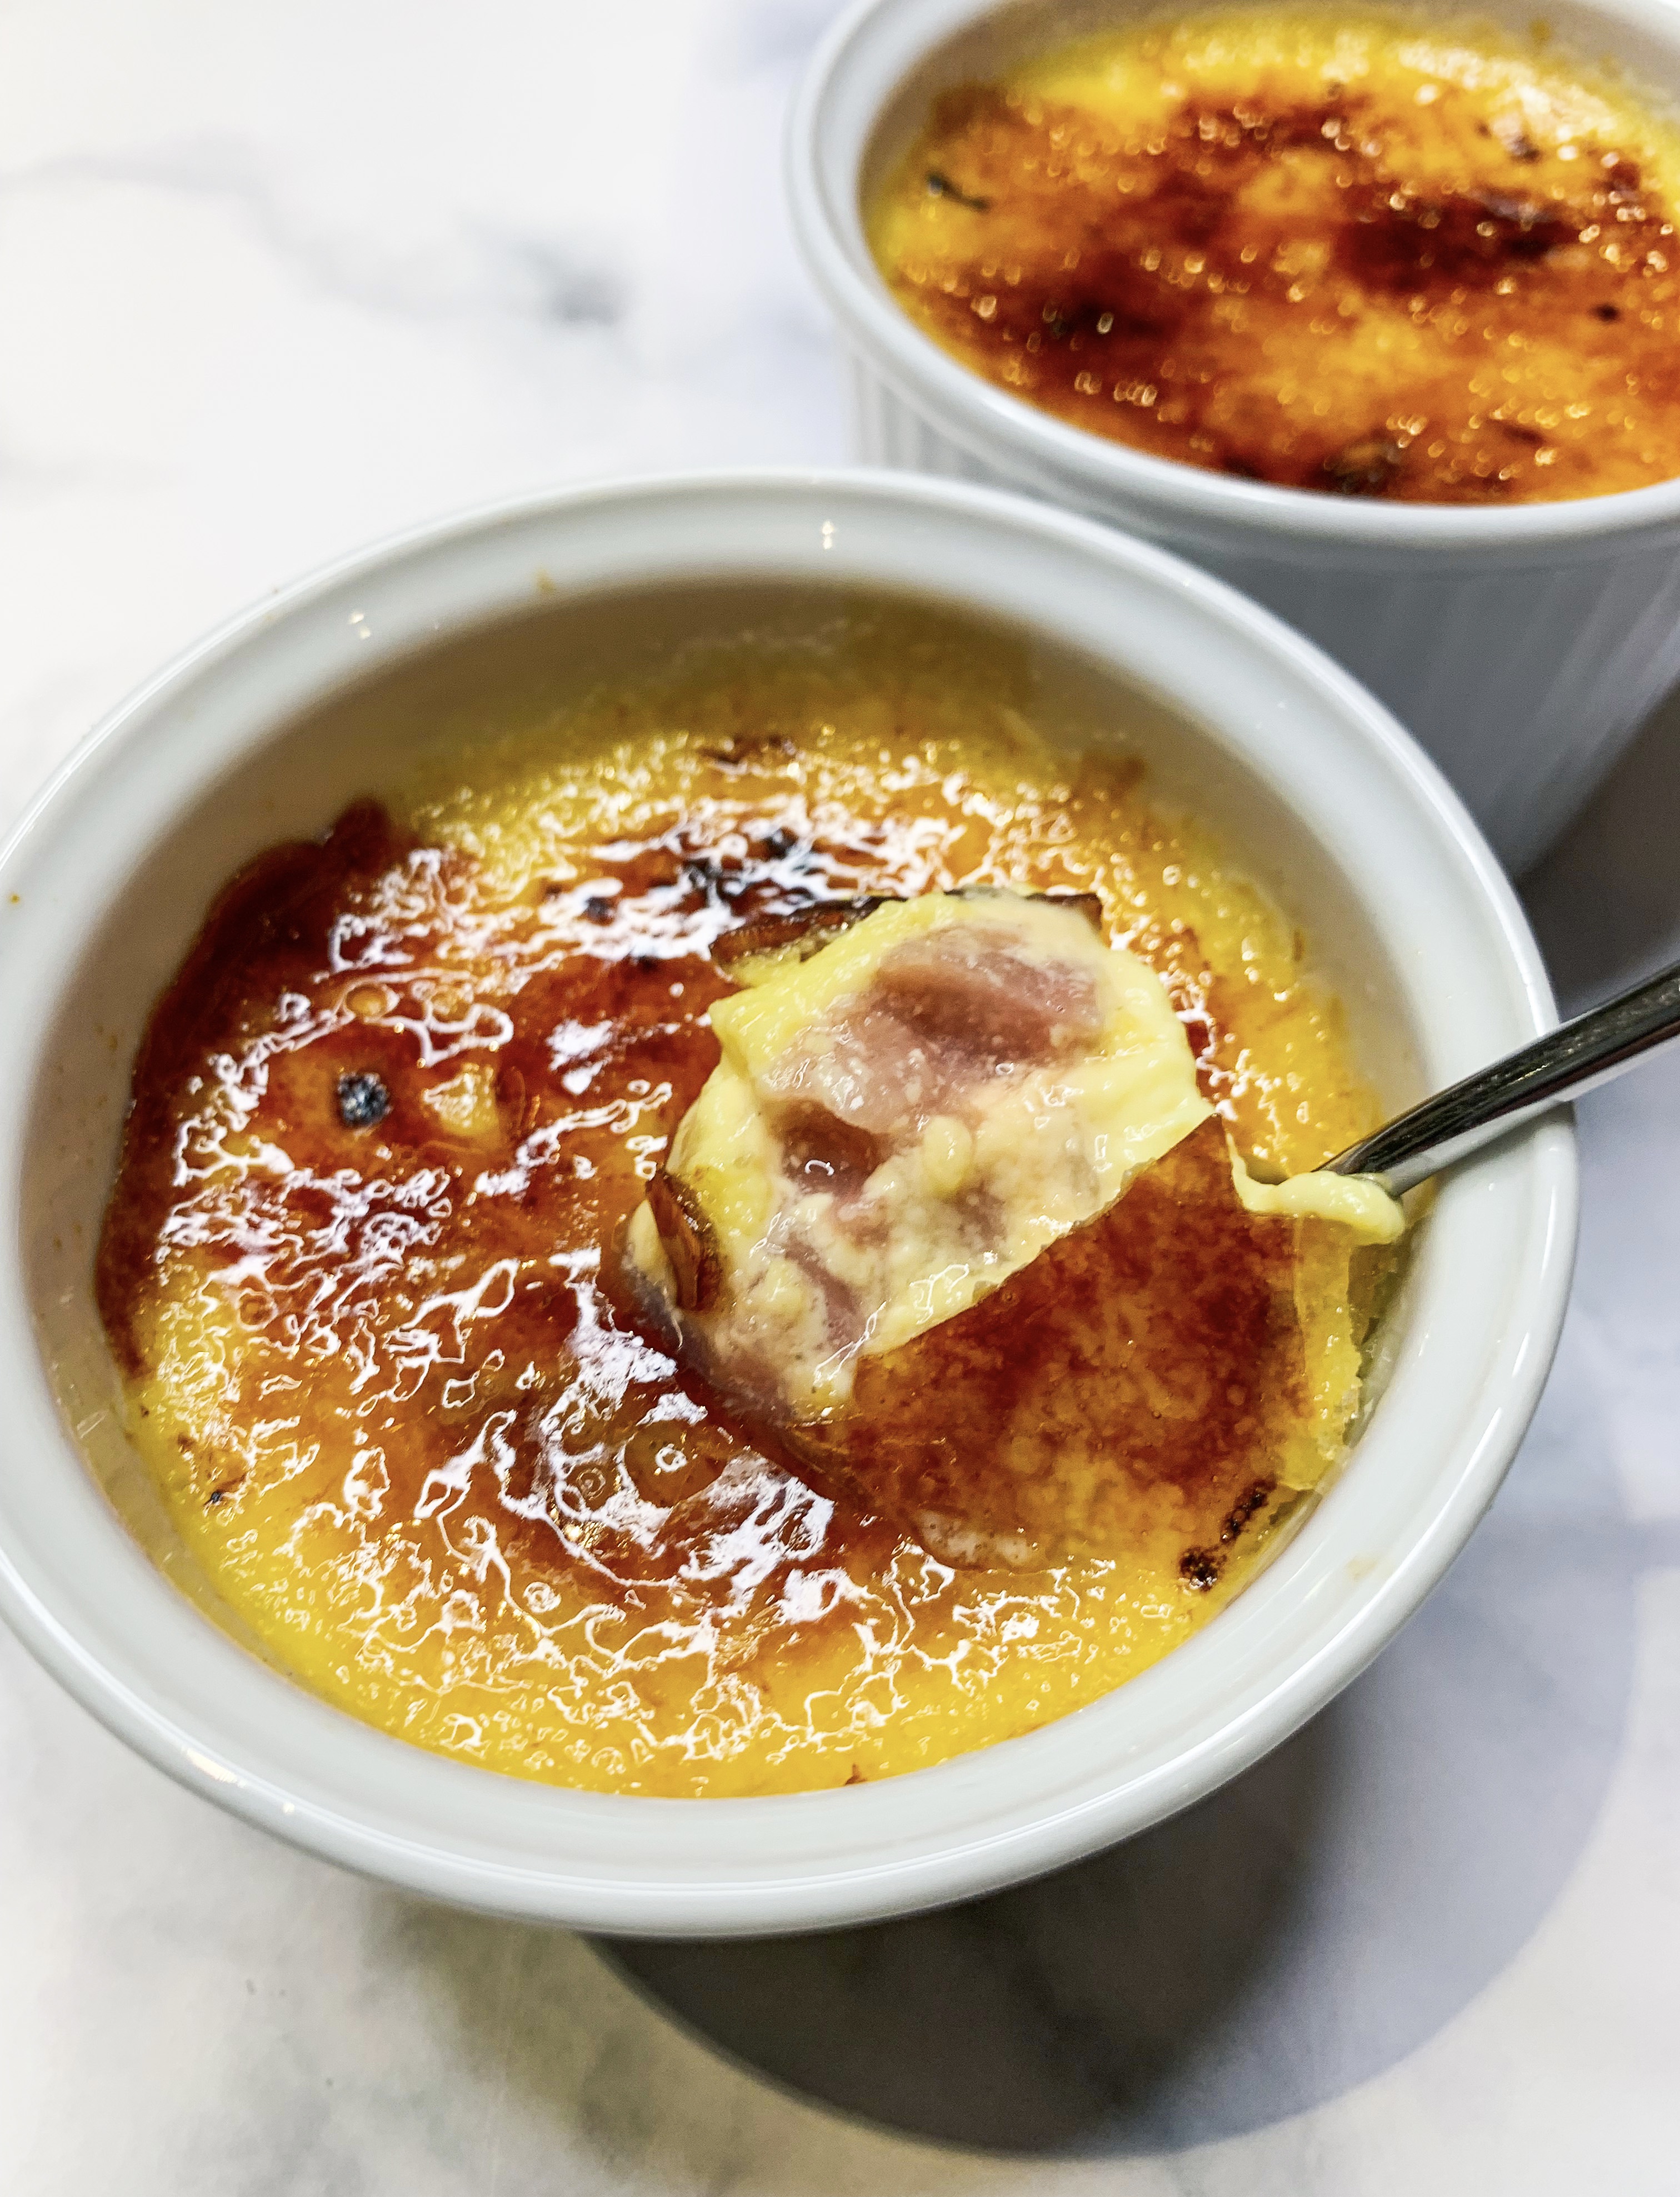
Who can resist the combination of rhubarb and custard?!… In this recipe the French classic, crème brûlée, is given an English twist with the addition of rhubarb and I must say, it’s better for it! The slightly tart rhubarb cuts the creamy richness of the brûlée beautifully.
I suggest you use a kitchen blowtorch to create the caramelised topping as it’s much easier than trying to get your grill hot enough to do it. Dare I mention the ‘Amazon’ word?…kitchen blow torches can be found there for around £12-14; they are a great addition to any kitchen and you will seriously appreciate the wonderful crunch they will give to your Brûlée!
400g rhubarb cut into 1cm slices
4 tablespoons caster sugar
330ml double cream
160ml whole milk
50g caster sugar, plus more for caramelising
Pinch of sea salt
4 large egg yolks
1 teaspoon vanilla bean paste
You will need 6 ramekins with 125ml capacity
- First of all place the rhubarb in a roasting dish and sprinkle over 4 tablespoons of caster sugar. Roast in a preheated oven, 180’c fan, for 20-30 minutes until soft. Divide into the ramekins and chill.
- In a small saucepan over a medium heat, warm the cream, milk, sugar, and salt until the sugar has melted.
- In a bowl, whisk together the egg yolks. Gradually add the warm cream mixture, stirring rather than whisking, as you don’t want to create too much froth.
- Mix in the vanilla paste then use a sieve to strain the cream mixture into large jug.
- Gently pour the mixture between 6 ramekins, over the chilled rhubarb.
- Place a tea towel over the base of a roasting tin (this will stop the ramekins from slipping), then place the ramekins in the tin. Pour enough boiling water into the roasting tin so that it comes halfway up the sides of the ramekins. Cover with foil.
- Place the roasting tin in a preheated oven, 150’c fan, cook for about 40-45 minutes until they are just about set but still a little ‘jiggly’.
- Remove the ramekins to cool on a rack. When cool, refrigerate until ready to serve.
- To serve, sprinkle with a thin, even layer of sugar (about 1½ teaspoons), then use a kitchen blow torch to caramelise the sugar – you may need to lift the ramekin to swirl the caramel evenly across the top. Serve immediately.
Apple and Almond Puddings (Serves 6)
This is one of those delicious, comforting puddings that was made for a winters day, but is just as good in the summer – you really have got to make it! They are wonderfully light; just make sure you serve them with lashings of cream!… The recipe is from Bill Granger’s cookbook, ‘Bills Open Kitchen’. You can substitute the plain flour for gluten-free flour – I use ‘Dove’s’.
150g unsalted butter
150g caster sugar
3 Granny Smith apples, peeled, cored and sliced
1 teaspoon natural vanilla extract
Batter:
175g unsalted butter, cubed (plus extra to grease ramekins)
175g caster sugar
3 eggs
100g ground almonds
100g plain flour (gluten- free if required – see note above)
2 teaspoons baking powder
1 teaspoon cinnamon
(To serve – cream)
*You will need six large 250ml ramekins, greased.
- For the apples – place a saucepan over a medium-high heat and add the butter and sugar. Stir until the butter has melted and the sugar has dissolved. Add the apple and vanilla and cook for 10-15 minutes until soft and caramelised.
- To make the batter, cream the butter and sugar together until pale and creamy. Add the eggs, one at a time, stirring well until combined. Fold in the ground almonds, flour, baking powder and cinnamon and mix until combined.
- Grease six 250ml ovenproof ramekins with butter. Arrange the caramelised apples on the bottom. Divide the batter evenly between the ramekins and smooth over with the back of a spoon. Cook in a preheated oven, 180’c fan, for 25 minutes until lightly golden.
- Run a knife around the edge of each ramekin then invert onto a serving dish. Serve with cream.
Pineapple and Black Pepper Crumble (Serves 4-6)
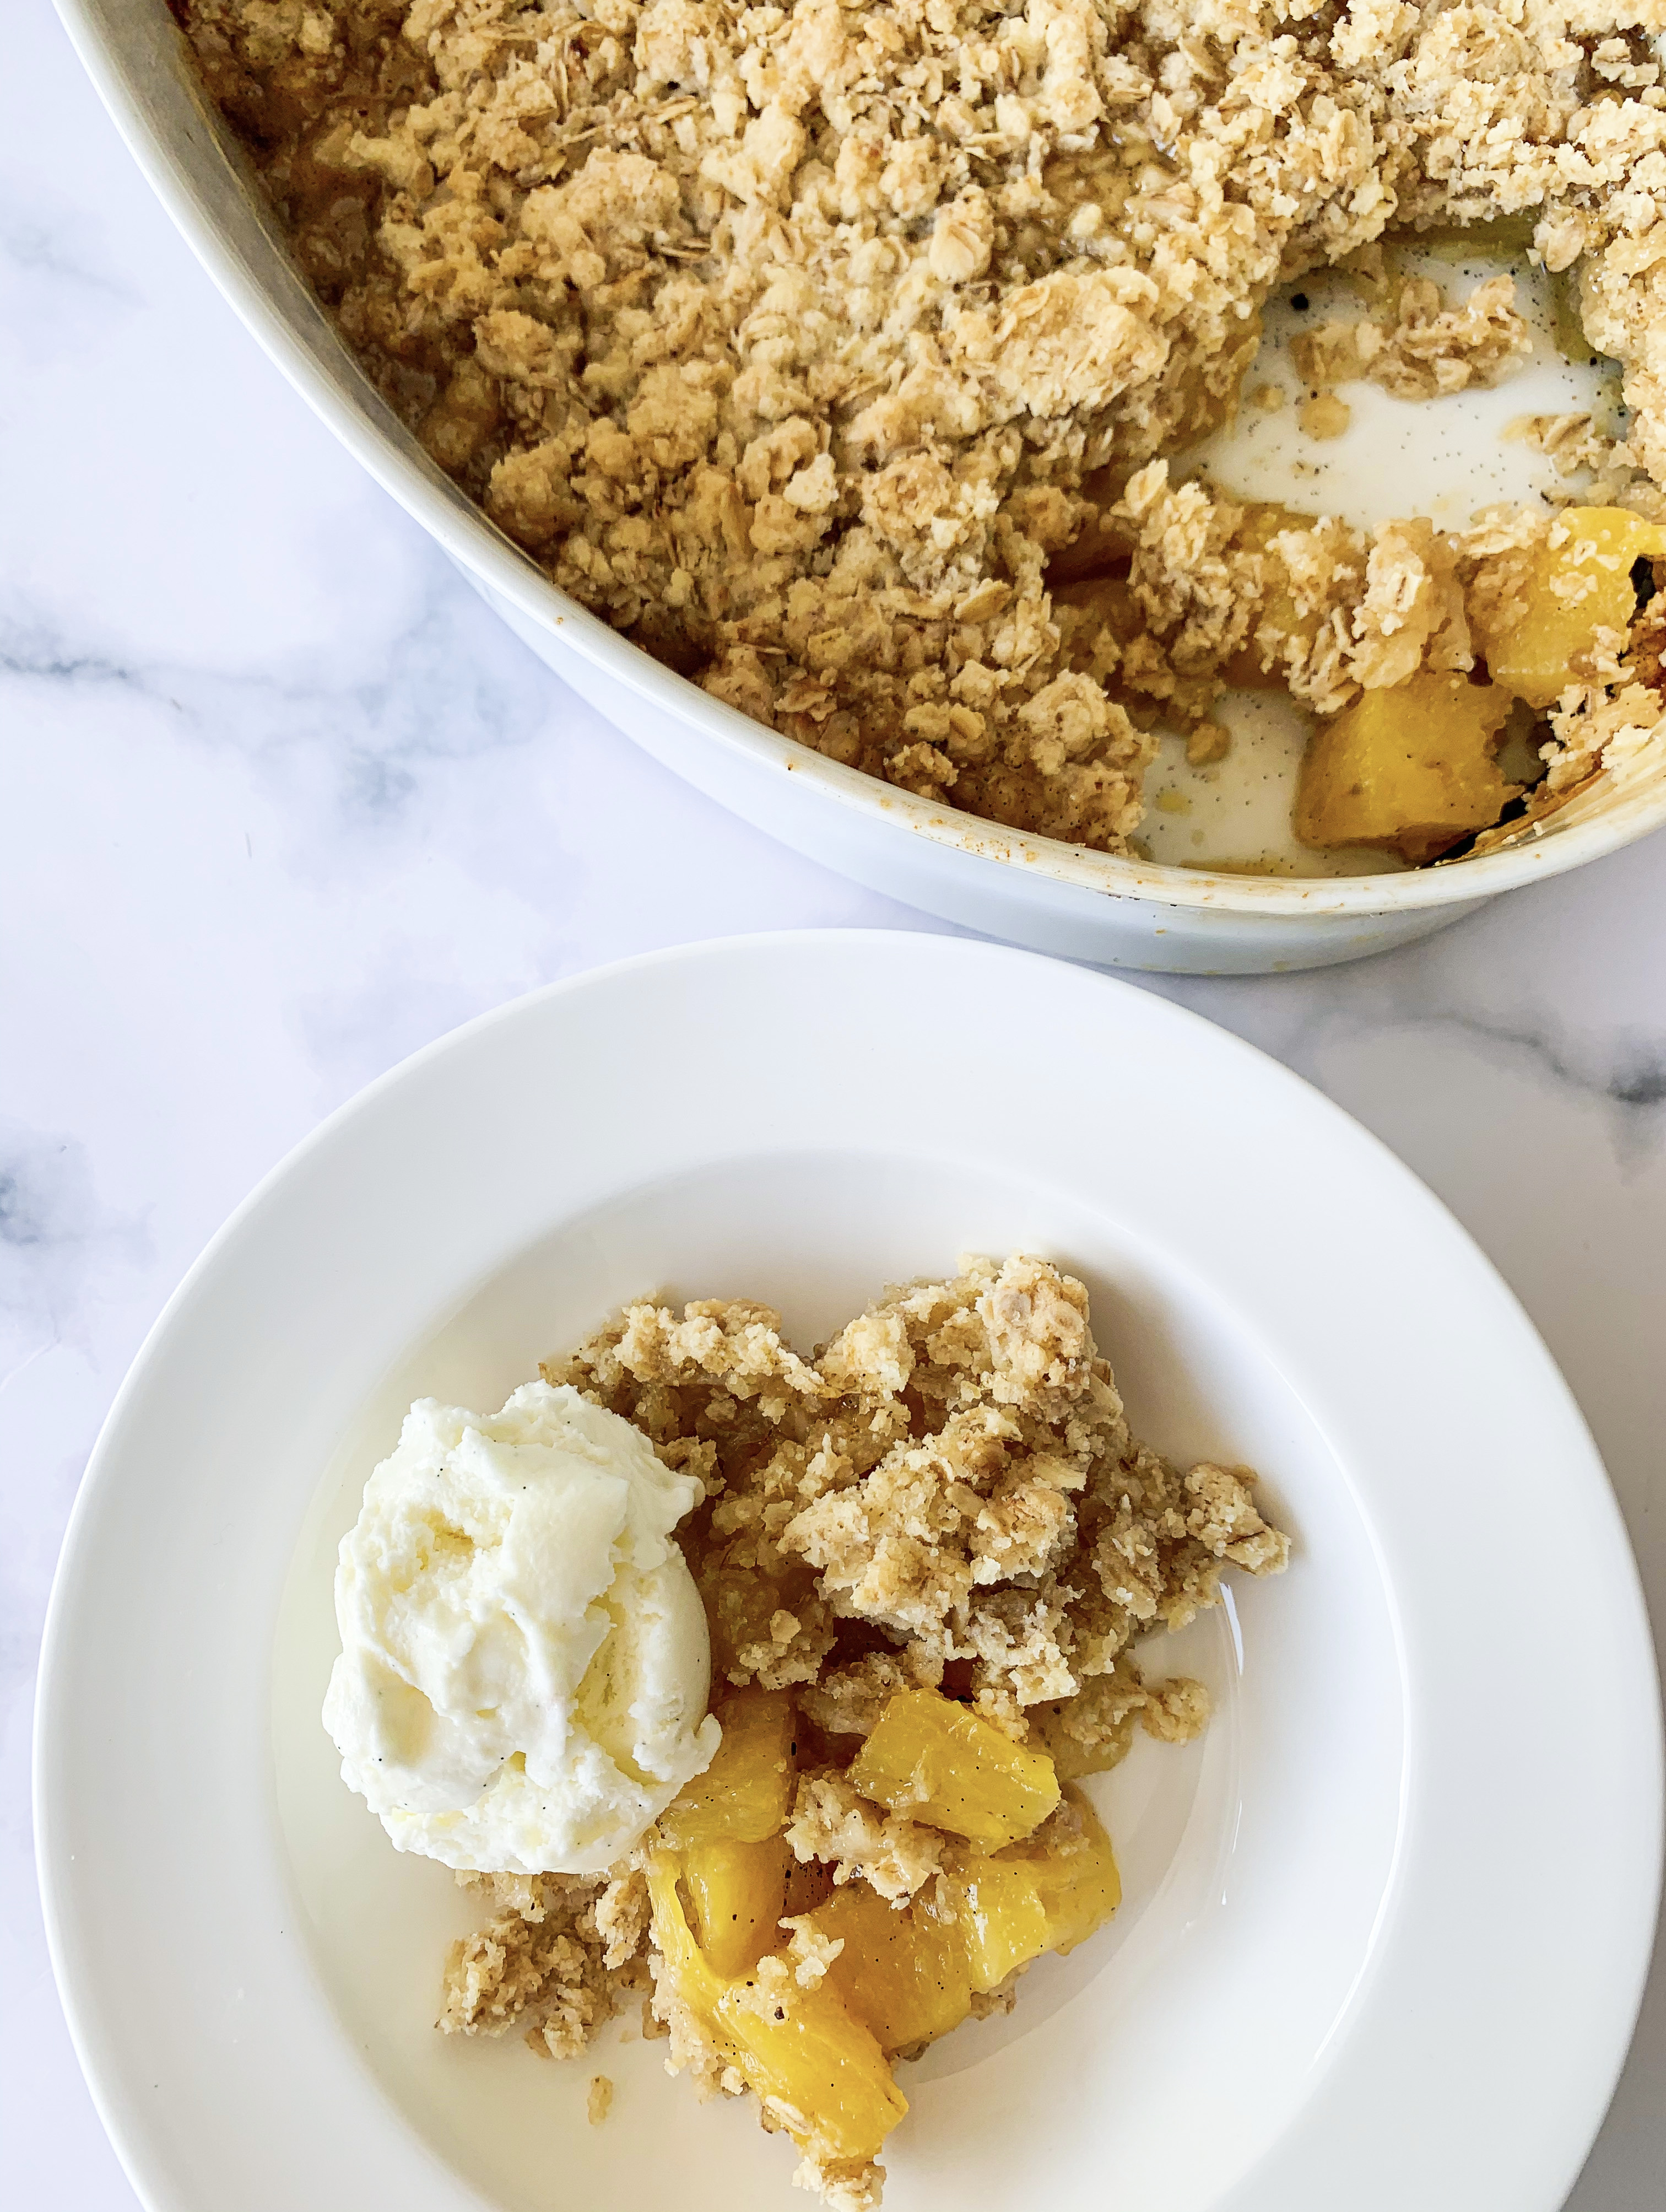
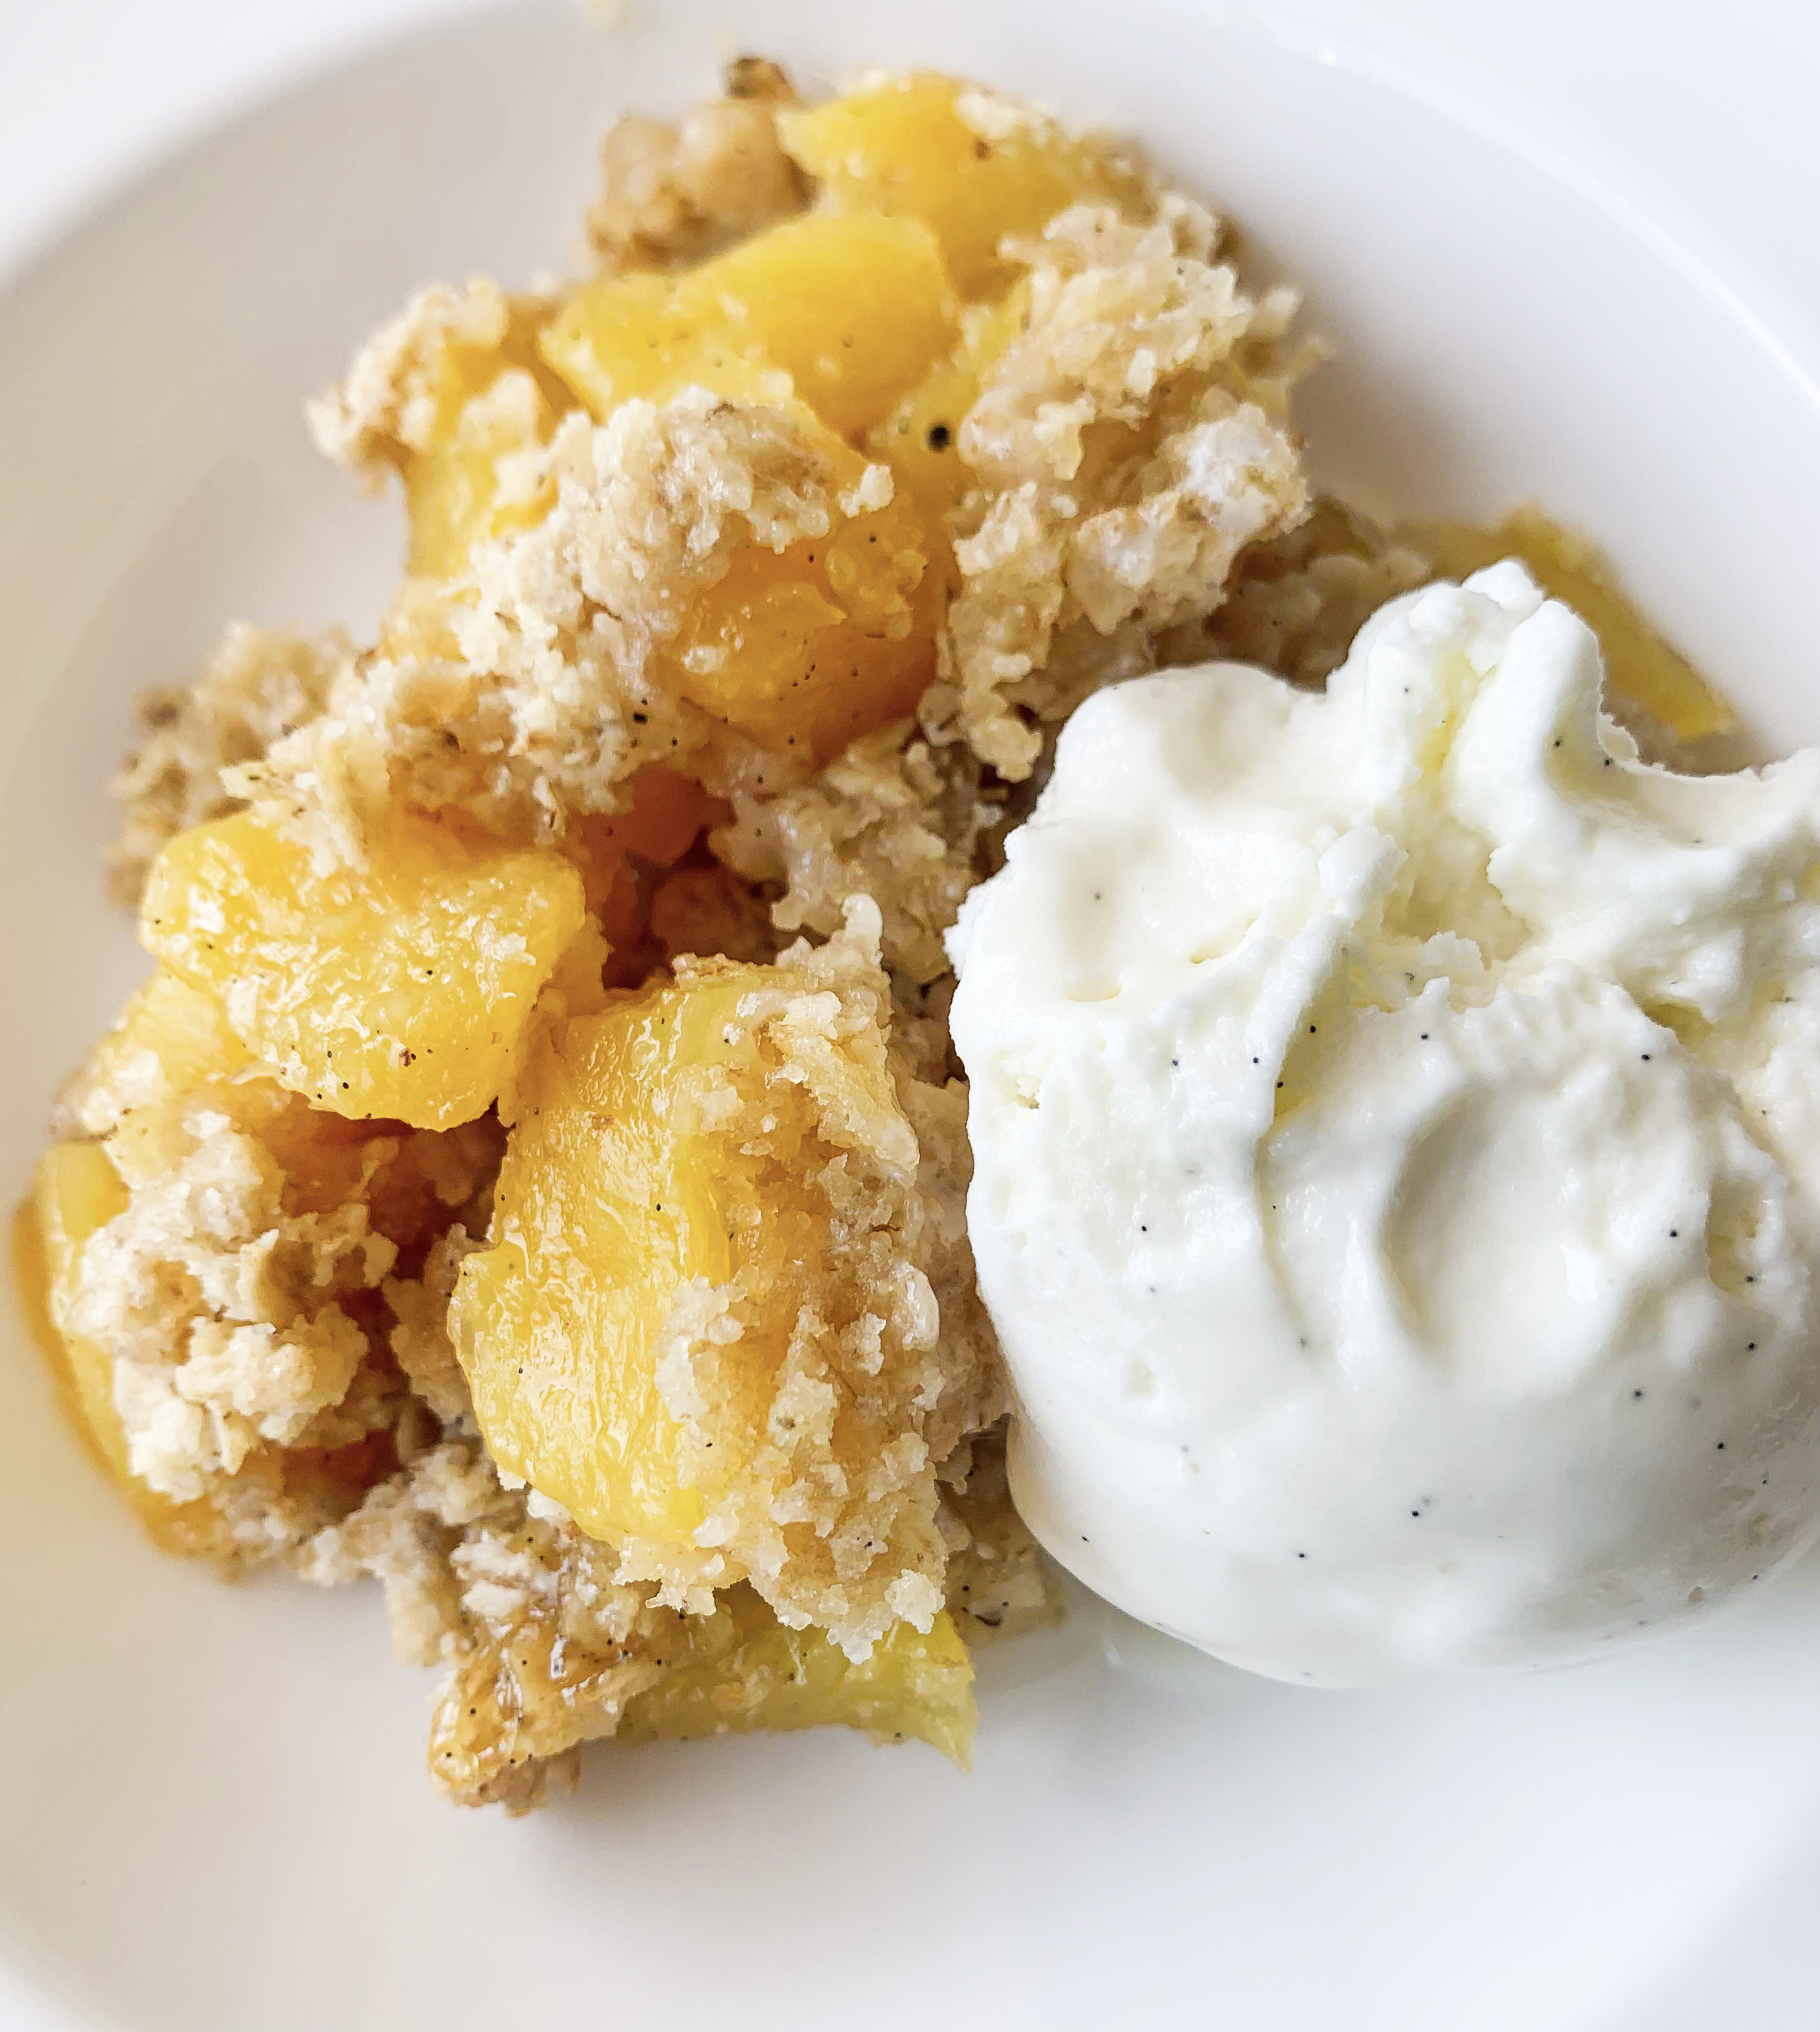
This is no ordinary crumble(!) – the tang of the pineapple is beautifully complemented by the spice of the black pepper, it is a delicious and unusual take on the British classic crumble. The recipe is from the cookbook ‘Dishoom’, which is by the owners of the Indian restaurant chain of the same name. Once you’ve tried this crumble you may find it difficult to return to the classic fruit versions…
*This crumble recipe works well with gluten free plain flour – I used ‘Doves’.
1 large, fresh ripe pineapple (you need about 750g flesh)
1 vanilla pod or 2 teaspoons vanilla extract
100g granulated sugar
A few twists of black pepper
For the crumble:
100g plain flour (gluten free if required)
100g rolled oats
100g granulated sugar
100g salted butter, cubed at room temperature
To Serve:
Vanilla Ice-cream or a dollop of fresh cream
- Peel the pineapple, prising out the ‘eyes’ and cut the flesh into 2 cm chunks, discarding the hard core.
- Place the pineapple chunks in a saucepan with 200ml water. If using a vanilla pod, split it in half and run a knife down the length to remove the seeds, add both the seeds and the pod to the pan (if using vanilla extract you will need to add this later). Simmer over a medium-high heat for 20-25 minutes until the pineapple is soft. If the pan becomes a little dry add a little more water.
- Once the pineapple is soft, add the sugar and simmer for an extra 5 minutes. Add the black pepper and if using the vanilla extract instead of the vanilla pod, add it now. Turn off the heat and leave to one side.
- Meanwhile make the crumble. Mix the dry ingredients together in a large bowl. Add the butter and rub it into the mixture with your hands until it is fully incorporated – there should be no loose flour left.
- Spread the pineapple mixture in a medium baking dish and top with the crumble mixture. Bake in a preheated oven, 180’c fan, for 30-40 minutes until the topping has formed a golden crust.
- Allow to stand for 5 minutes then serve with vanilla ice-cream or a dollop of fresh cream (or custard!).
Roast Apricot & Orange Blossom Fool (Serves 8)

This is a fantastic recipe for making the most of fresh apricots. The flavours are perfectly balanced; the sweetness of roasted apricots is delicately cut by whipped cream which is combined with a little Greek yogurt, orange flower water and honey. I have taken the recipe from Diana Henry’s cookbook ‘Simple’, and yes it is simple but very impressive! (Any leftovers make a great, indulgent breakfast!!)
900g apricots, halved and pitted
75ml white wine or water
1 teaspoon vanilla extract
115g granulated sugar
300ml double cream
4 tablespoons Greek yogurt
5 tablespoons orange blossom honey, or to taste, plus more to serve
3 teaspoons orange flower water, or to taste
Toasted almond flakes, to serve
- Put the apricots in a gratin dish, cut sides up, so that they lay in a single layer. Mix the wine or water with the vanilla, then pour it over the apricots. Sprinkle evenly with the sugar and roast in a preheated oven, 190’c fan, for 30-45 minutes until completely soft. Leave until cold.
- Remove eight of the best looking apricot halves to put on top of each serving. Puree the rest of the fruit and any of its juice in a food processor.
- Whip the cream until it forms soft peaks, then stir in the yogurt, honey and orange flower water.
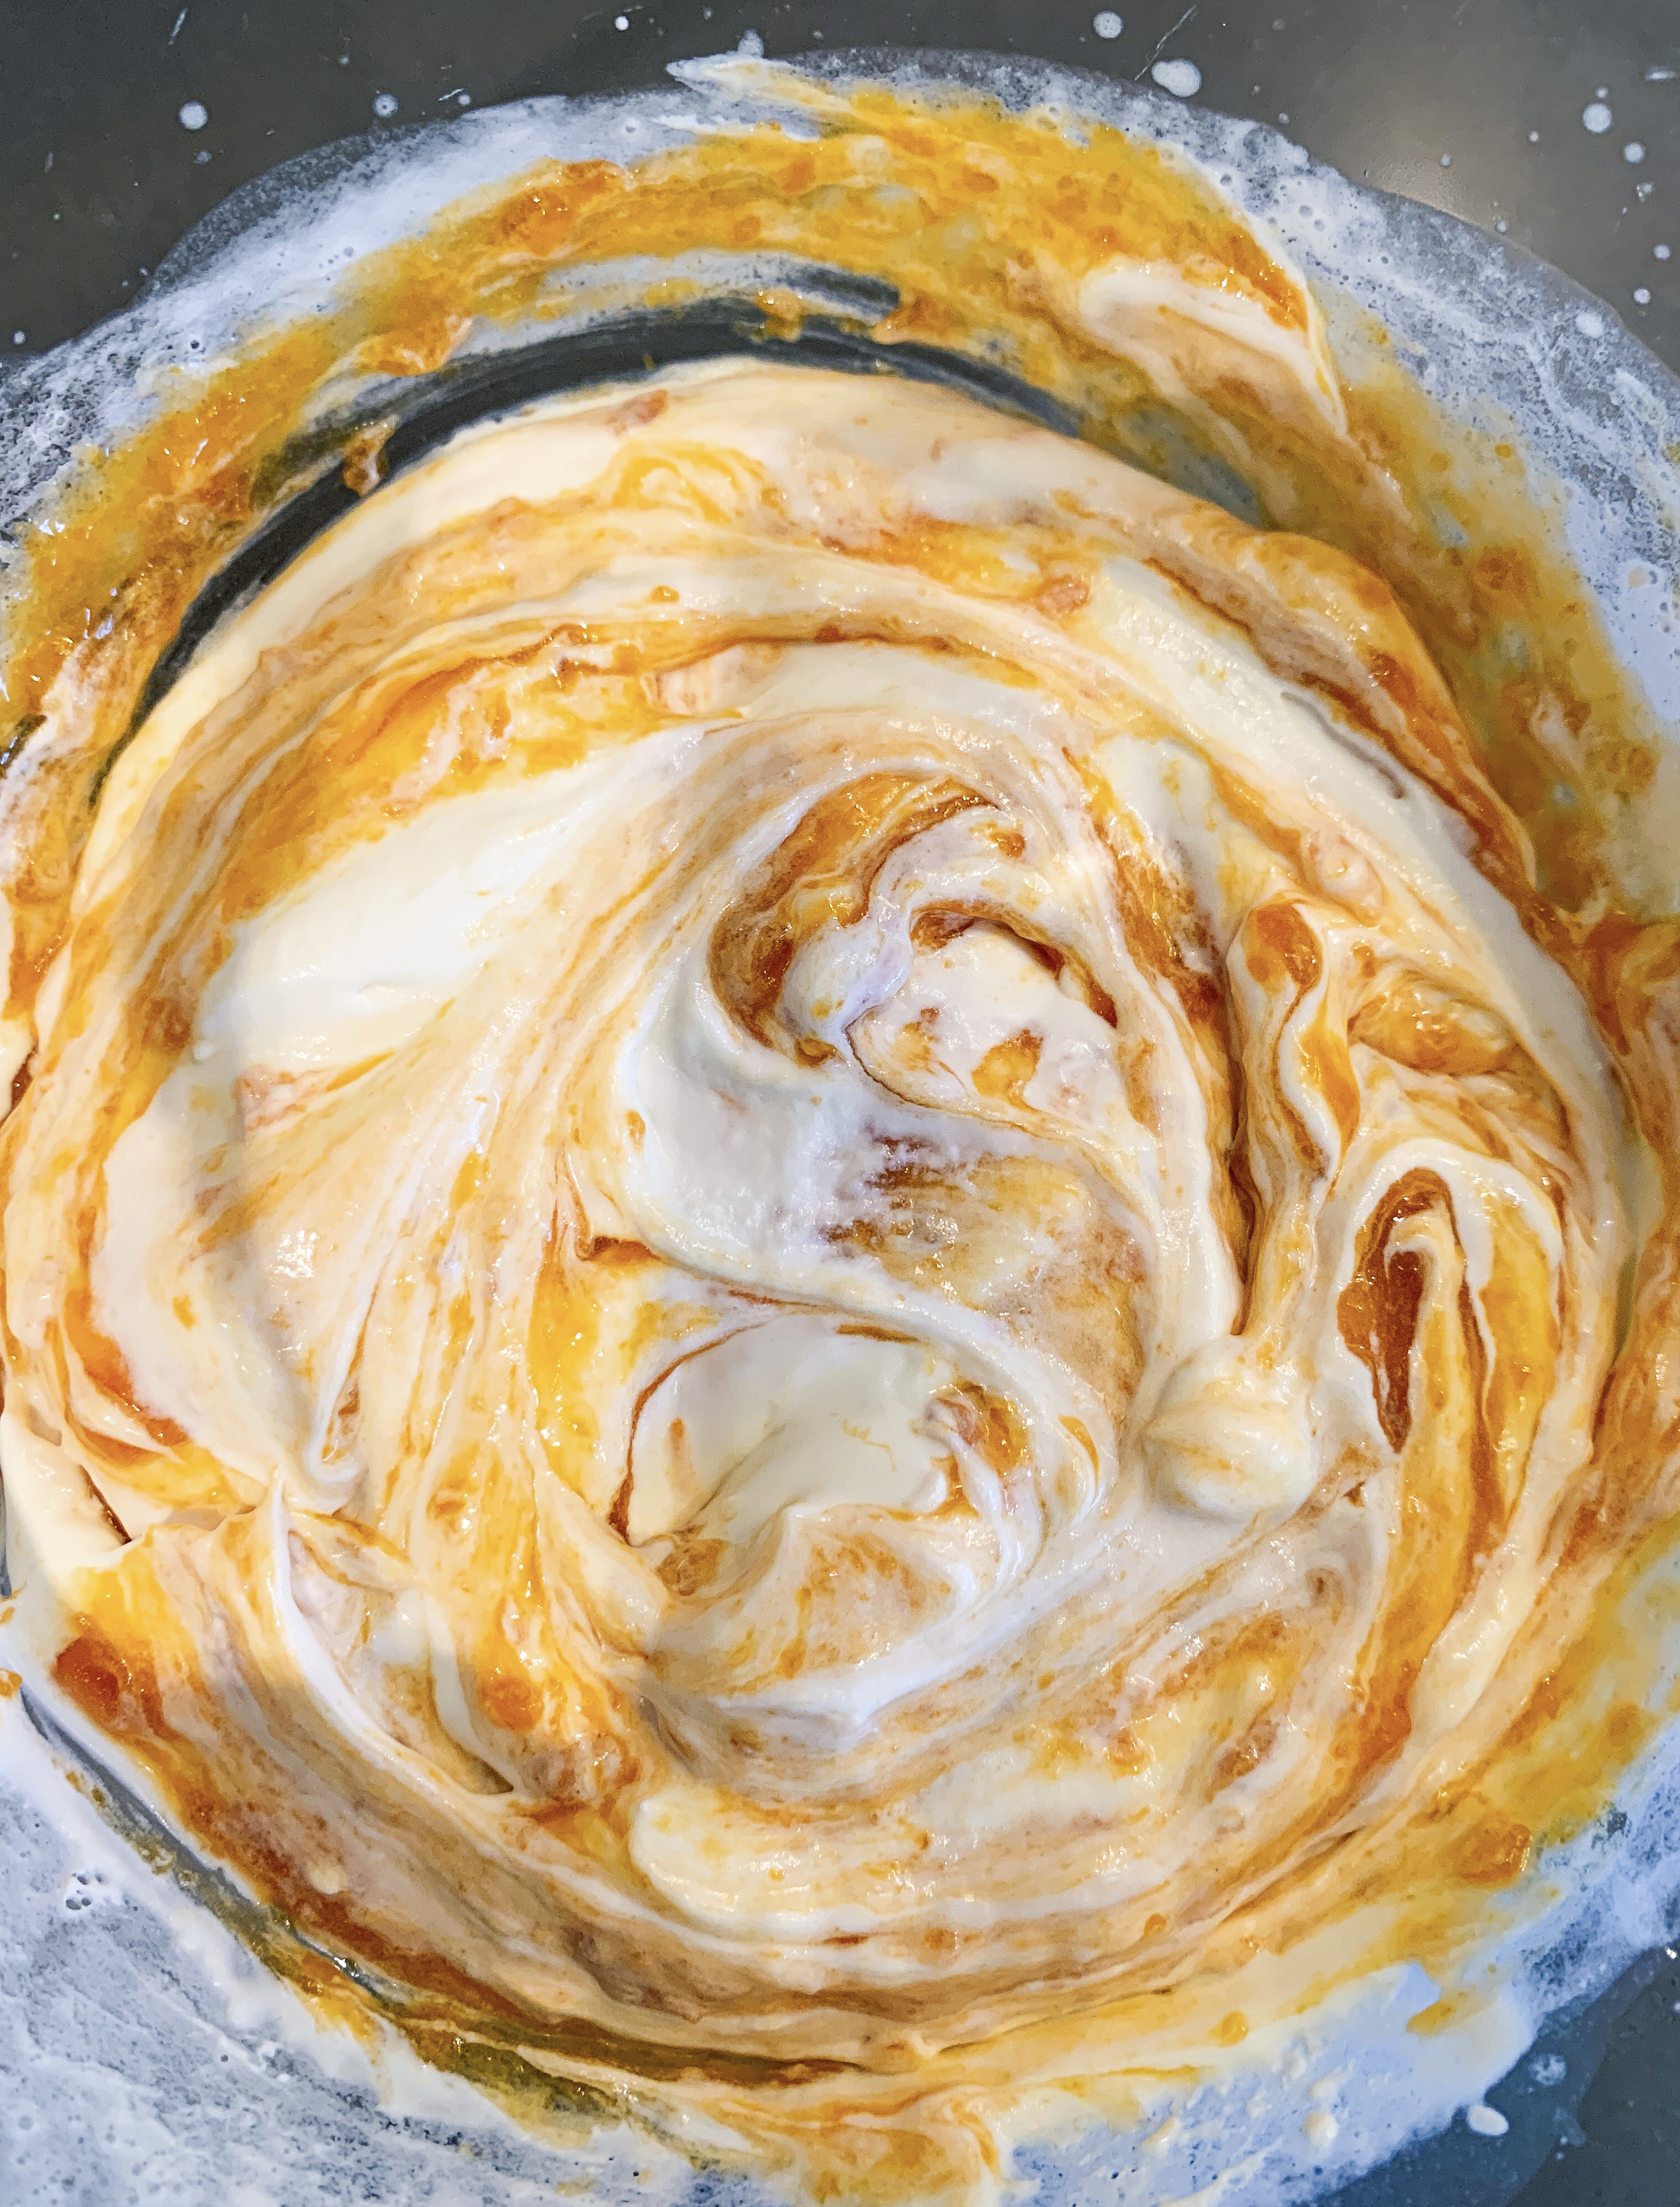
- Fold the purée through the cream, don’t over mix – you want it to be marbled with the bright orange colour. (You can add more flower water to taste).
- Spoon into bowls, top each with an apricot half, if you want a little more sweetness drizzle with extra honey, then sprinkle with the toasted almonds.
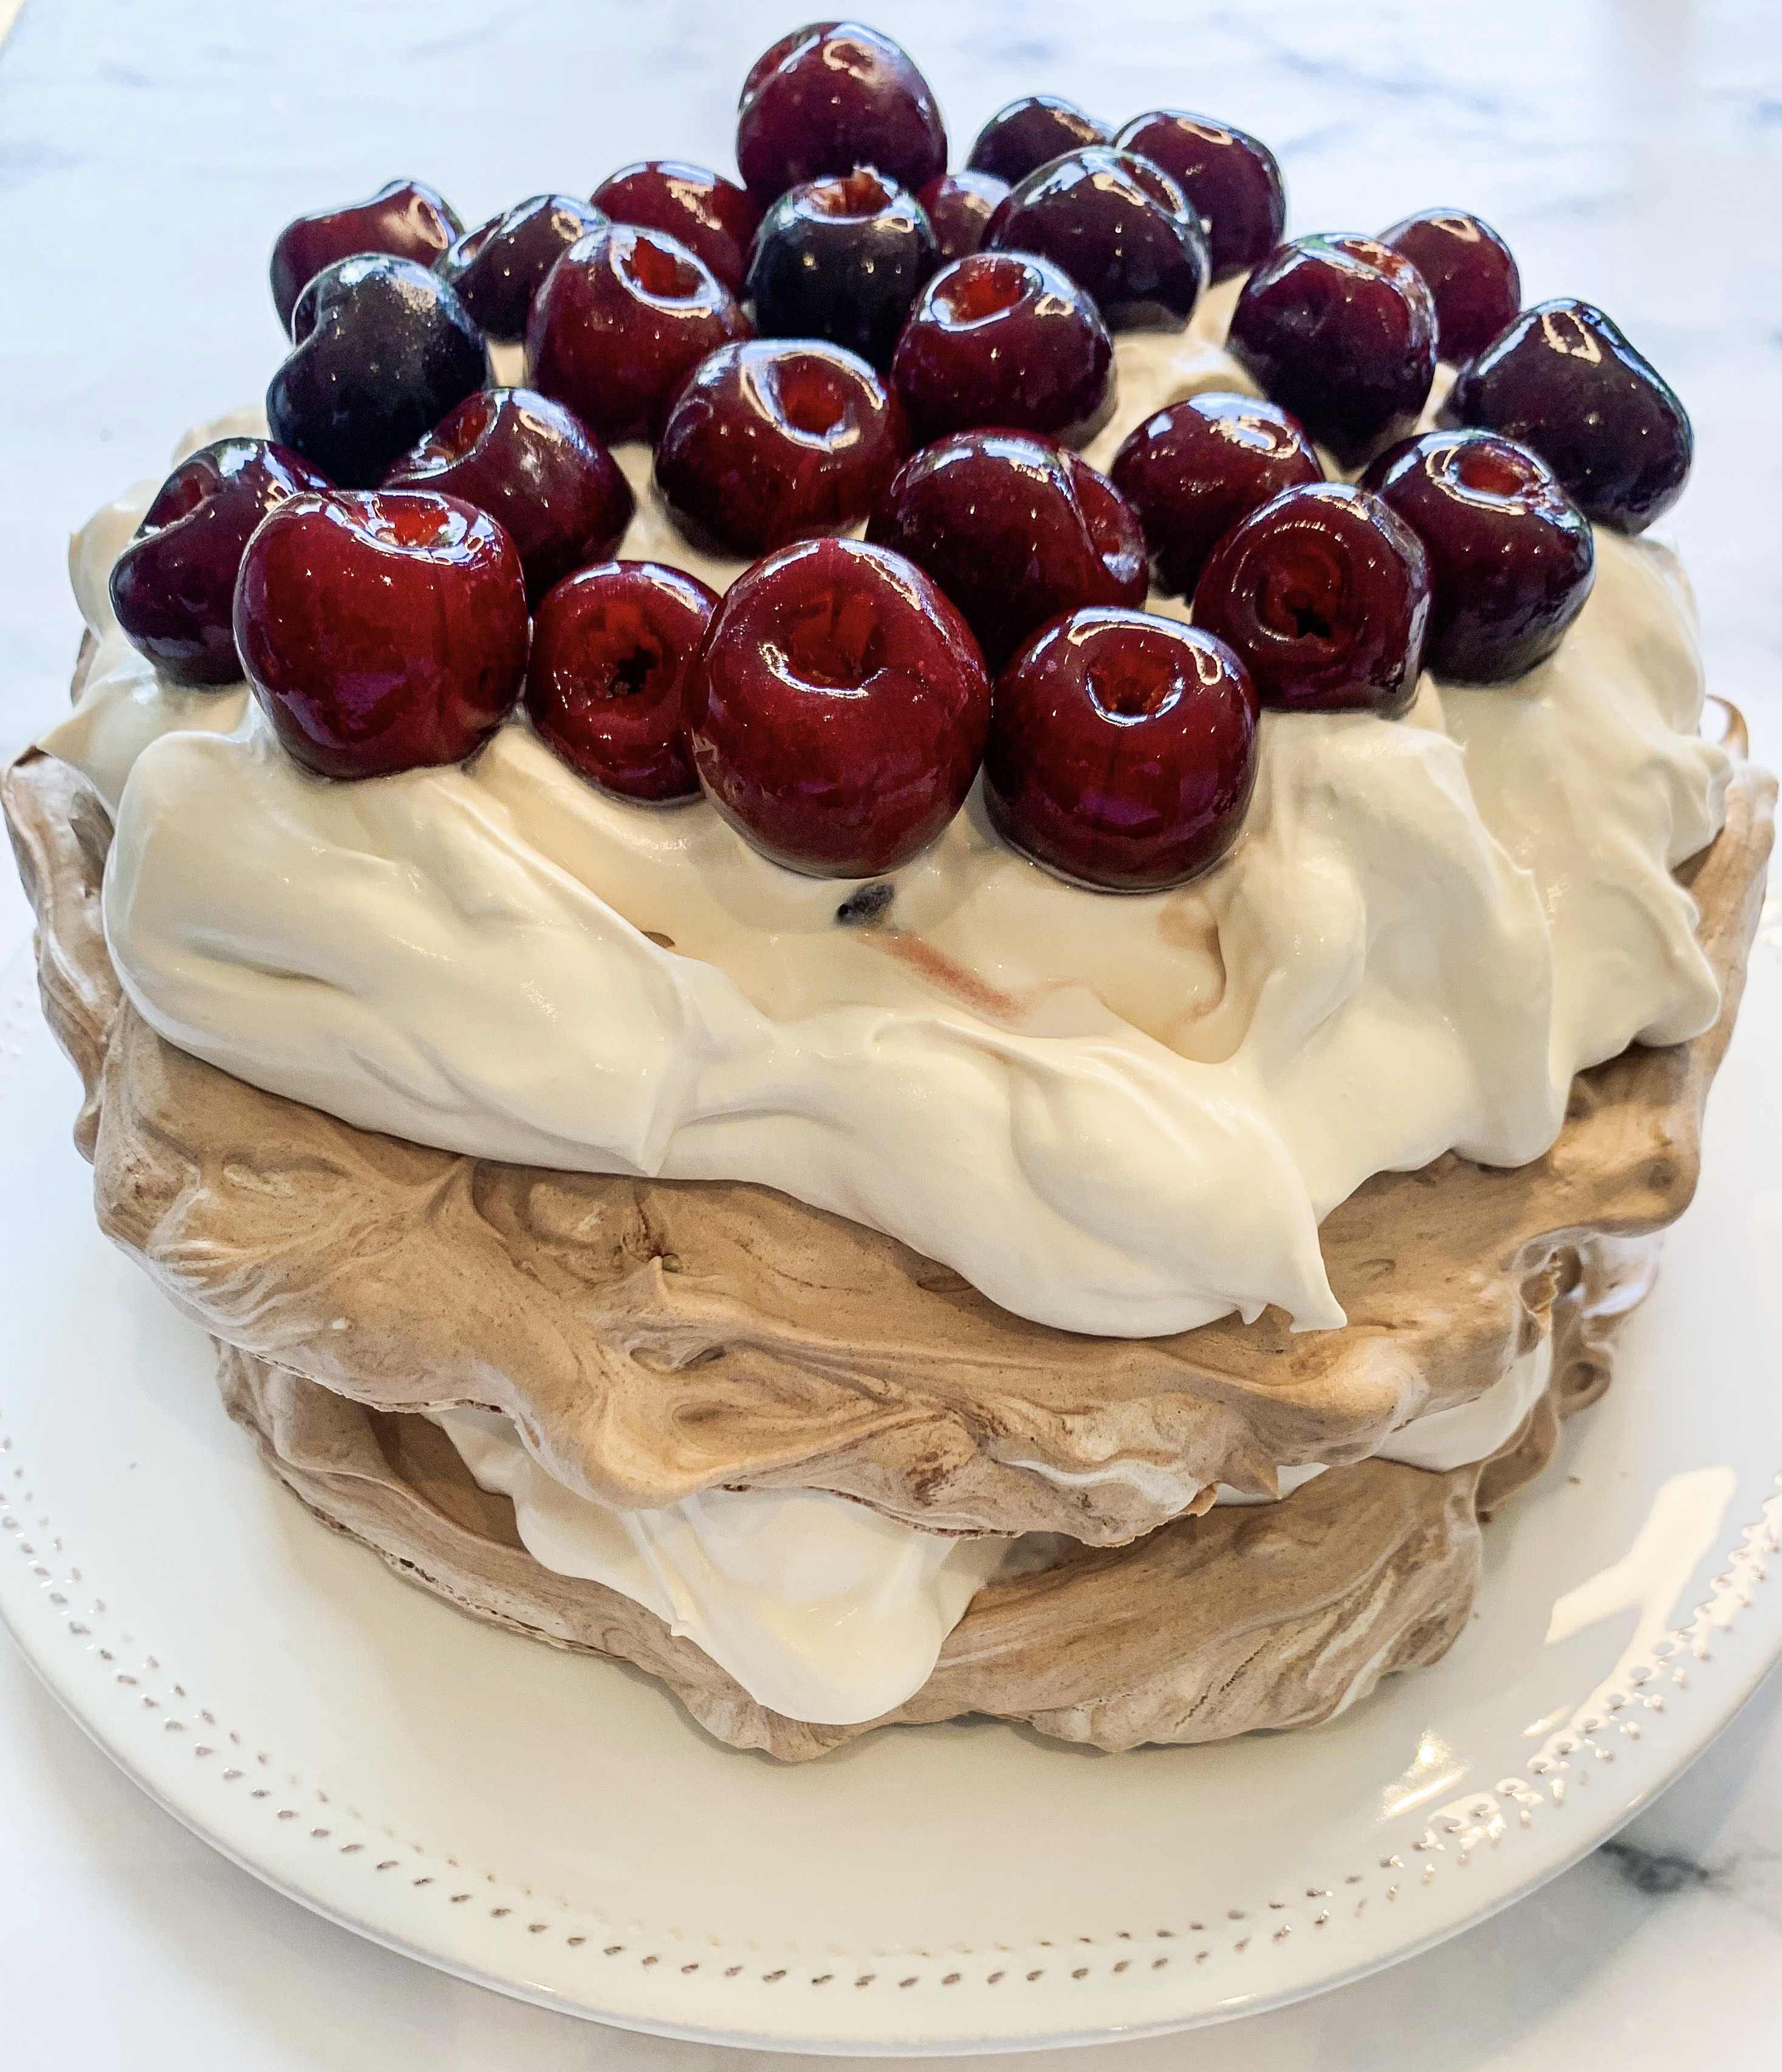
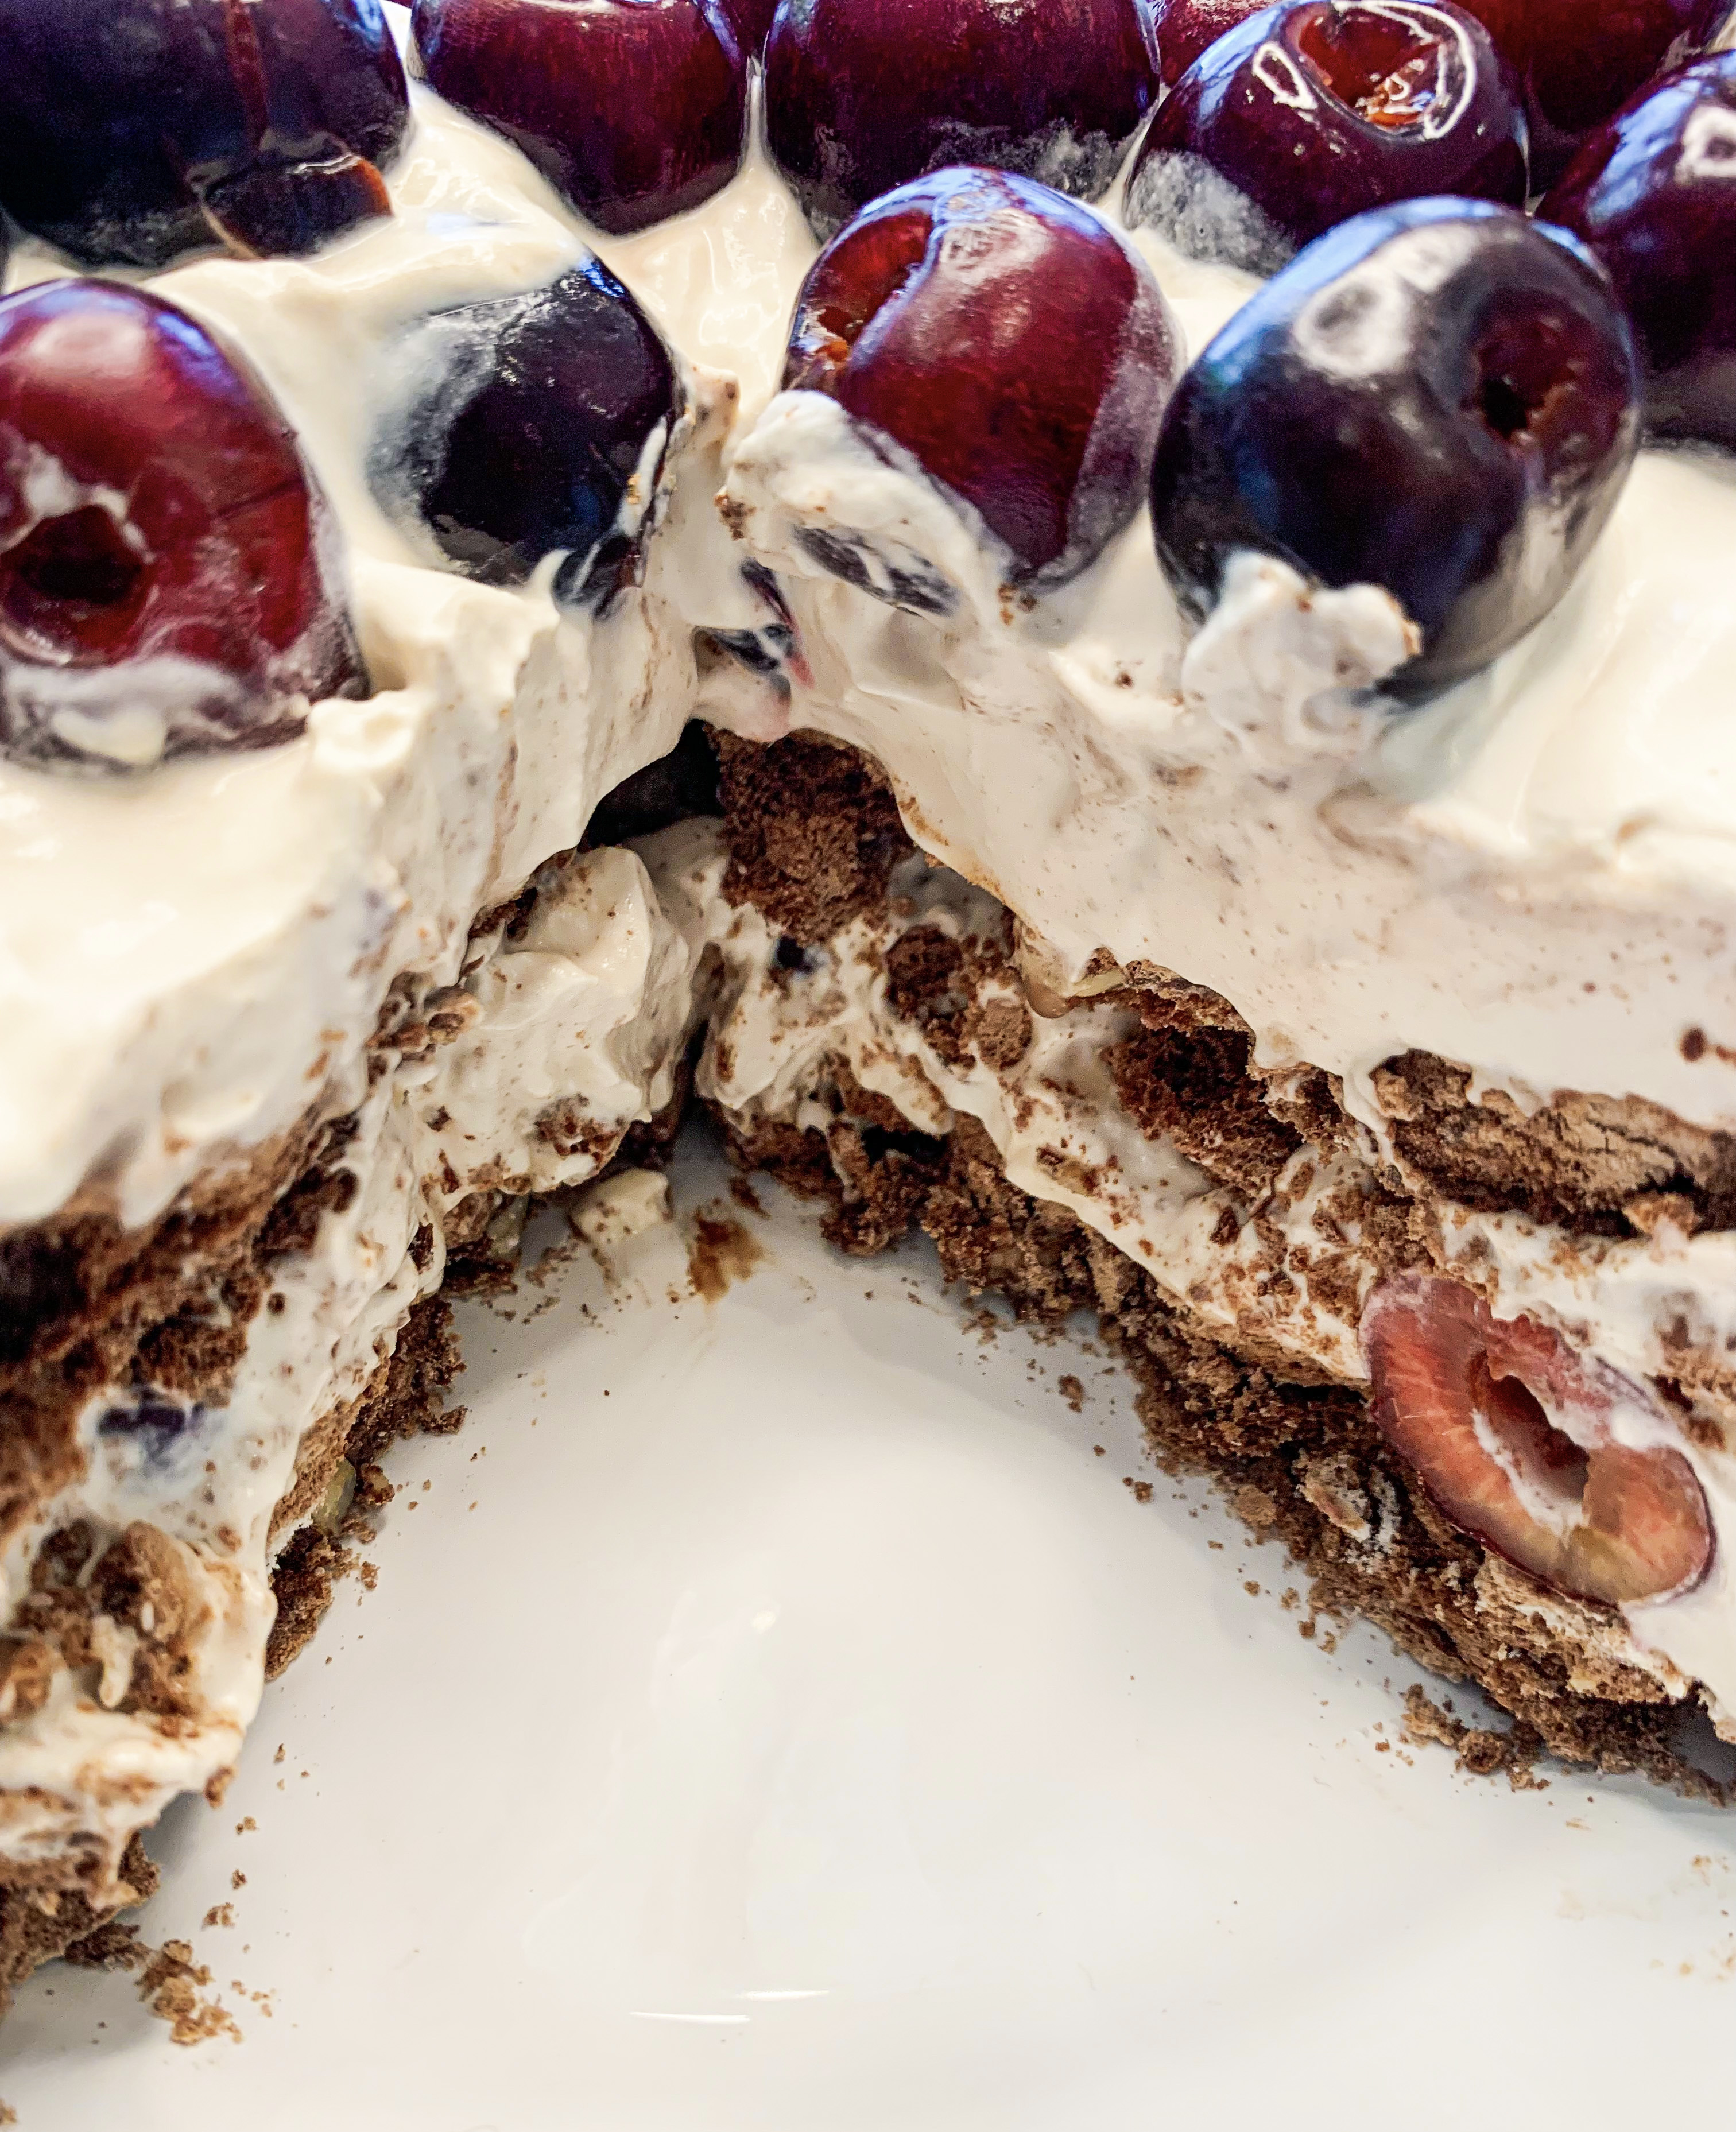
Chocolate and Cherry Pavlova
This dessert is inspired by the retro dessert, black forest gateau, but made with chocolate meringue instead of sponge – it’s fantastic. The recipe is from Rosie Birkett’s cookbook ‘The Joyful Home Cook’, and with recipes like this, it truly is a joyous book! This recipe works well year-round, even when cherries are out of season, as they are macerated in Marsala wine which sweetens them. Although it is made with meringue, once made up, this dessert does keep quite well in the fridge as unlike traditional meringues it is mixed with hazelnuts and chocolate which give it a coarser texture that doesn’t dissolve with the addition of cream. Having said that, I do think it tastes better fresh, and there won’t be much leftover once you get started on it!…
100g dark chocolate (I use Lindt Excellence 70% Cocoa Dark Chocolate), roughly broken up
4 egg whites
220g caster sugar
½ teaspoon white wine vinegar
100g blanched, skinless hazelnuts, roughly chopped
500g cherries, pitted
175ml Marsala wine or cherry liqueur
350ml double cream
10g dark chocolate for grating
- First, macerate the cherries. Put them in a bowl and cover with the Marsala wine, tossing them so that they are thoroughly coated. Set aside.
- Melt the chocolate in a bowl over a saucepan of barely simmering water (a bain-marie).
- Whisk the egg whites in a spotlessly clean bowl until stiff peaks form. Gradually, in batches, add the caster sugar, whisking constantly until the mixture is thick and glossy. Whisk in the vinegar. Pour the melted chocolate down the sides of the bowl, turning the bowl to distribute it evenly, then add the nuts and fold them through lightly so that the meringue is marbled with the chocolate.
- Line 2 baking trays with baking parchment, draw a 20cm circle on each and spread the meringue mixture evenly onto each circle – creating two meringue discs.
- Bake in a preheated oven, 110’c fan, for 2 hours. Remove from the oven, lift the meringues and parchment onto wire racks to cool.
- Whip up the cream until it just forms soft peaks – being careful not to over-whip it.
- Drain the Marsala from the macerating cherries and fold it into the cream – it will seem runny at first but will thicken as you incorporate it. Now fold in half of the cherries.
- Peel the baking parchment from the cooled meringues. Place one of the meringues on a serving plate, spread with just over half the cream mixture and top with the other meringue disc. Top with the remaining cream mixture and then the remaining cherries. Grate over the dark chocolate and serve.
Strawberry Meringues (Serves 4)
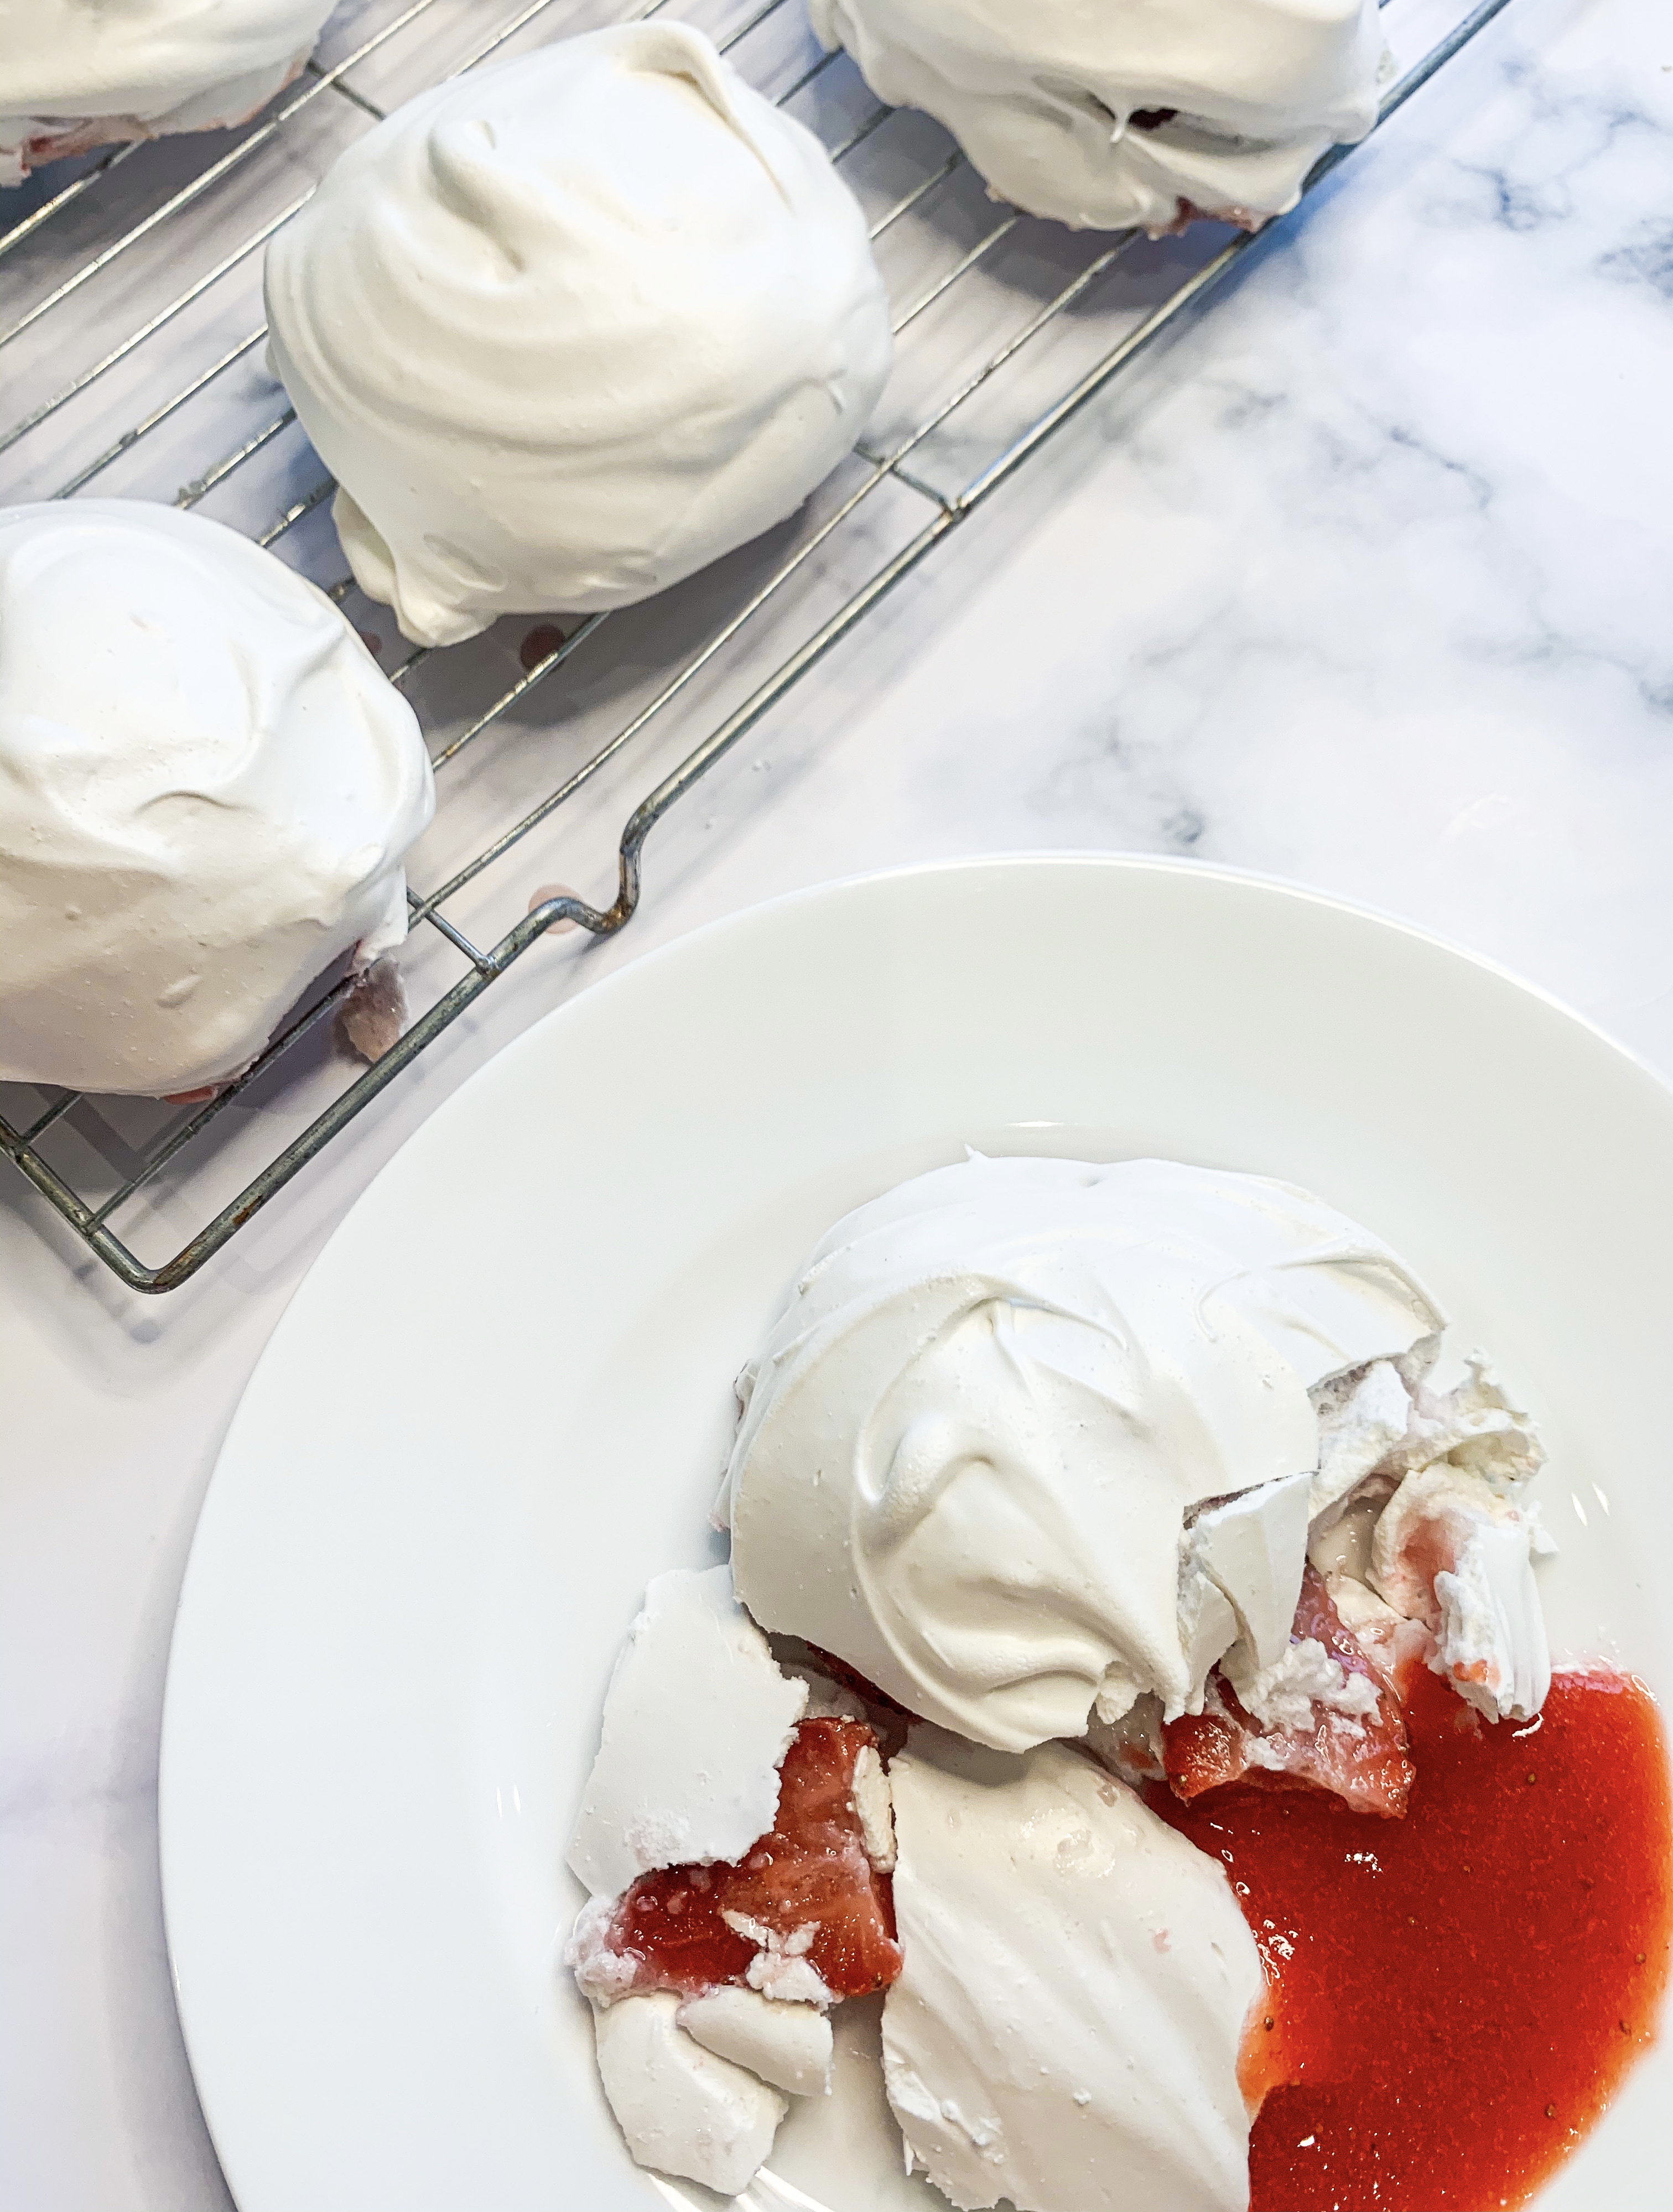
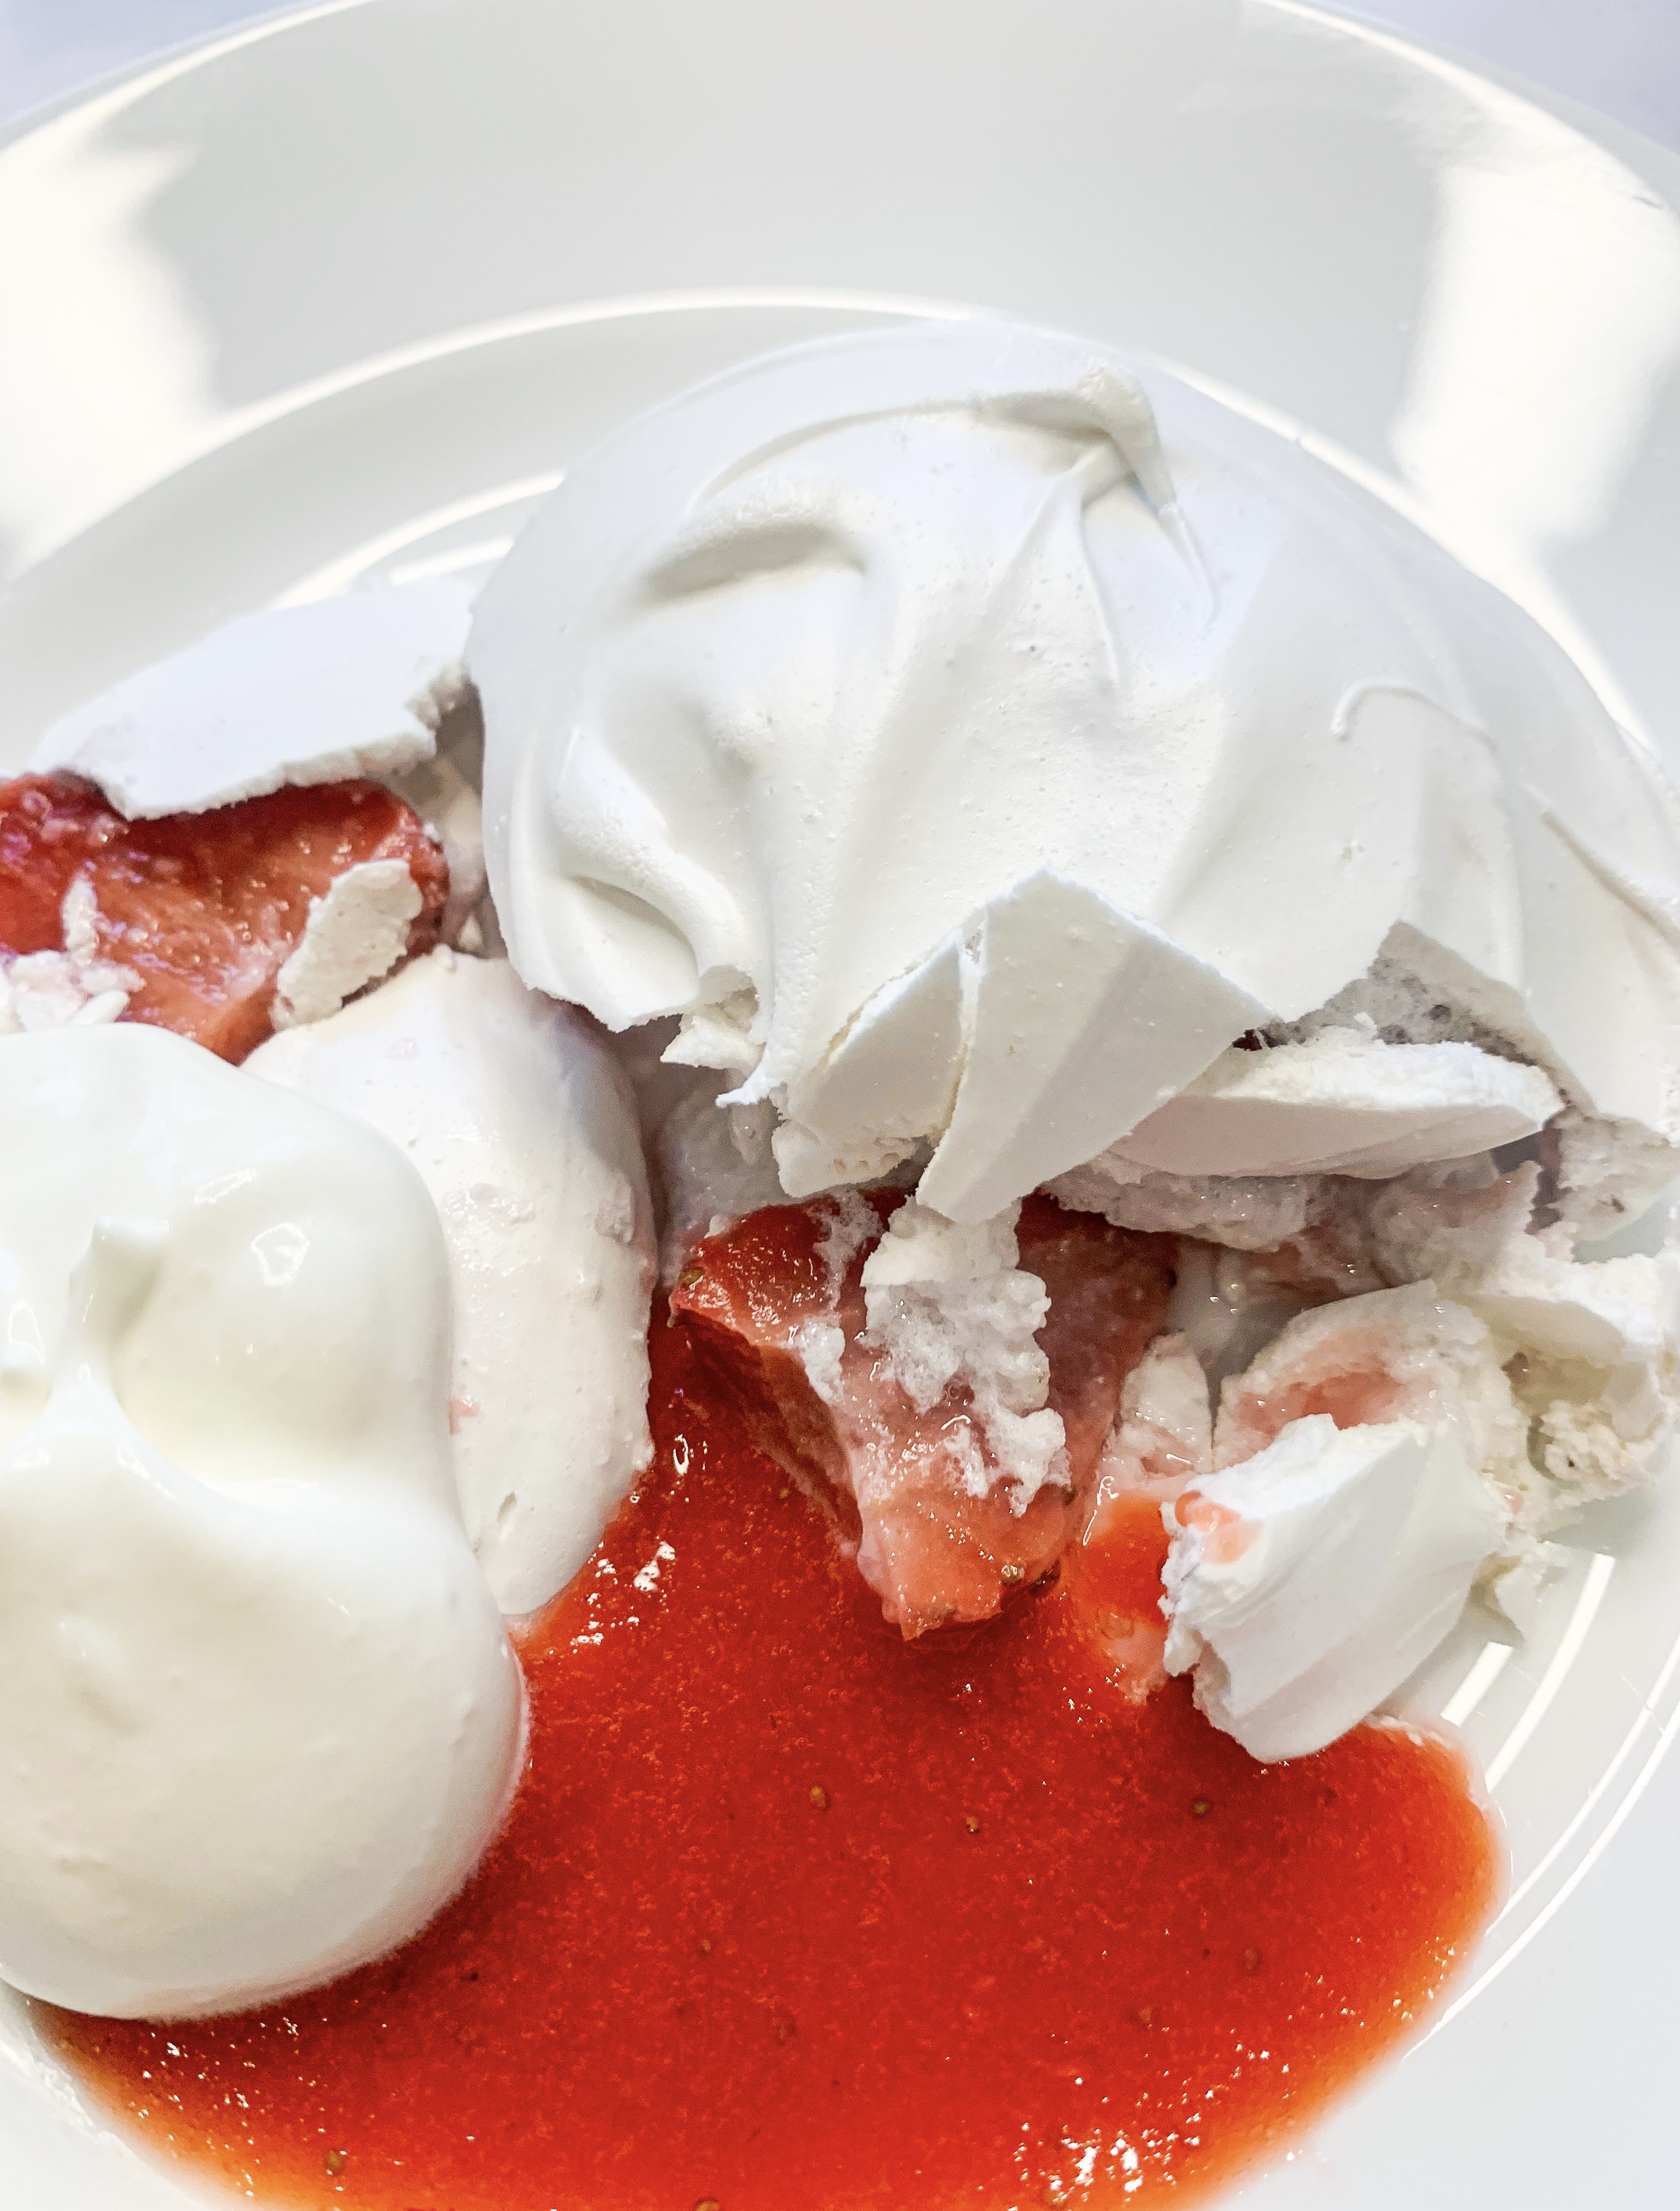
What better way to serve strawberries than combined with meringues?…No, on this occasion I’m not suggesting the classic Eton Mess (you can find that recipe here!)…Instead, in this recipe, the strawberries are actually cooked inside the meringues. By cooking them inside the meringues, the taste of the strawberries becomes more intense – you ‘ripen’ the flavour, so it’s a good recipe for those strawberries which are slightly disappointing. For that reason, it’s worth remembering over the long months after the summer season – when you can only get strawberries that have been flown in from abroad and consequently taste a little bland.
These meringues are best eaten the same day – which I’m sure won’t be a hardship! However, if there are one or two left over they will keep for 24 hrs in the fridge, but no longer. In cooking, you will find that the strawberries will leak out a gooey mixture this just adds to the flavour!
I found this recipe in James Martin’s book ‘Slow Cooking’. The recipes in this book are all simple to prepare yet are cooked or marinated slowly for at least an hour to create show-stopping dishes with little fuss – and this recipe for meringues is definitely one of those!
*You could also make this with raspberries
550g strawberries
4 egg whites
110g caster sugar
110g icing sugar, plus 20g for the sauce
250ml double cream
- Hull the strawberries and cut them in half.
- Beat the egg whites with the caster sugar in a grease-free bowl until stiff peaks form.
- Add 110g of the icing sugar and continue to beat for 4-6minutes until the mixture is smooth and shiny.
- Using a large metal spoon, lightly fold just under half of the strawberries into the meringue mixture.
- Carefully place 8 evenly sized spoonfuls on the mixture onto a baking sheet lined with greaseproof paper.
- Place in a preheated oven, 100’c fan, and bake for 2 hours.
- Whilst the meringues are cooking make the strawberry purée. Place the remaining strawberries in a blender with 3 tablespoons water and the 20g icing sugar, process to a purée, then pass through a sieve to remove the seeds. Set aside.
- Place the cream in bowl and whip until soft peaks form. Set aside.
- When the meringues are cooked, remove from the baking sheet using a palette knife to transfer to a wire cooking rack, allow to cool before serving.
- Serve the meringues with the cream and purée on the side.
Lemon Surprises (Serves 4)
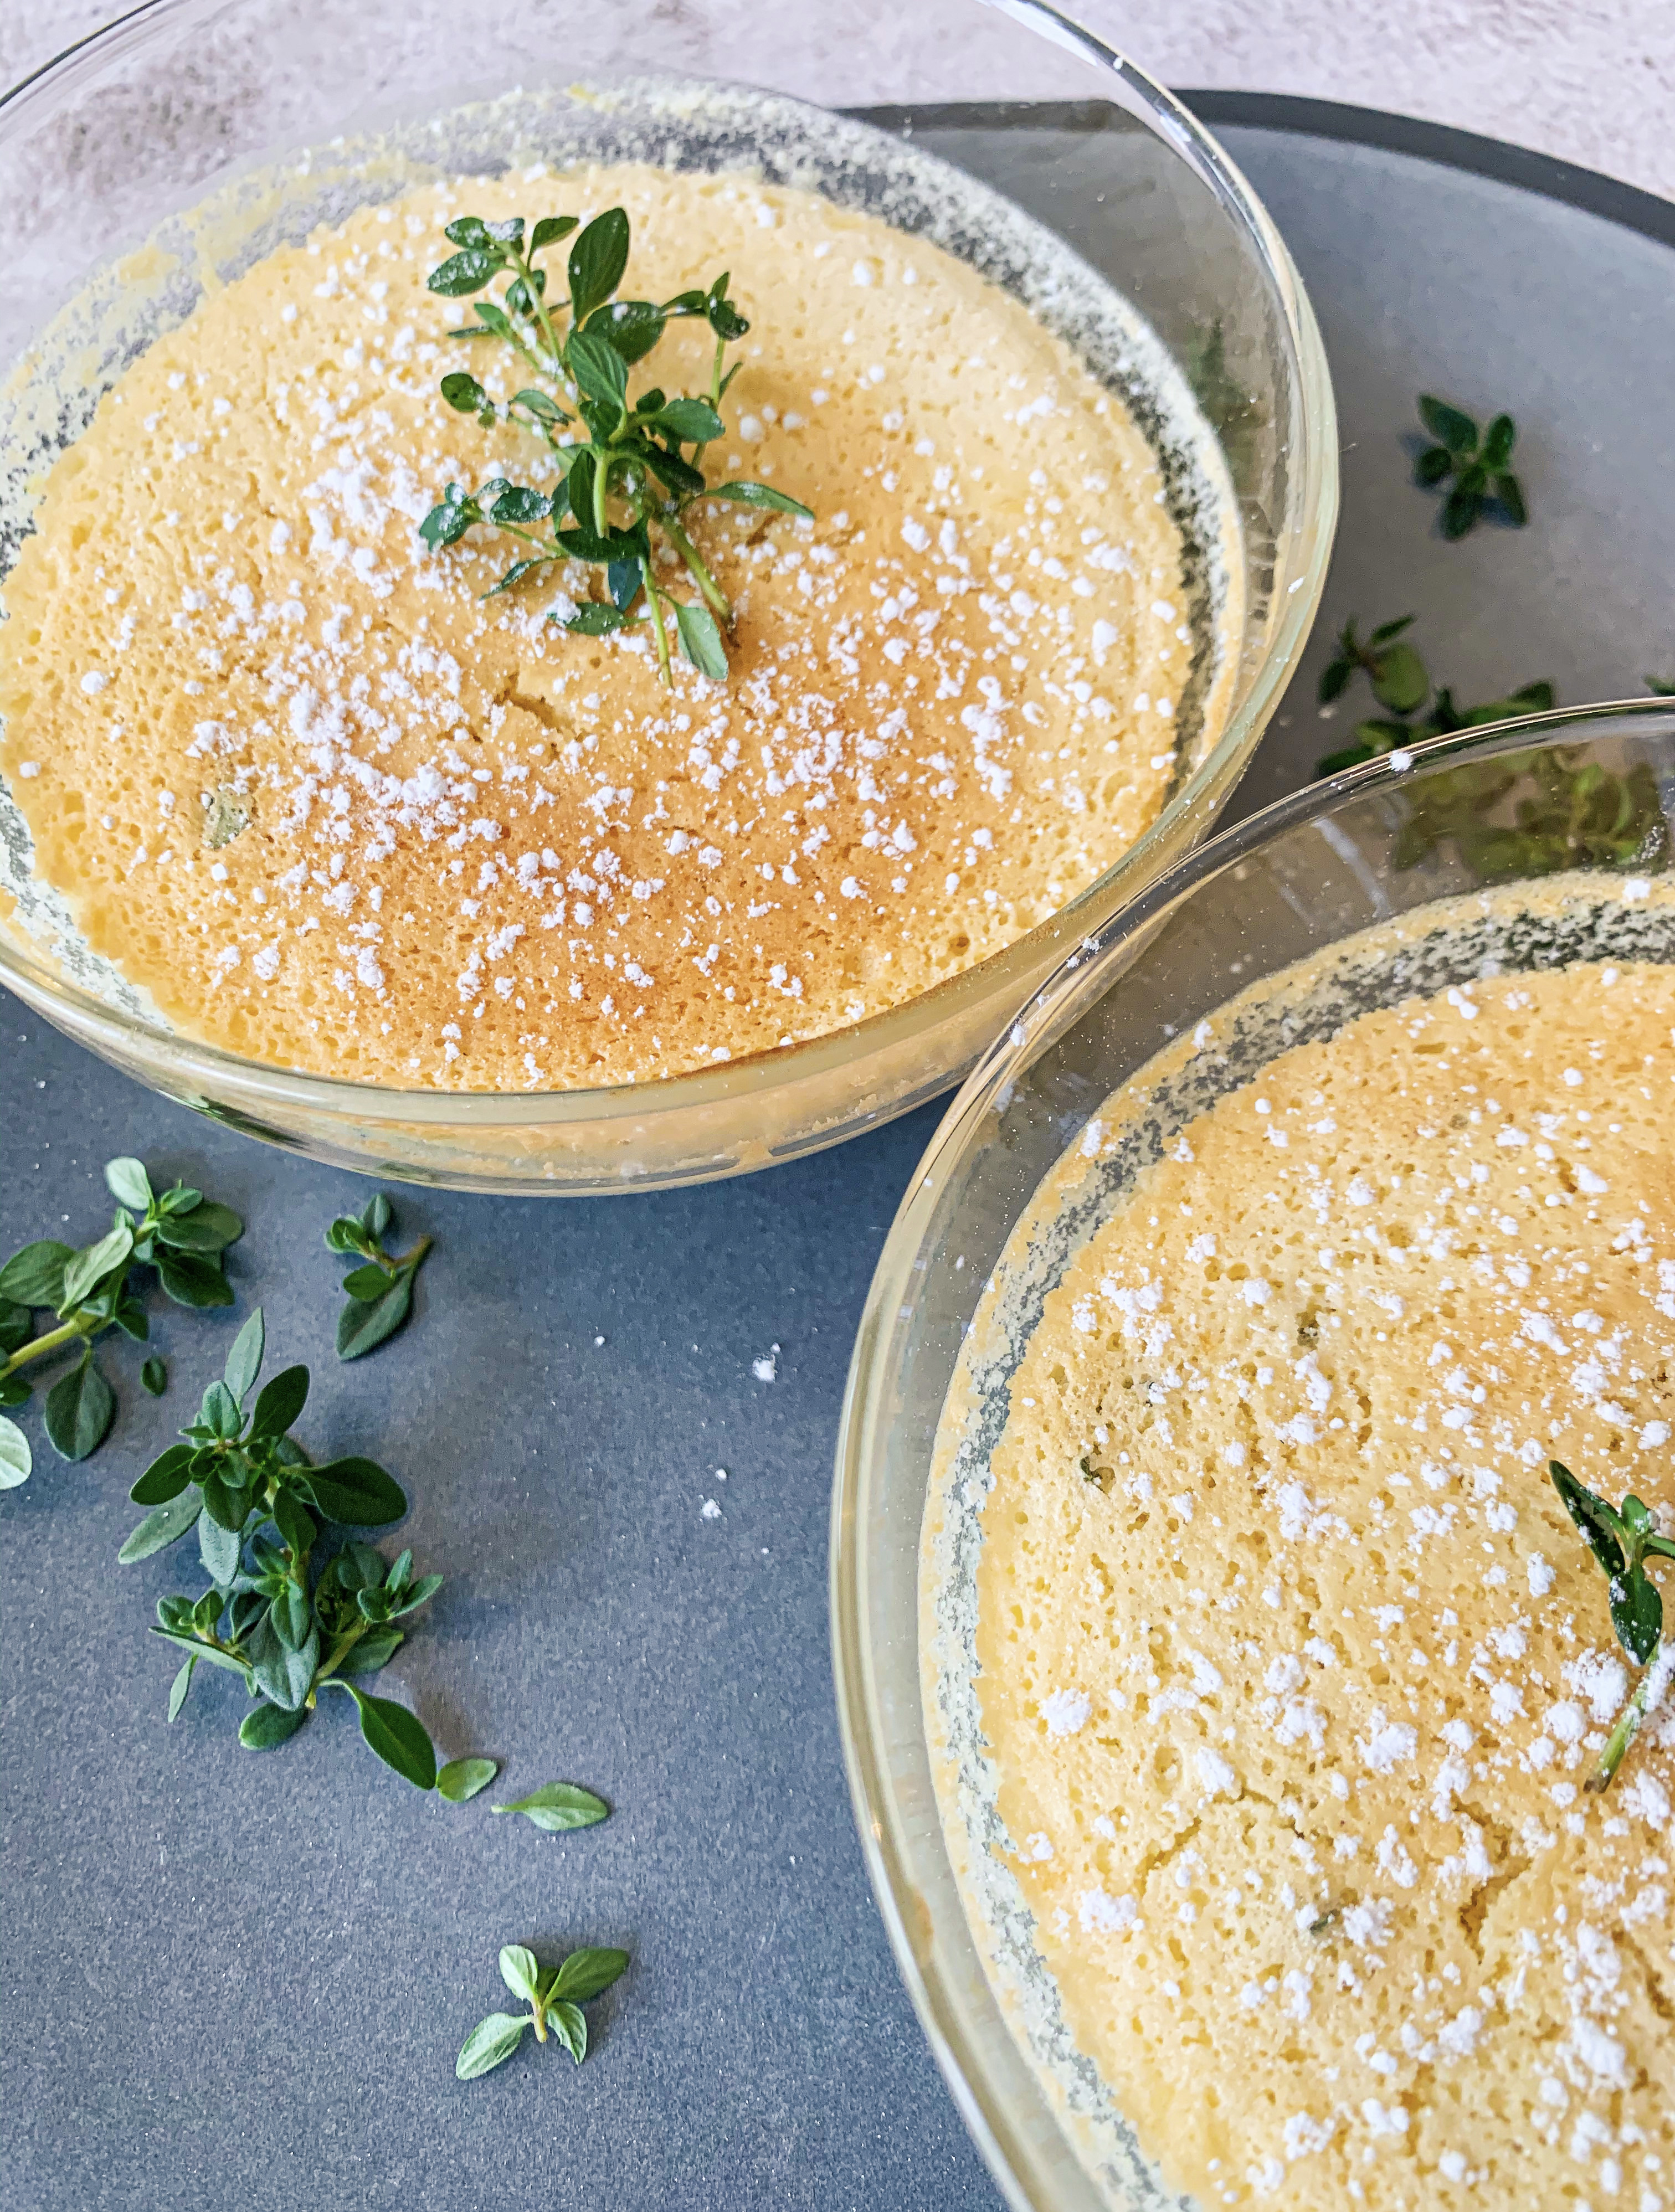
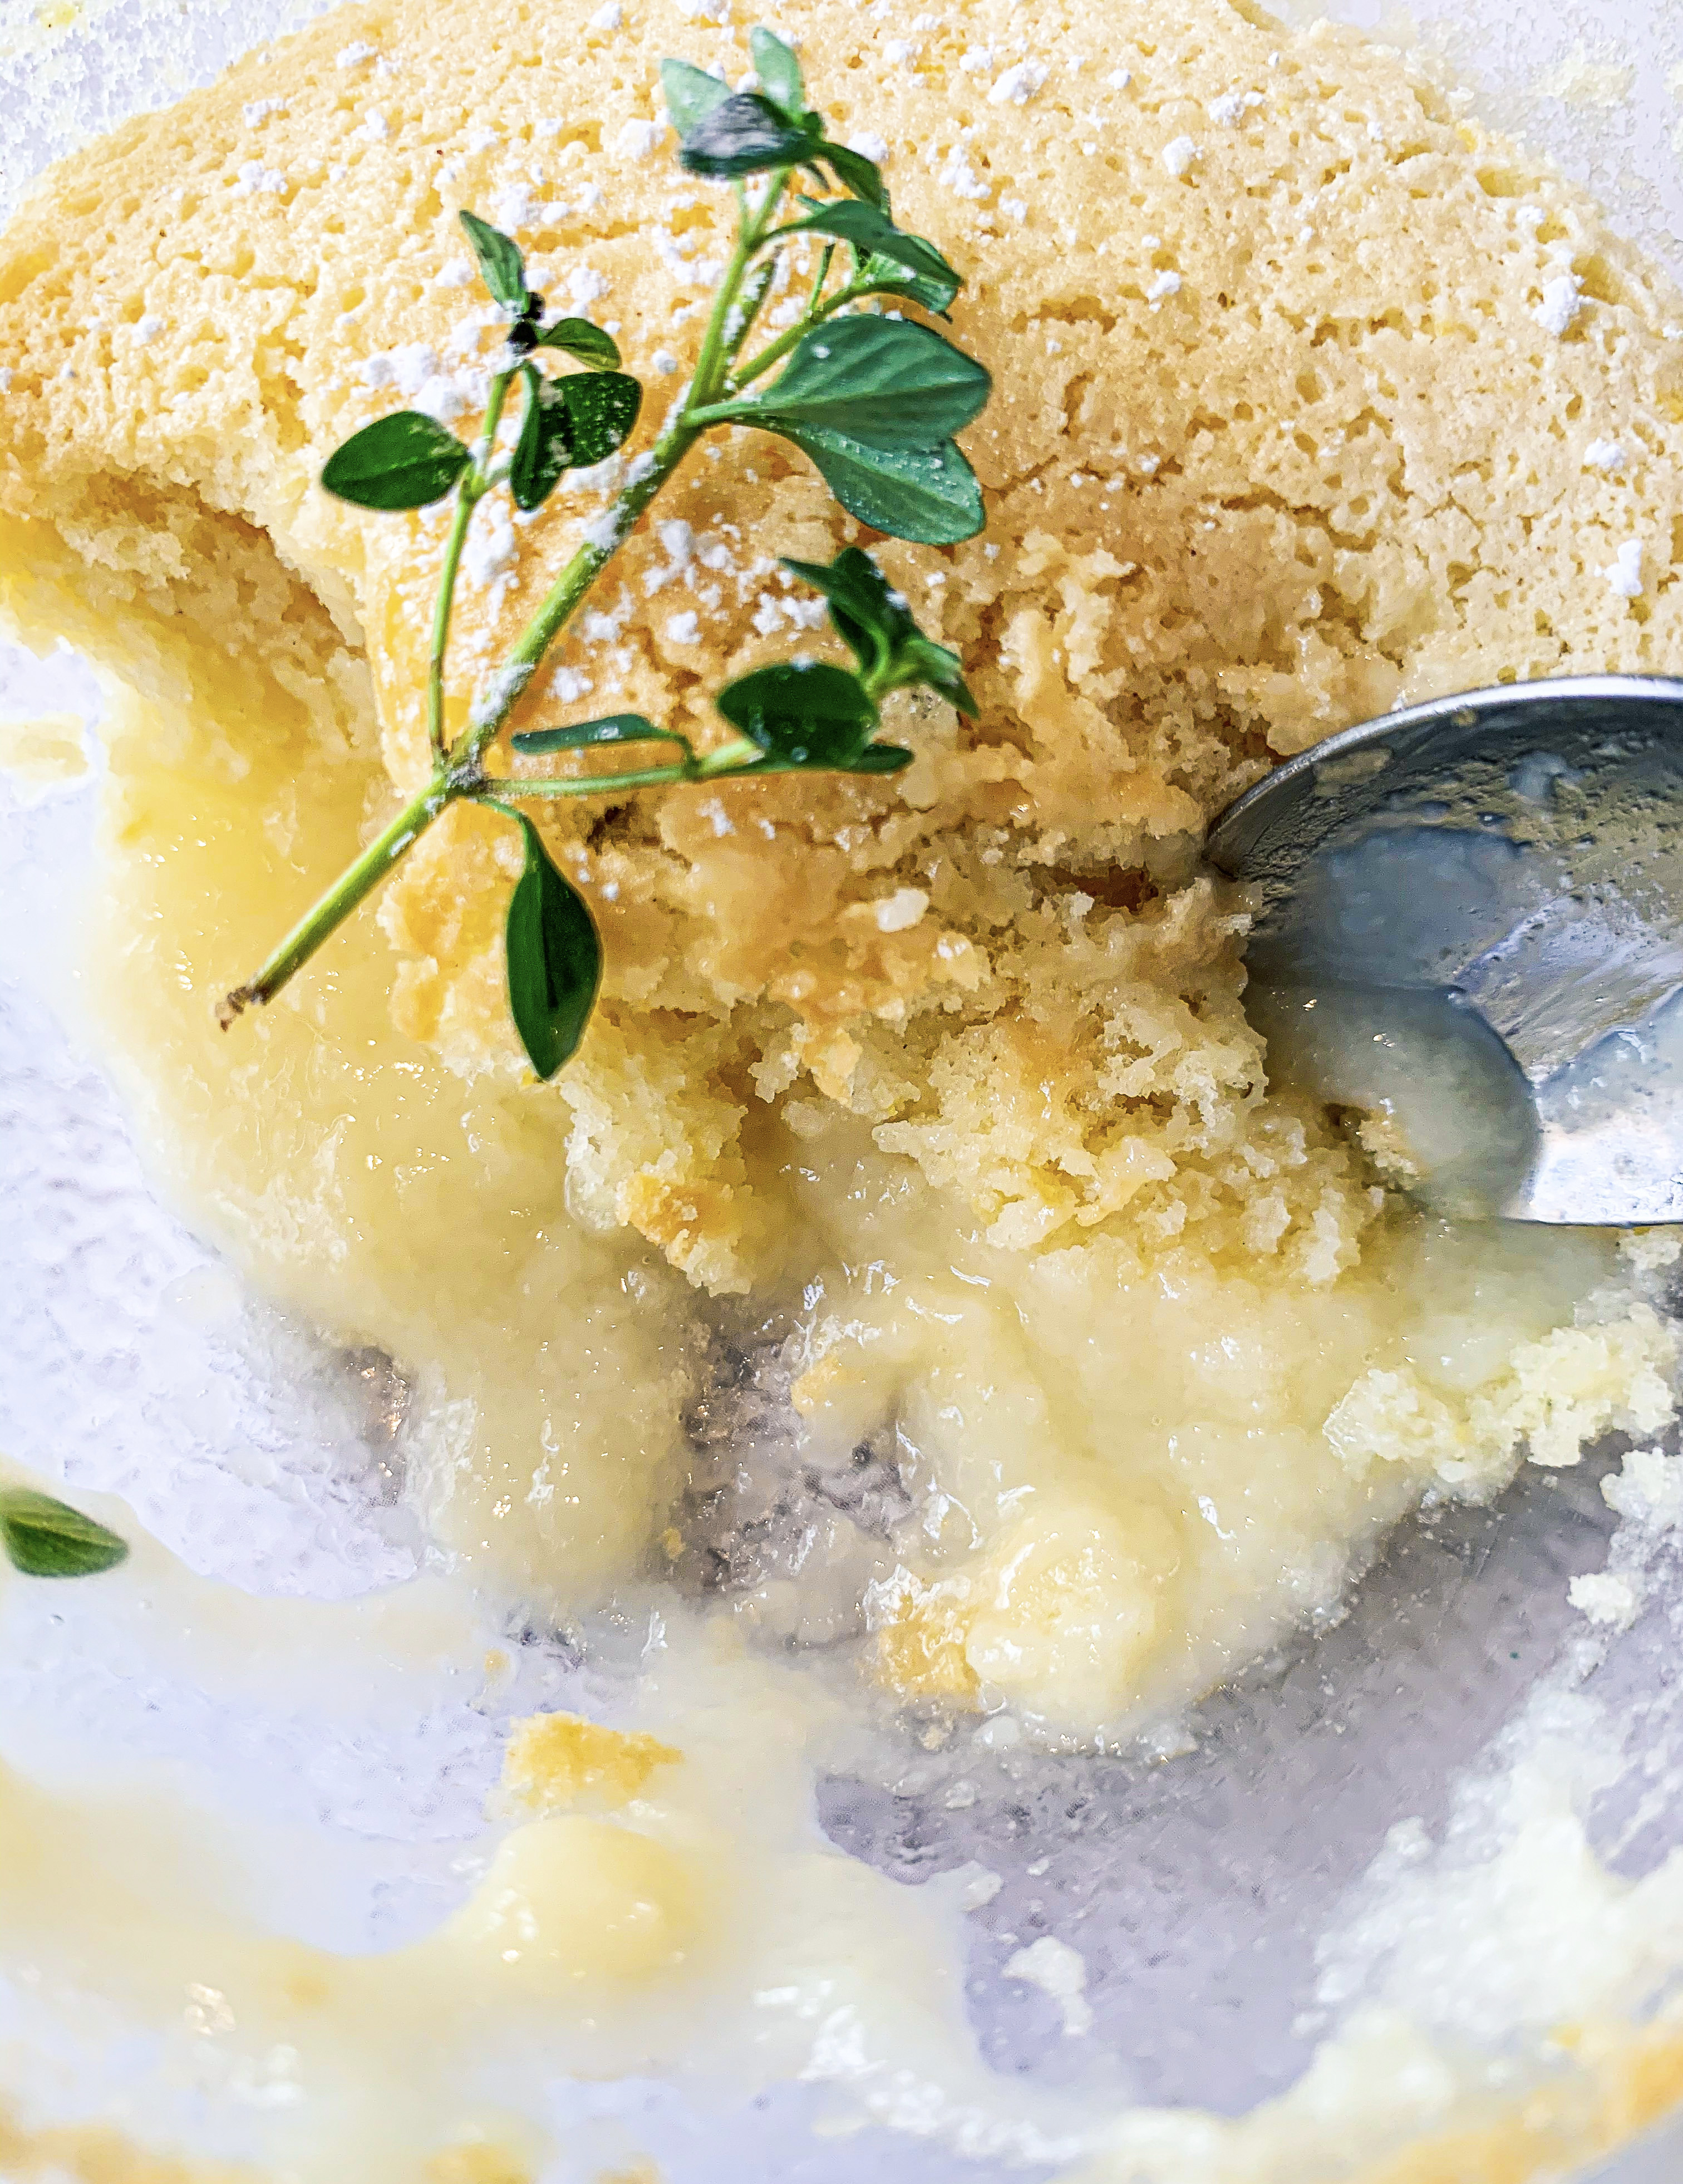
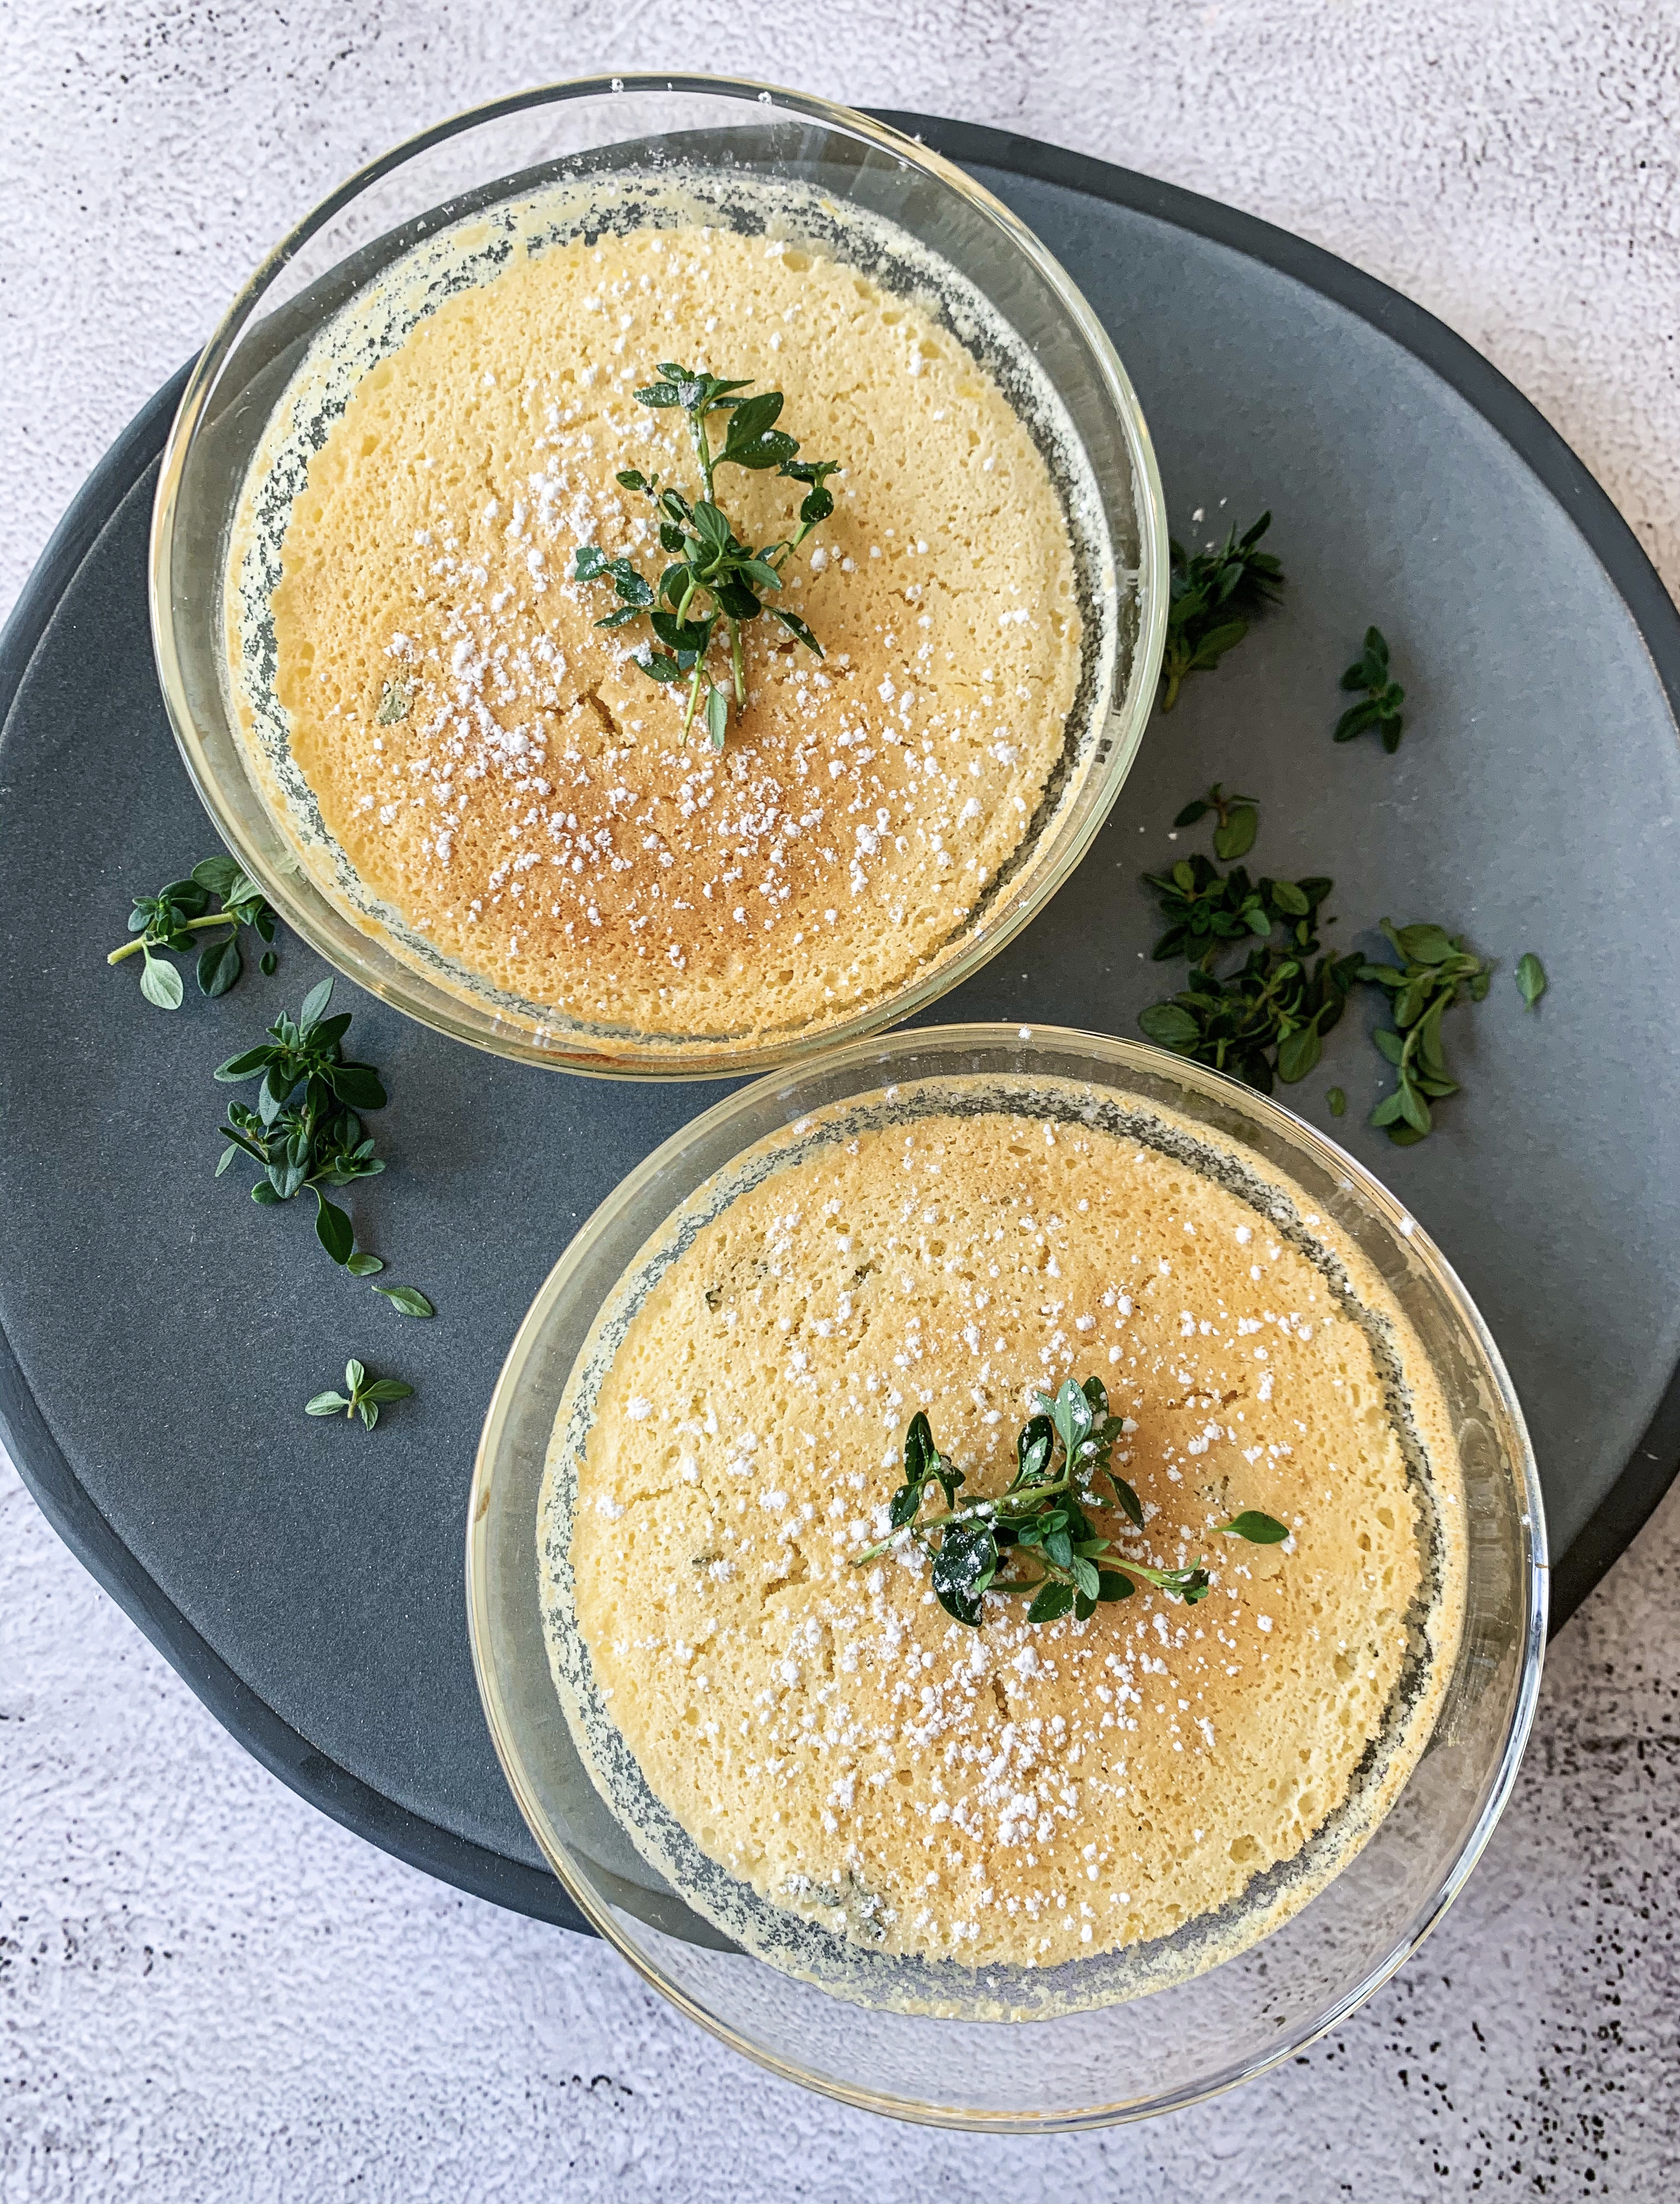
Many of you will be familiar with ‘Lemon Surprise Pudding’, it’s one of those gratifying recipes which you put in the oven as a batter and it comes out not only as a soft sponge, but miraculously with a pool of lemony sauce underneath! You may already have a recipe for it, but I urge you to try this one, as the sponge really is the lightest that I have come across! The addition of lemon thyme is optional, it slightly lifts the flavours and, of course, makes a lovely decoration!
I like to make this dessert in individual bowls or ramekins, but you can make it in one dish.
45g soft butter
150g caster sugar
2 lemons, finely grated zest & juiced
2 eggs, separated
200ml milk
50g self-raising flour (gluten free if required – I use Doves)
4 sprigs lemon thyme (optional)
Icing sugar, for dusting
Double cream to serve
- Use an electric mixer to cream the butter and 100 g of the caster sugar with the lemon zest until pale and fluffy. Beat in the egg yolks. Gradually add the milk, lemon juice and flour in turns, mixing well between each addition to make a smooth batter.
- Place the egg whites in a clean bowl and whisk with the remaining 50g caster sugar to soft peaks, add the picked leaves from two sprigs of thyme, then gently fold through the batter.
- Divide the batter among four individual bowls/ramekins with the capacity for about 175ml or put in one dish. Place in a roasting tin, lined with a tea towel (this will stop them slipping), and pour in enough boiling water to come about halfway up the sides of the ramekins or dish.
- Carefully transfer to a preheated oven, 160’c fan, and bake for 20 minutes or until golden on top and springy to touch. Turn the oven off and let the puddings rest in the oven for another 20 minutes, so the custard firms slightly.
- Decorate with the remaining thyme sprigs, dust with icing sugar and serve with cream.
Rhubarb and Ginger Meringues (Serves 4)
I love the tart nature of rhubarb; this recipe for Rhubarb and Ginger Meringues has been a favourite of mine for some years now. These individual meringues are not the crunchy type, but are lovely, marshmallowy, soft meringues – you only cook them for 10-15 minutes. They do tend to crack a bit around the edges, so don’t be alarmed when they do, but this adds to their charm, and they still look impressive with the creamy rhubarb and ginger fool that sits in the middle of them. It really is a delicious dessert, the sharp rhubarb is perfectly balanced by the sweetness of the meringue. What’s more, it is the simplest of desserts – I found the recipe in Rachel Allen’s cookbook ‘Easy Meals’ – so enough said!…
Watch the video of this dessert being made here!
2 large egg whites
125g caster sugar
For the rhubarb fool:
175g rhubarb, cut into 1cm lengths
75g caster sugar
1 teaspoon grated root ginger
125ml double cream, softly whipped
- Place the egg whites in a bowl and using a hand-held electric whisk, whisk until they form soft peaks. Gradually whisk in the caster sugar and continue to whisk until the meringue mixture is stiff and glossy.
- Spoon 4 large blobs of the mixture onto a baking tray lined with greaseproof paper. Using the back of a spoon create a well in the centre of each meringue (this is where the rhubarb fool will sit).
- Place the meringues in a preheated oven, 160’c fan, for 10-15 minutes until they are crisp on the outside but still marshmallowy in the middle. Remove from the oven and carefully lift them from the greaseproof paper to cool on a wire rack.
- Meanwhile make the rhubarb fool. Place the rhubarb, sugar and ginger in a saucepan with 25ml of water. Cook over a medium heat for 5-10 minutes until the rhubarb is stewed to a mush and the syrup has thickened. Allow to cool, then fold into the whipped cream.
- To serve, place the meringues onto individual plates and spoon a dollop of rhubarb fool over the top of each one.
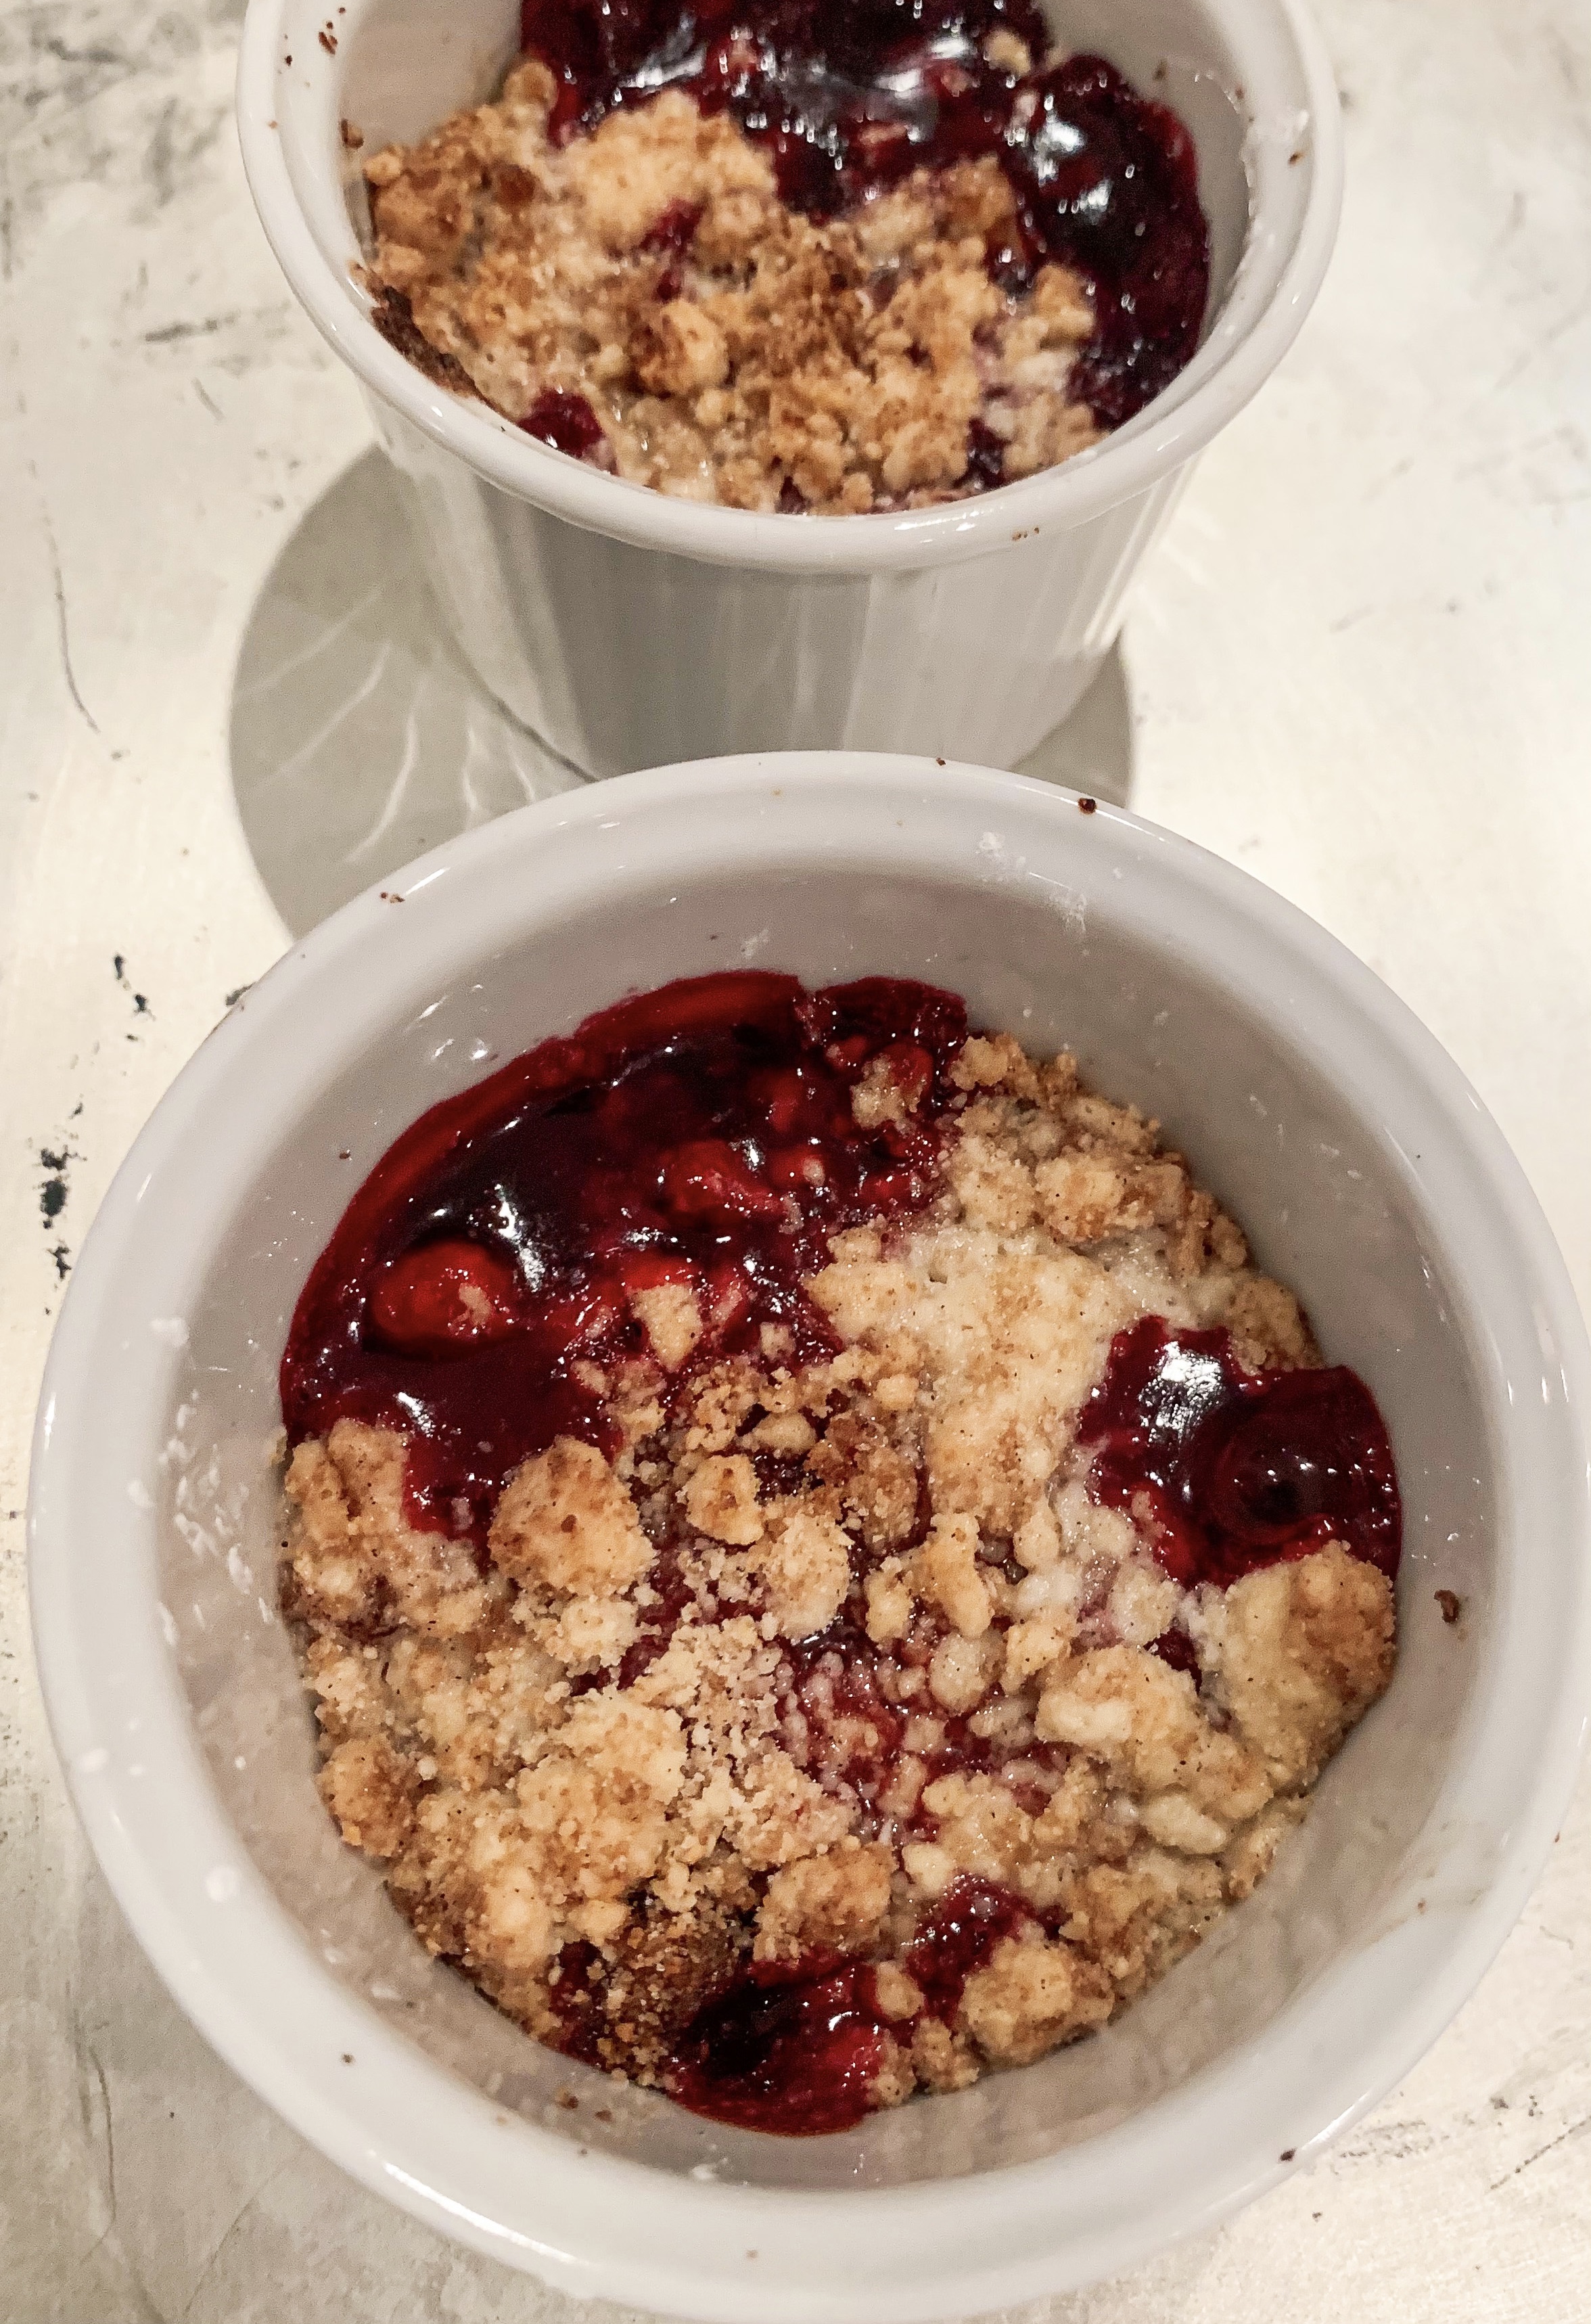
‘Flapjack’ Plum Crumble
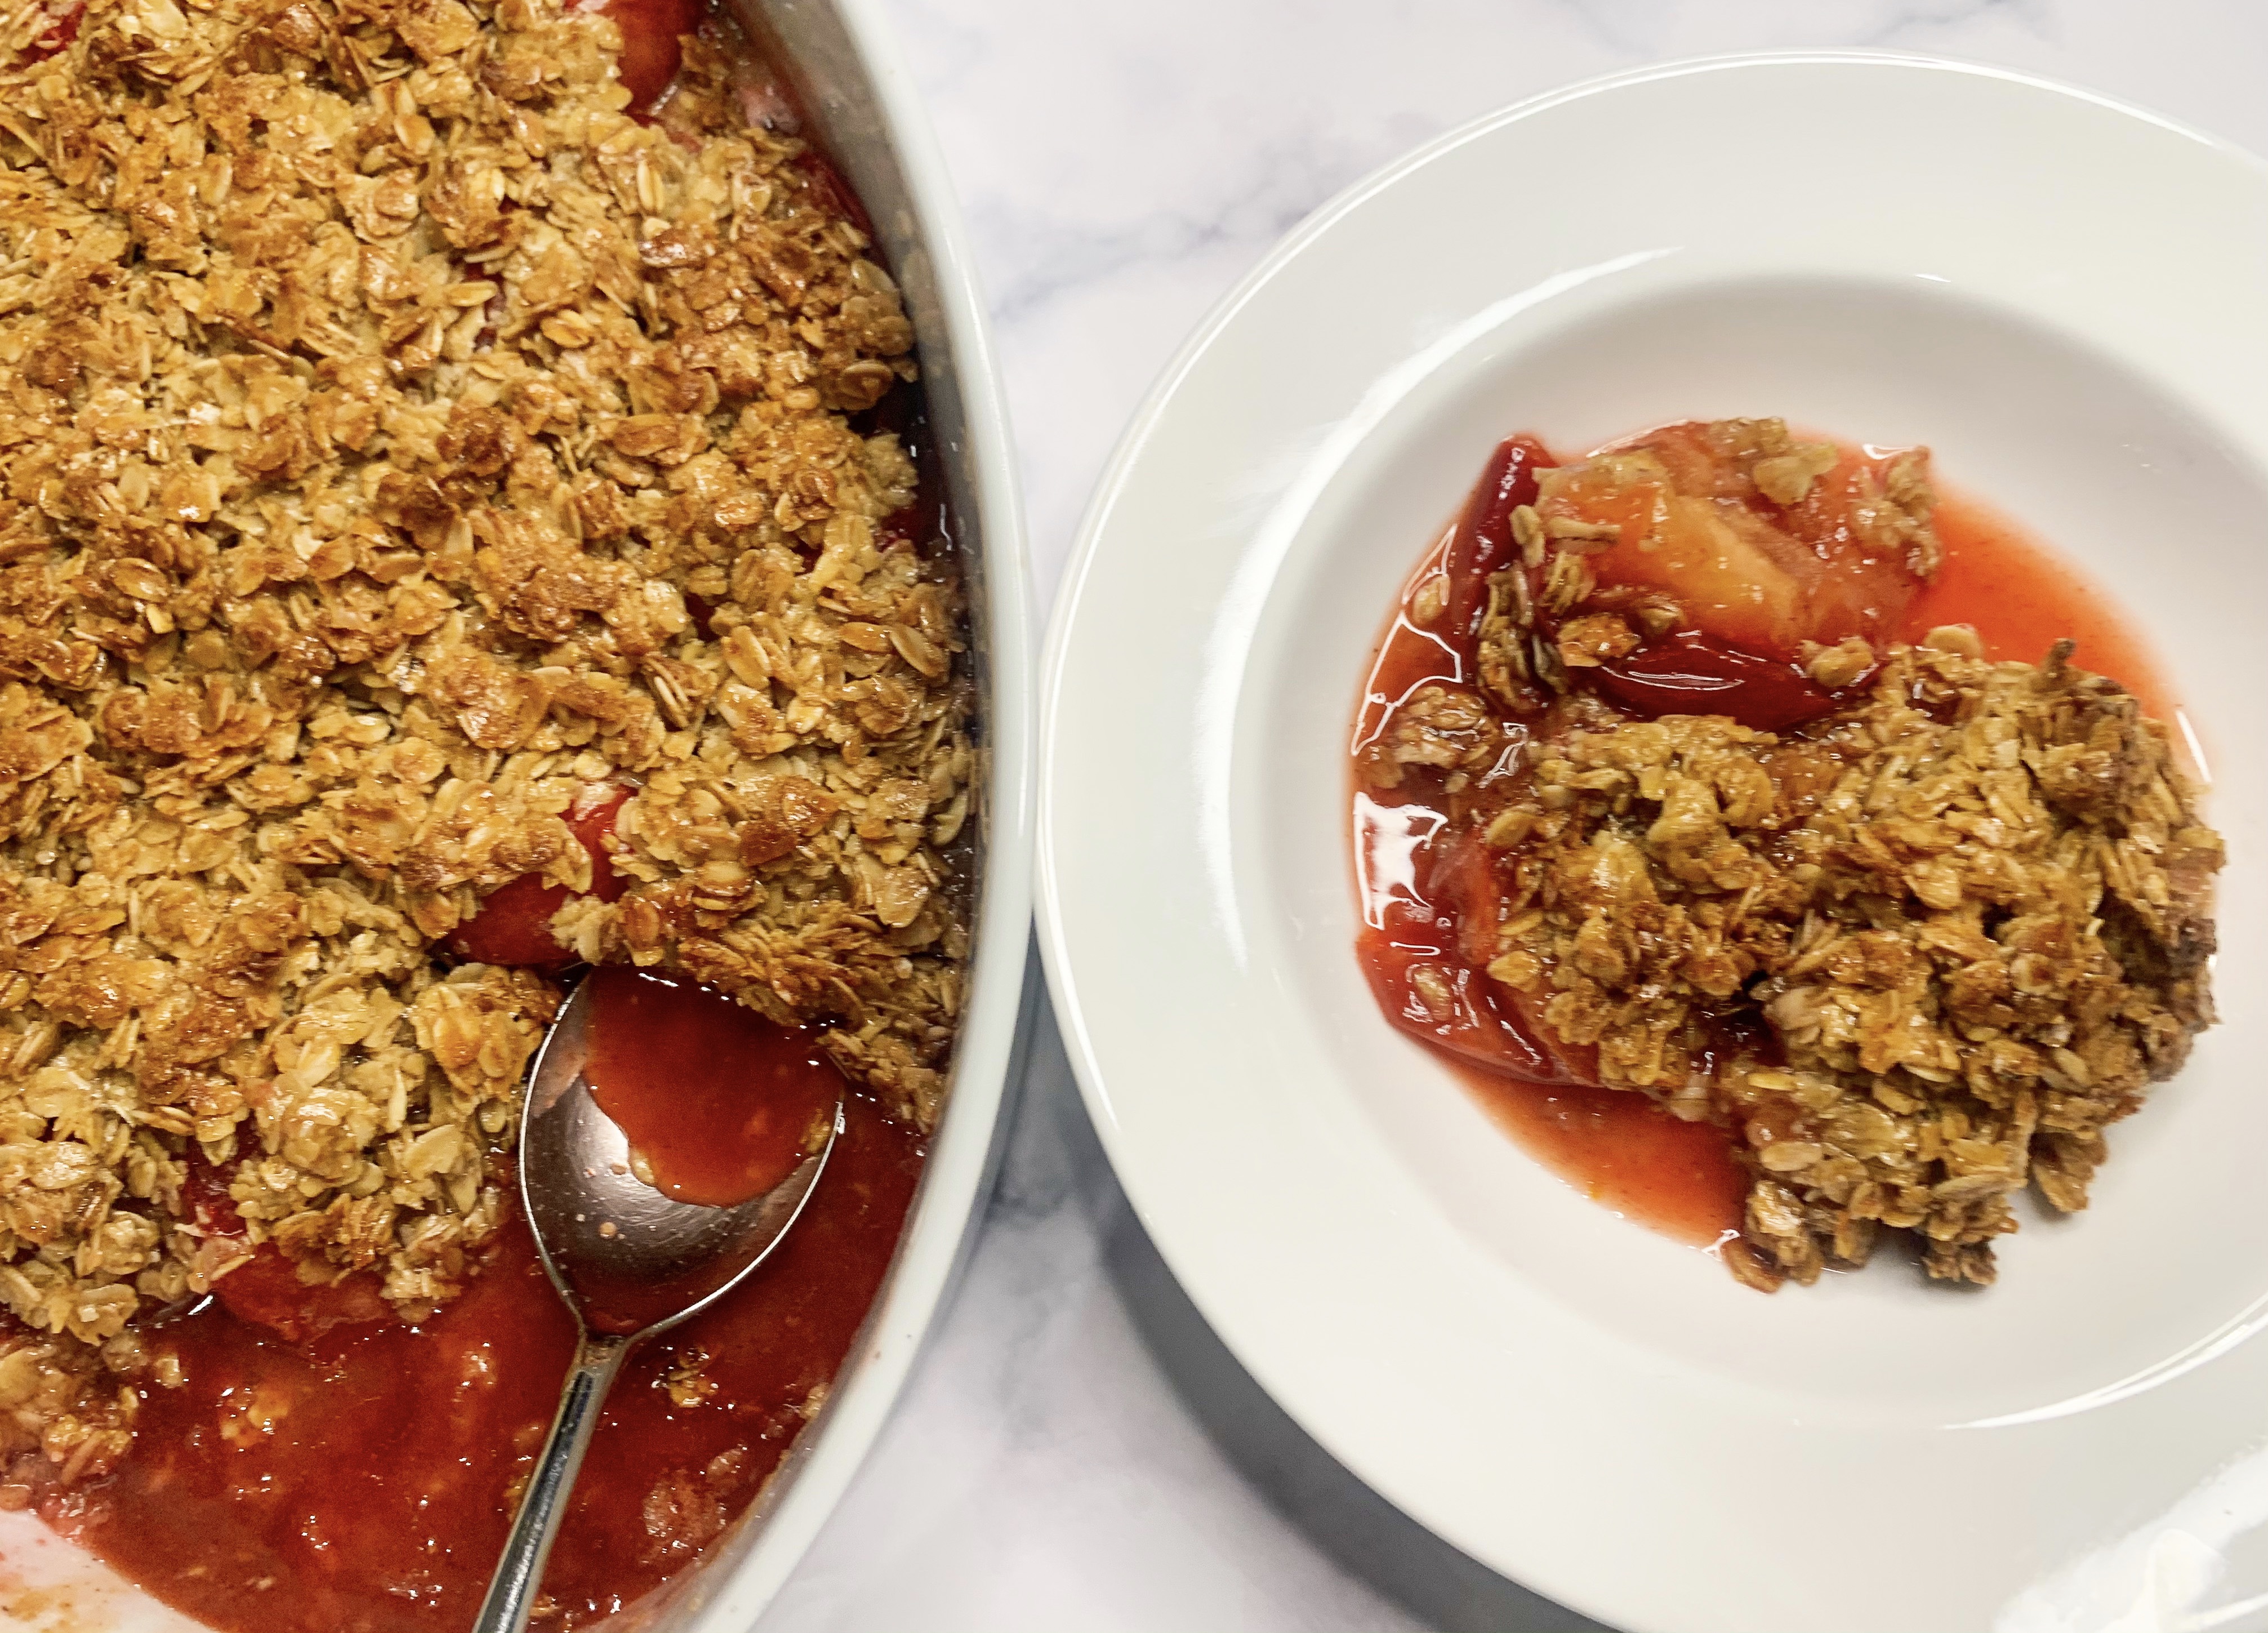
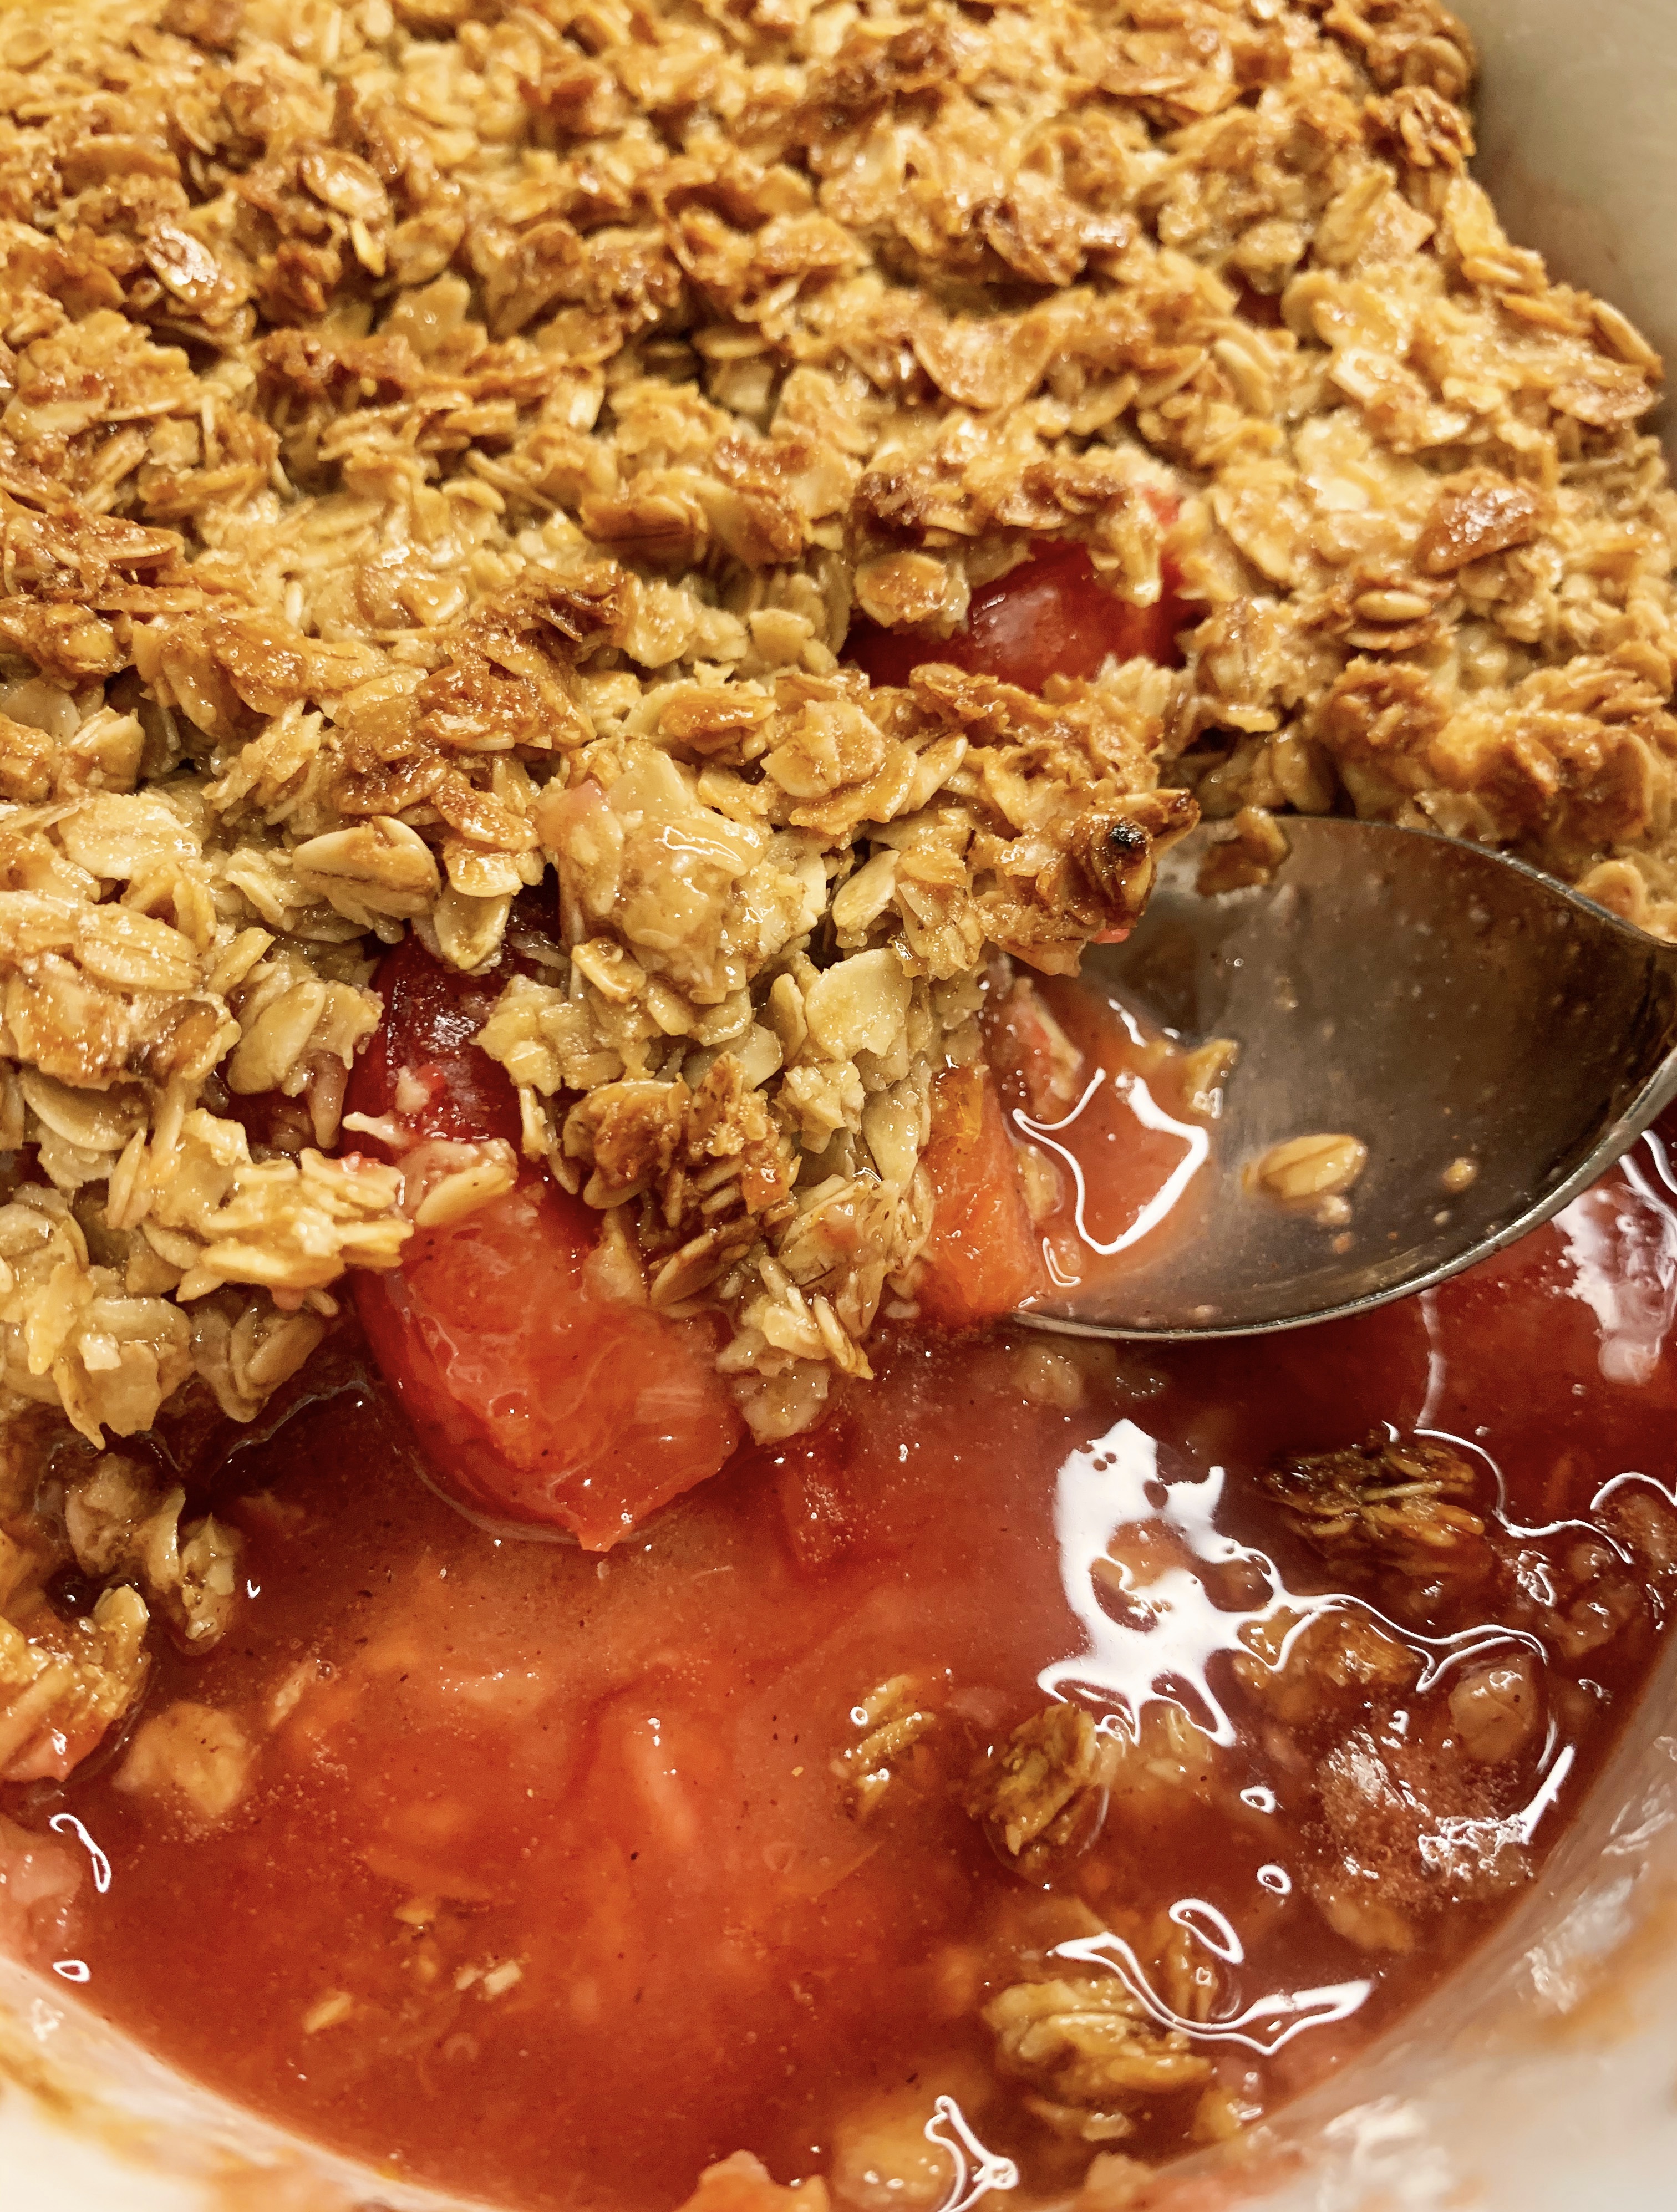
This comforting crumble has sophisticated flavours – the combination of plums with orange and a touch of cinnamon, beautifully cuts the sweetness of the oat crumble. Serve it with a dollop of cream, custard or a good quality vanilla ice-cream.
The great news is, is that it’s completely gluten free! As you may know, I am gluten free, and so finding ‘carbohydrate’ comforting desserts can be difficult, as I can’t eat wheat. A traditional crumble calls for flour, so it has been some years since I have been able to enjoy this English pudding in the traditional sense, but over the years I have perfected this ‘flapjack crumble’ by combining various recipes for toppings and fillings. Even if you don’t need to eat gluten free, I think that it will become your new favourite crumble!!…
This recipe is perfect for the plums we get in our supermarkets during the winter months, those that never seem to ripen but are perfect for baking with. The oats are best ‘toasted’ before making the topping, this makes their flavour nuttier, so it is worth doing if you have the time.
For the Crumble:
250g porridge oats
125g butter
100g light muscovado sugar
100g golden syrup
For the Plum Filling:
800-900g plums, cut in half, stones removed
1 large orange, zested and juiced
50g light muscovado sugar
1 teaspoon ground cinnamon
- Firstly, spread the oats on a large baking tray and bake in a preheated oven, 150’c fan, for 10-15 minutes, stirring once, until they are toasted and slightly golden.
- For the topping: melt the butter, sugar and syrup in a large saucepan (big enough to take the oats) over a medium heat until the sugar has dissolved. Add the toasted oats and stir to combine.
- Spread the plums out in a baking dish, cut side up – they should fit snuggly into the dish, covering the base completely. Spoon the orange juice over them.
- Mix together the orange zest and cinnamon with the sugar (50g), sprinkle over the plums.
- Spread the oat ‘flapjack’ mixture evenly over the plums. Place in a preheated oven, 180’c, for 30-35 minutes until the crumble is golden brown and bubbling.
- Serve with a dollop of cream, custard or vanilla ice-cream – Delicious!!
Chocolate Slab & Drunken Cherries
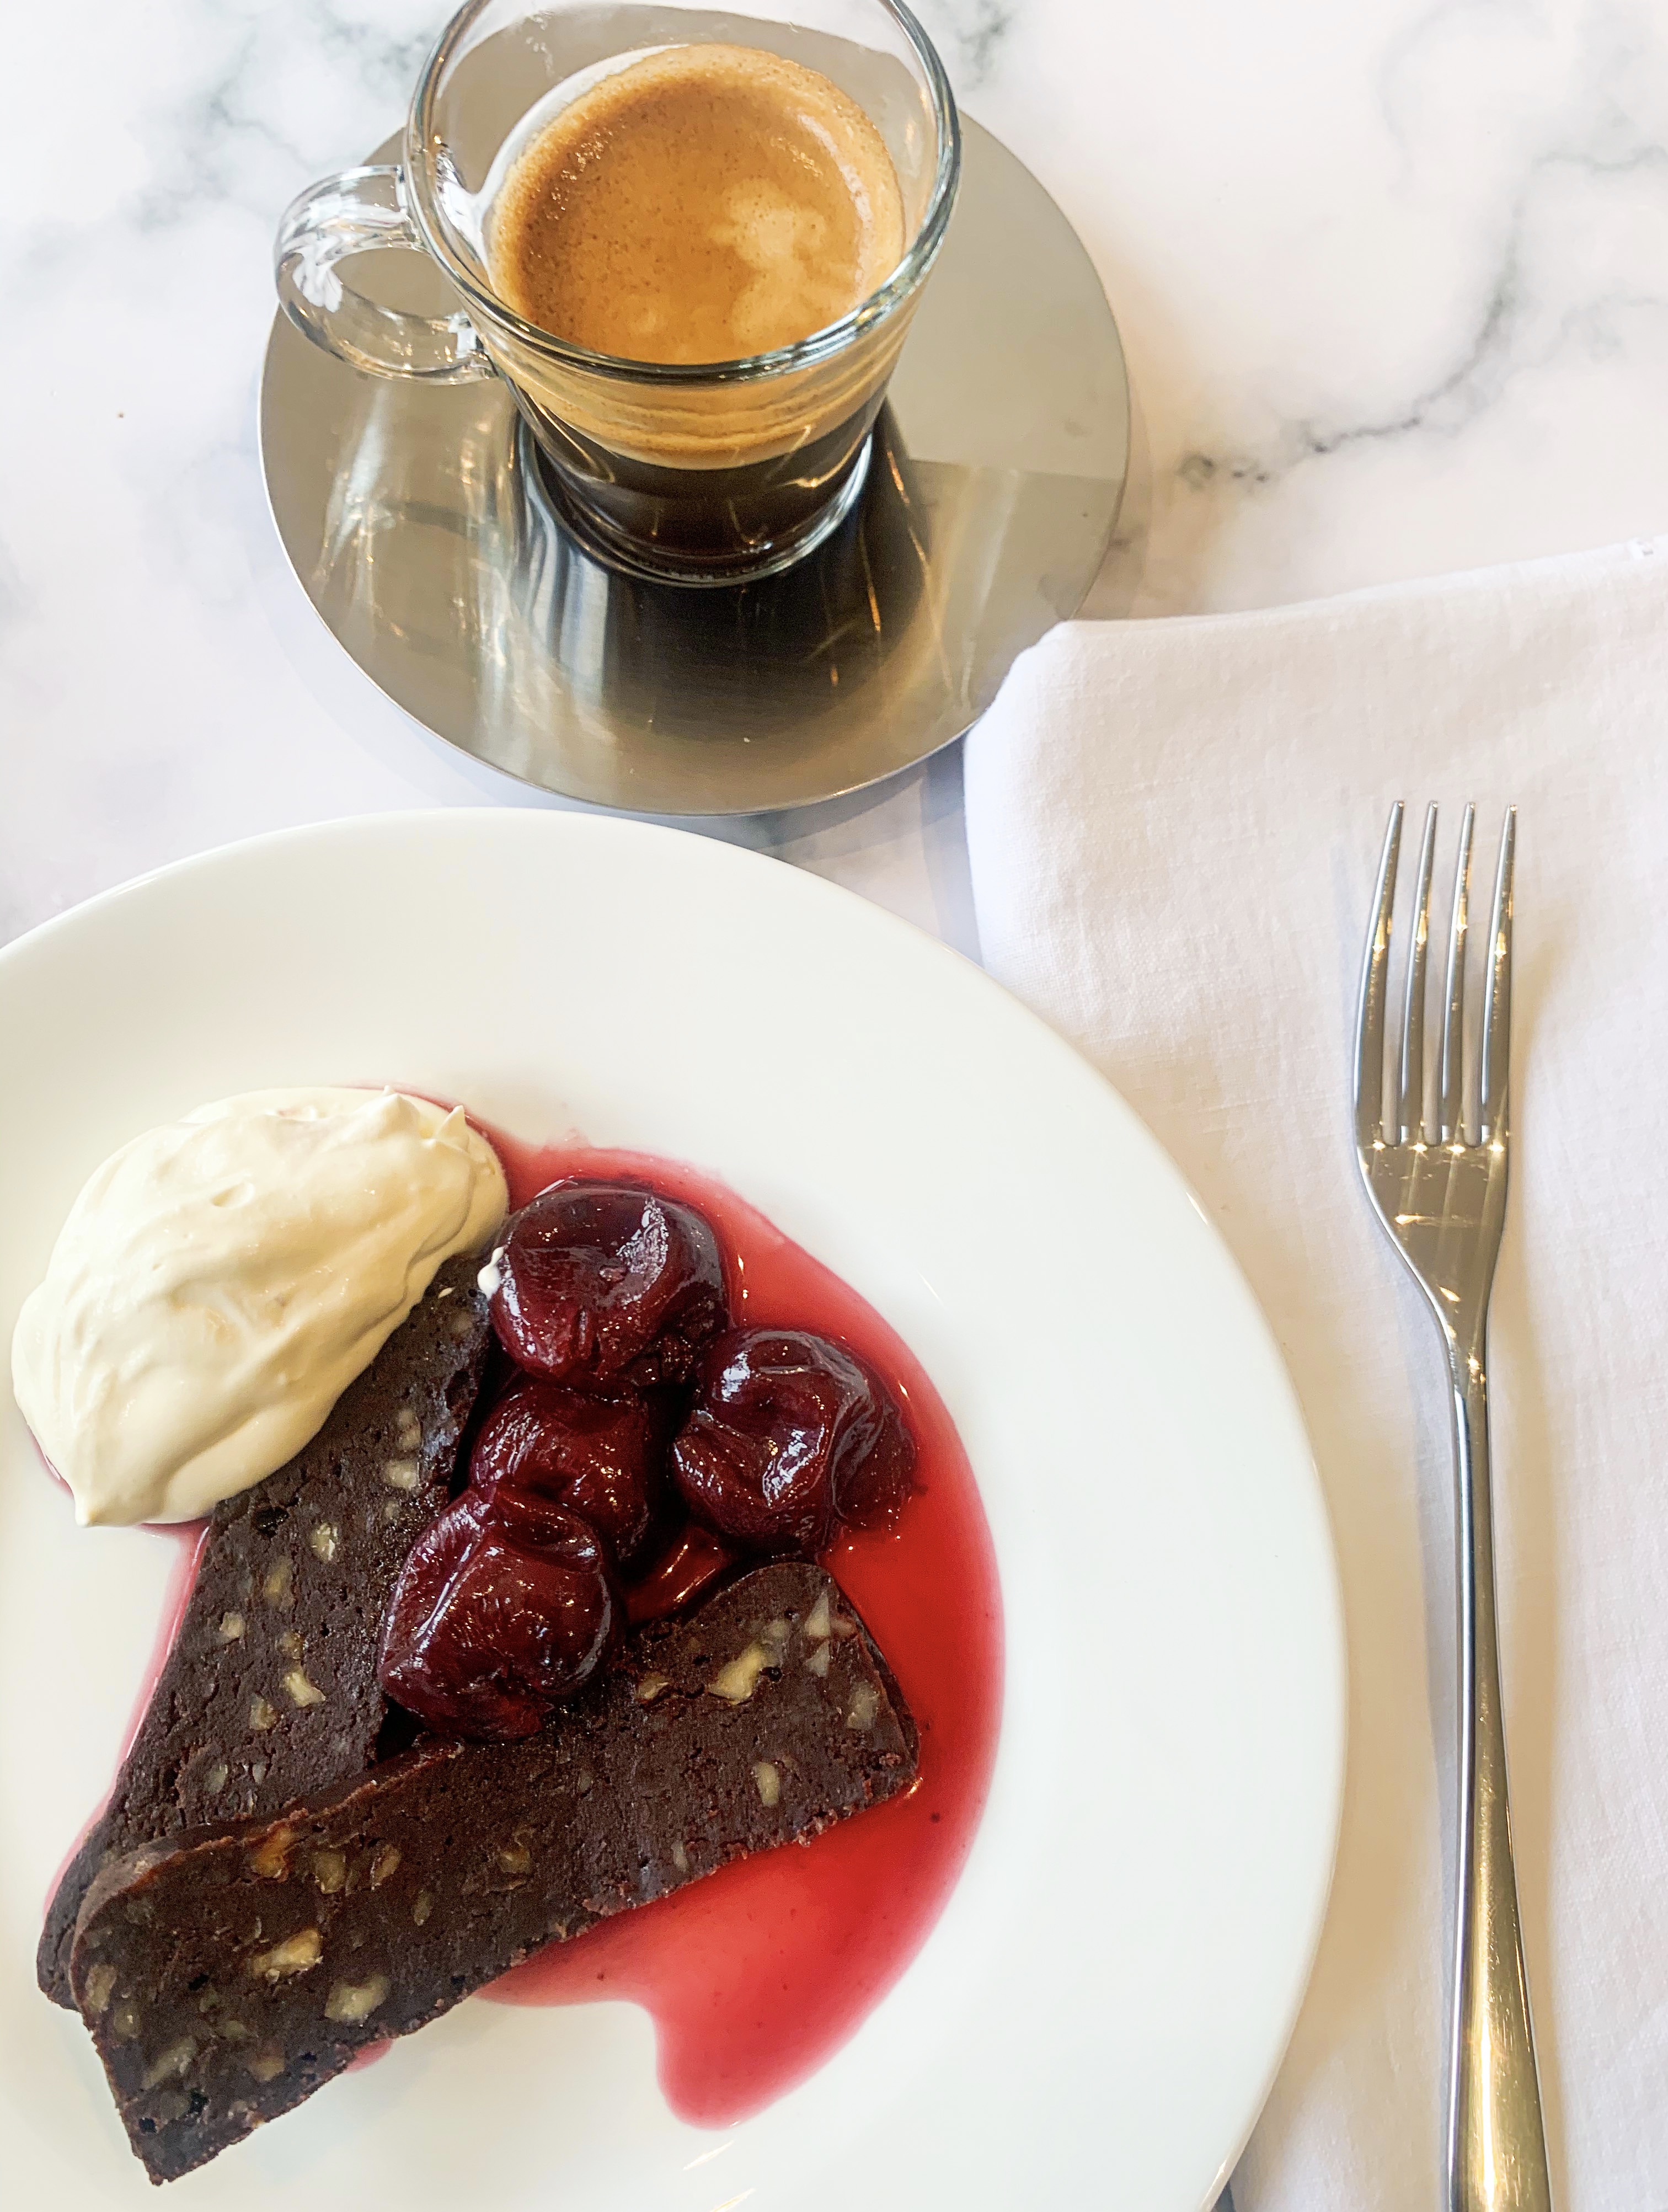

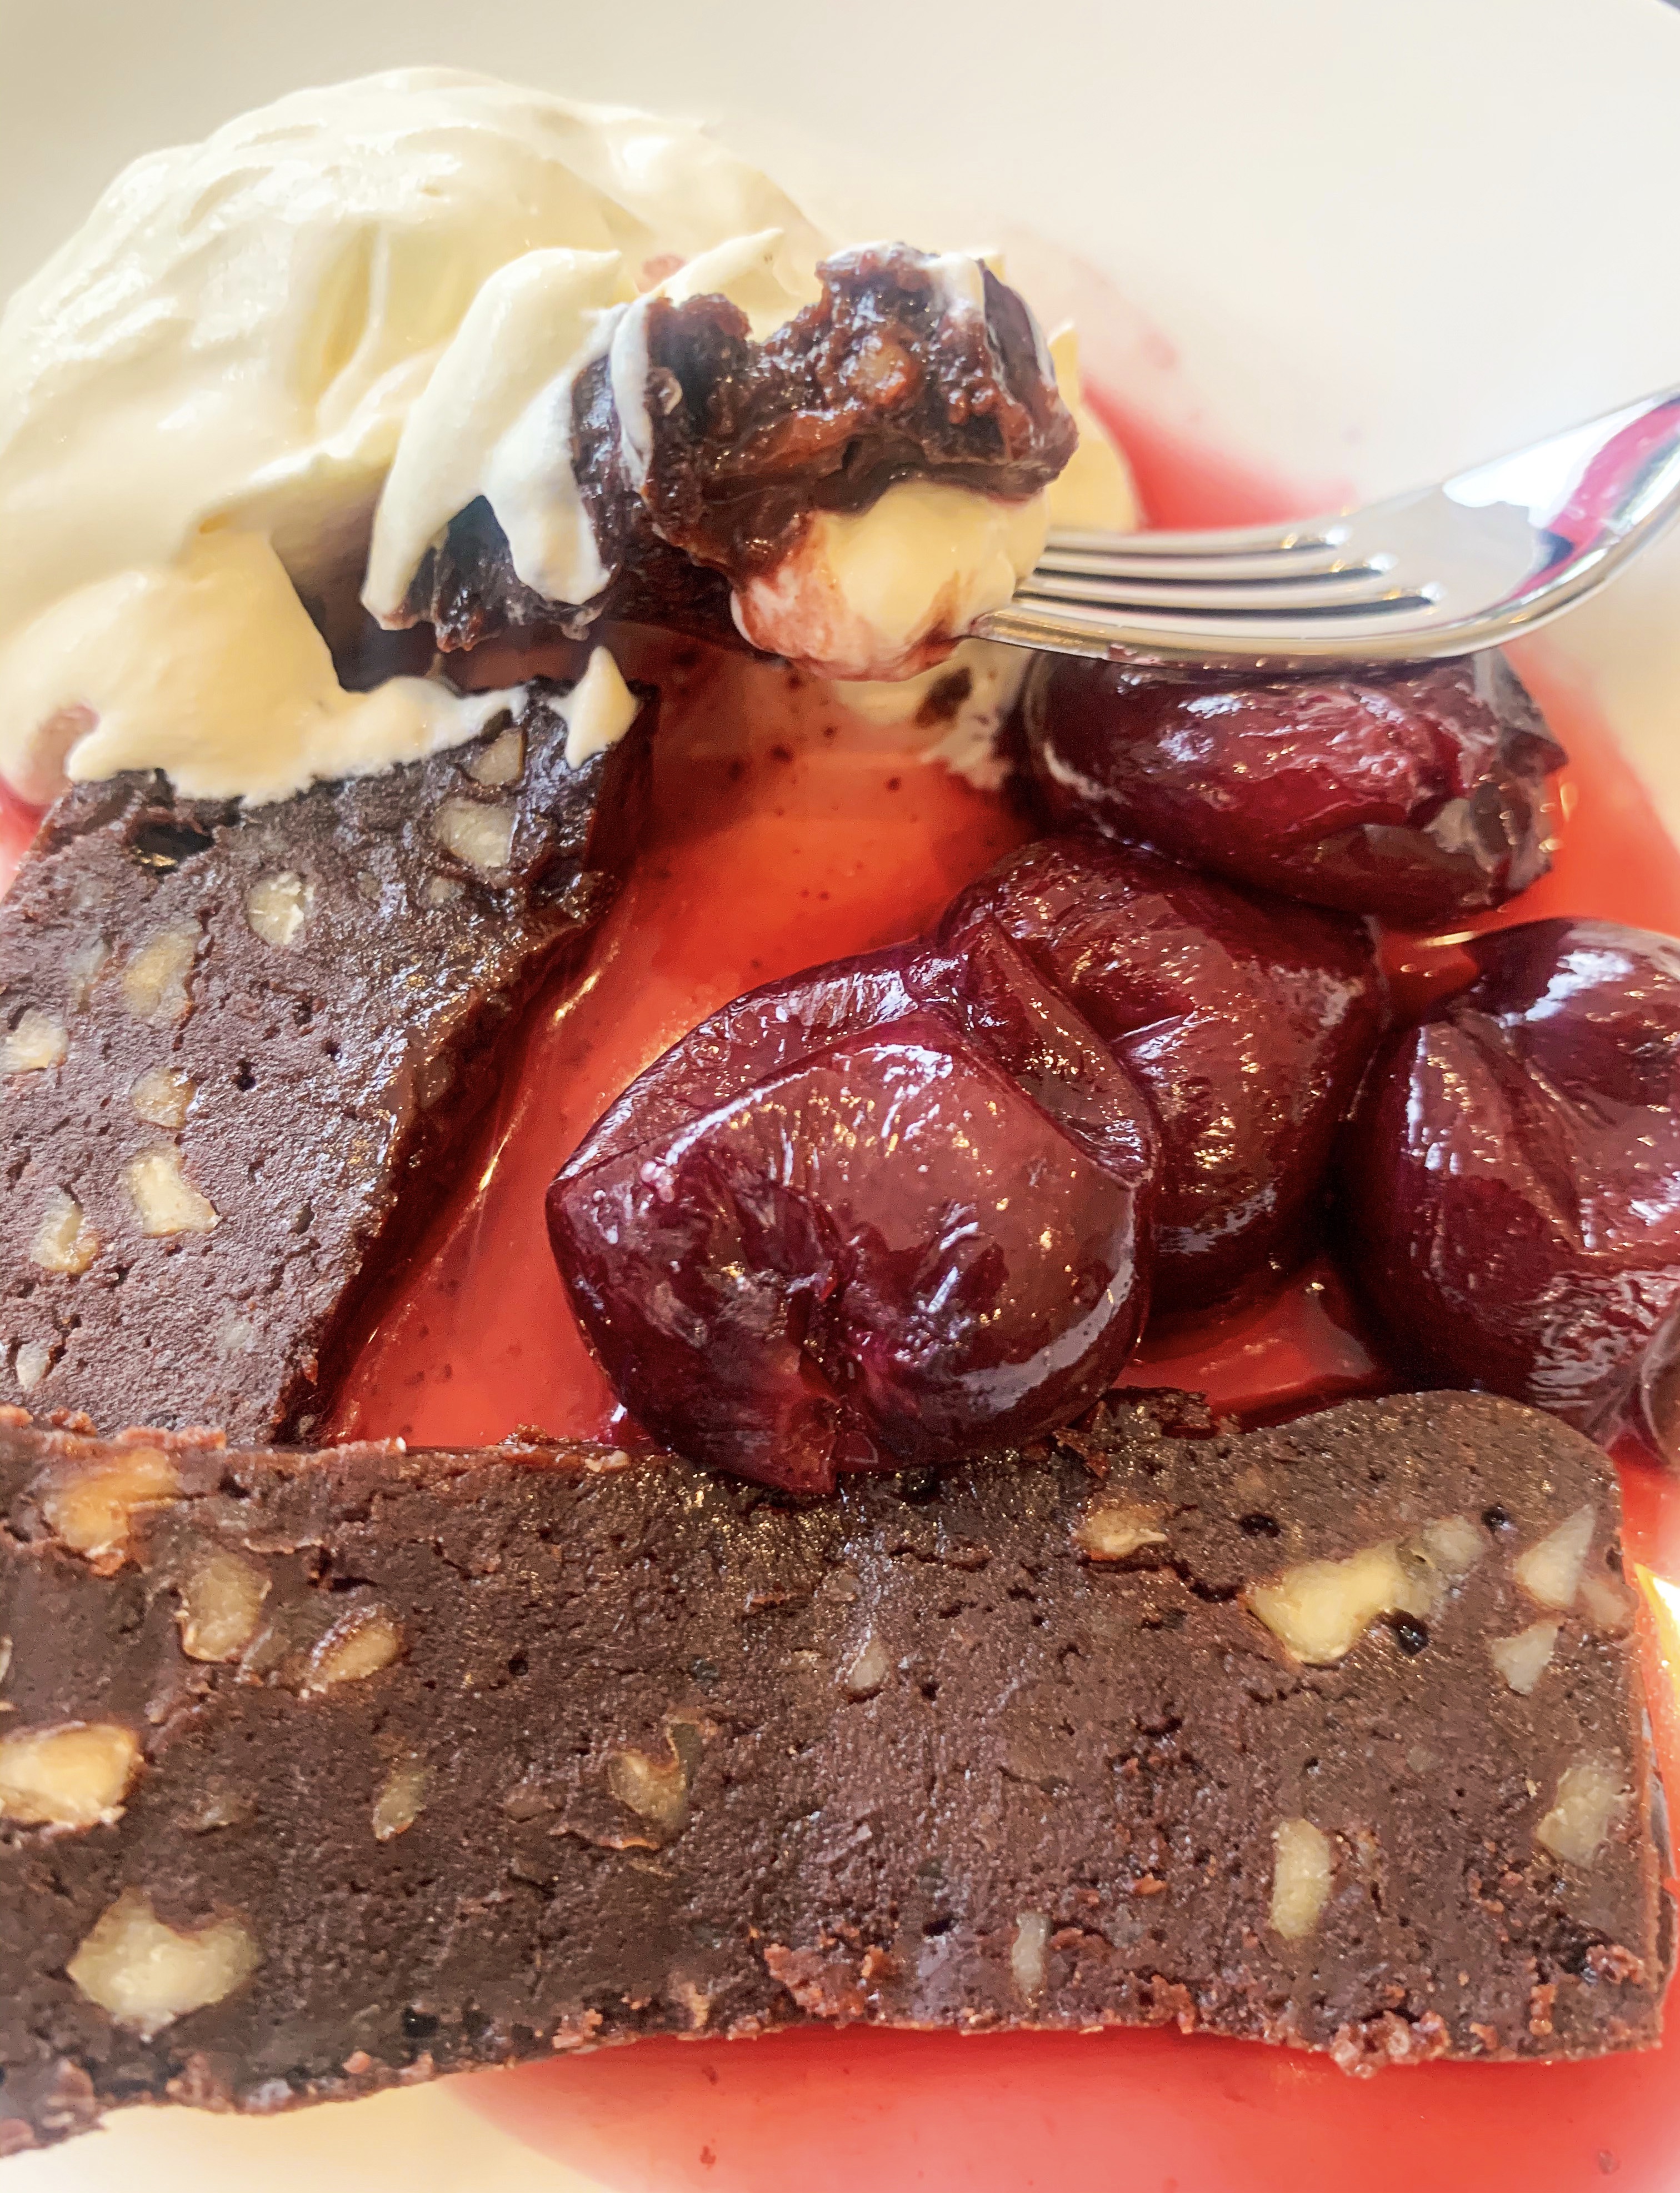
I found this dessert in a magazine many years ago, it’s simplicity caught my eye – it is a simple case of melt and mix. It keeps in the fridge, so it can be made well in advance. It is quite rich so you only need a small slices. The ‘drunken cherries’ are in a light winey compote – it’s an ideal recipe for cherries which are out of season. You could, and I have done this myself in the past, serve cherries in Kirsch from a jar, the taste will be different as the ‘drunken cherries’ in this recipe are made with red wine, however they do work well – giving the dessert a more ‘black forest gateau’ flavour. Serve with lightly whipped cream.
75g walnut pieces, finely chopped
75g butter
100g caster sugar
1 tablespoon golden syrup
150g dark chocolate, roughly chopped (I use Lindt 70% cocoa chocolate)
2 eggs, lightly beaten
35g plain flour (gluten free if required)
Generous pinch of sea salt
For the Cherries
400g cherries, stalks removed, pitted or left whole
300ml red wine
25g caster sugar
Whipped Cream to serve
- Line a small loaf tin with greaseproof paper.
- Spread the walnuts on a baking sheet and toast in a preheated oven, 150’c, for about 6 minutes until golden.
- Meanwhile put the butter, sugar and syrup into saucepan and melt over a low heat, stirring.
- Remove from the heat and add the chocolate, stirring until it has melted. Add the eggs stirring vigorously until combined. Fold in the flour, salt and nuts, then pour into the prepared loaf tin.
- Bake for 20 minutes in the preheated oven, 150’c fan. Leave to cool in the tin before transferring to the fridge for at least 2 hours.
- Meanwhile make the cherries. Tip the cherries, red wine and sugar into a small saucepan and bring to the boil. Reduce the heat slightly and allow to bubble for about 20 minutes until the cherries have begun to collapse and the liquid is syrupy. Leave to cool.
- Turn out the chocolate slab and cut into slices. Serve with a spoonful of cherries and a dollop of whipped cream!
Raspberry Clafoutis (Serves 4)
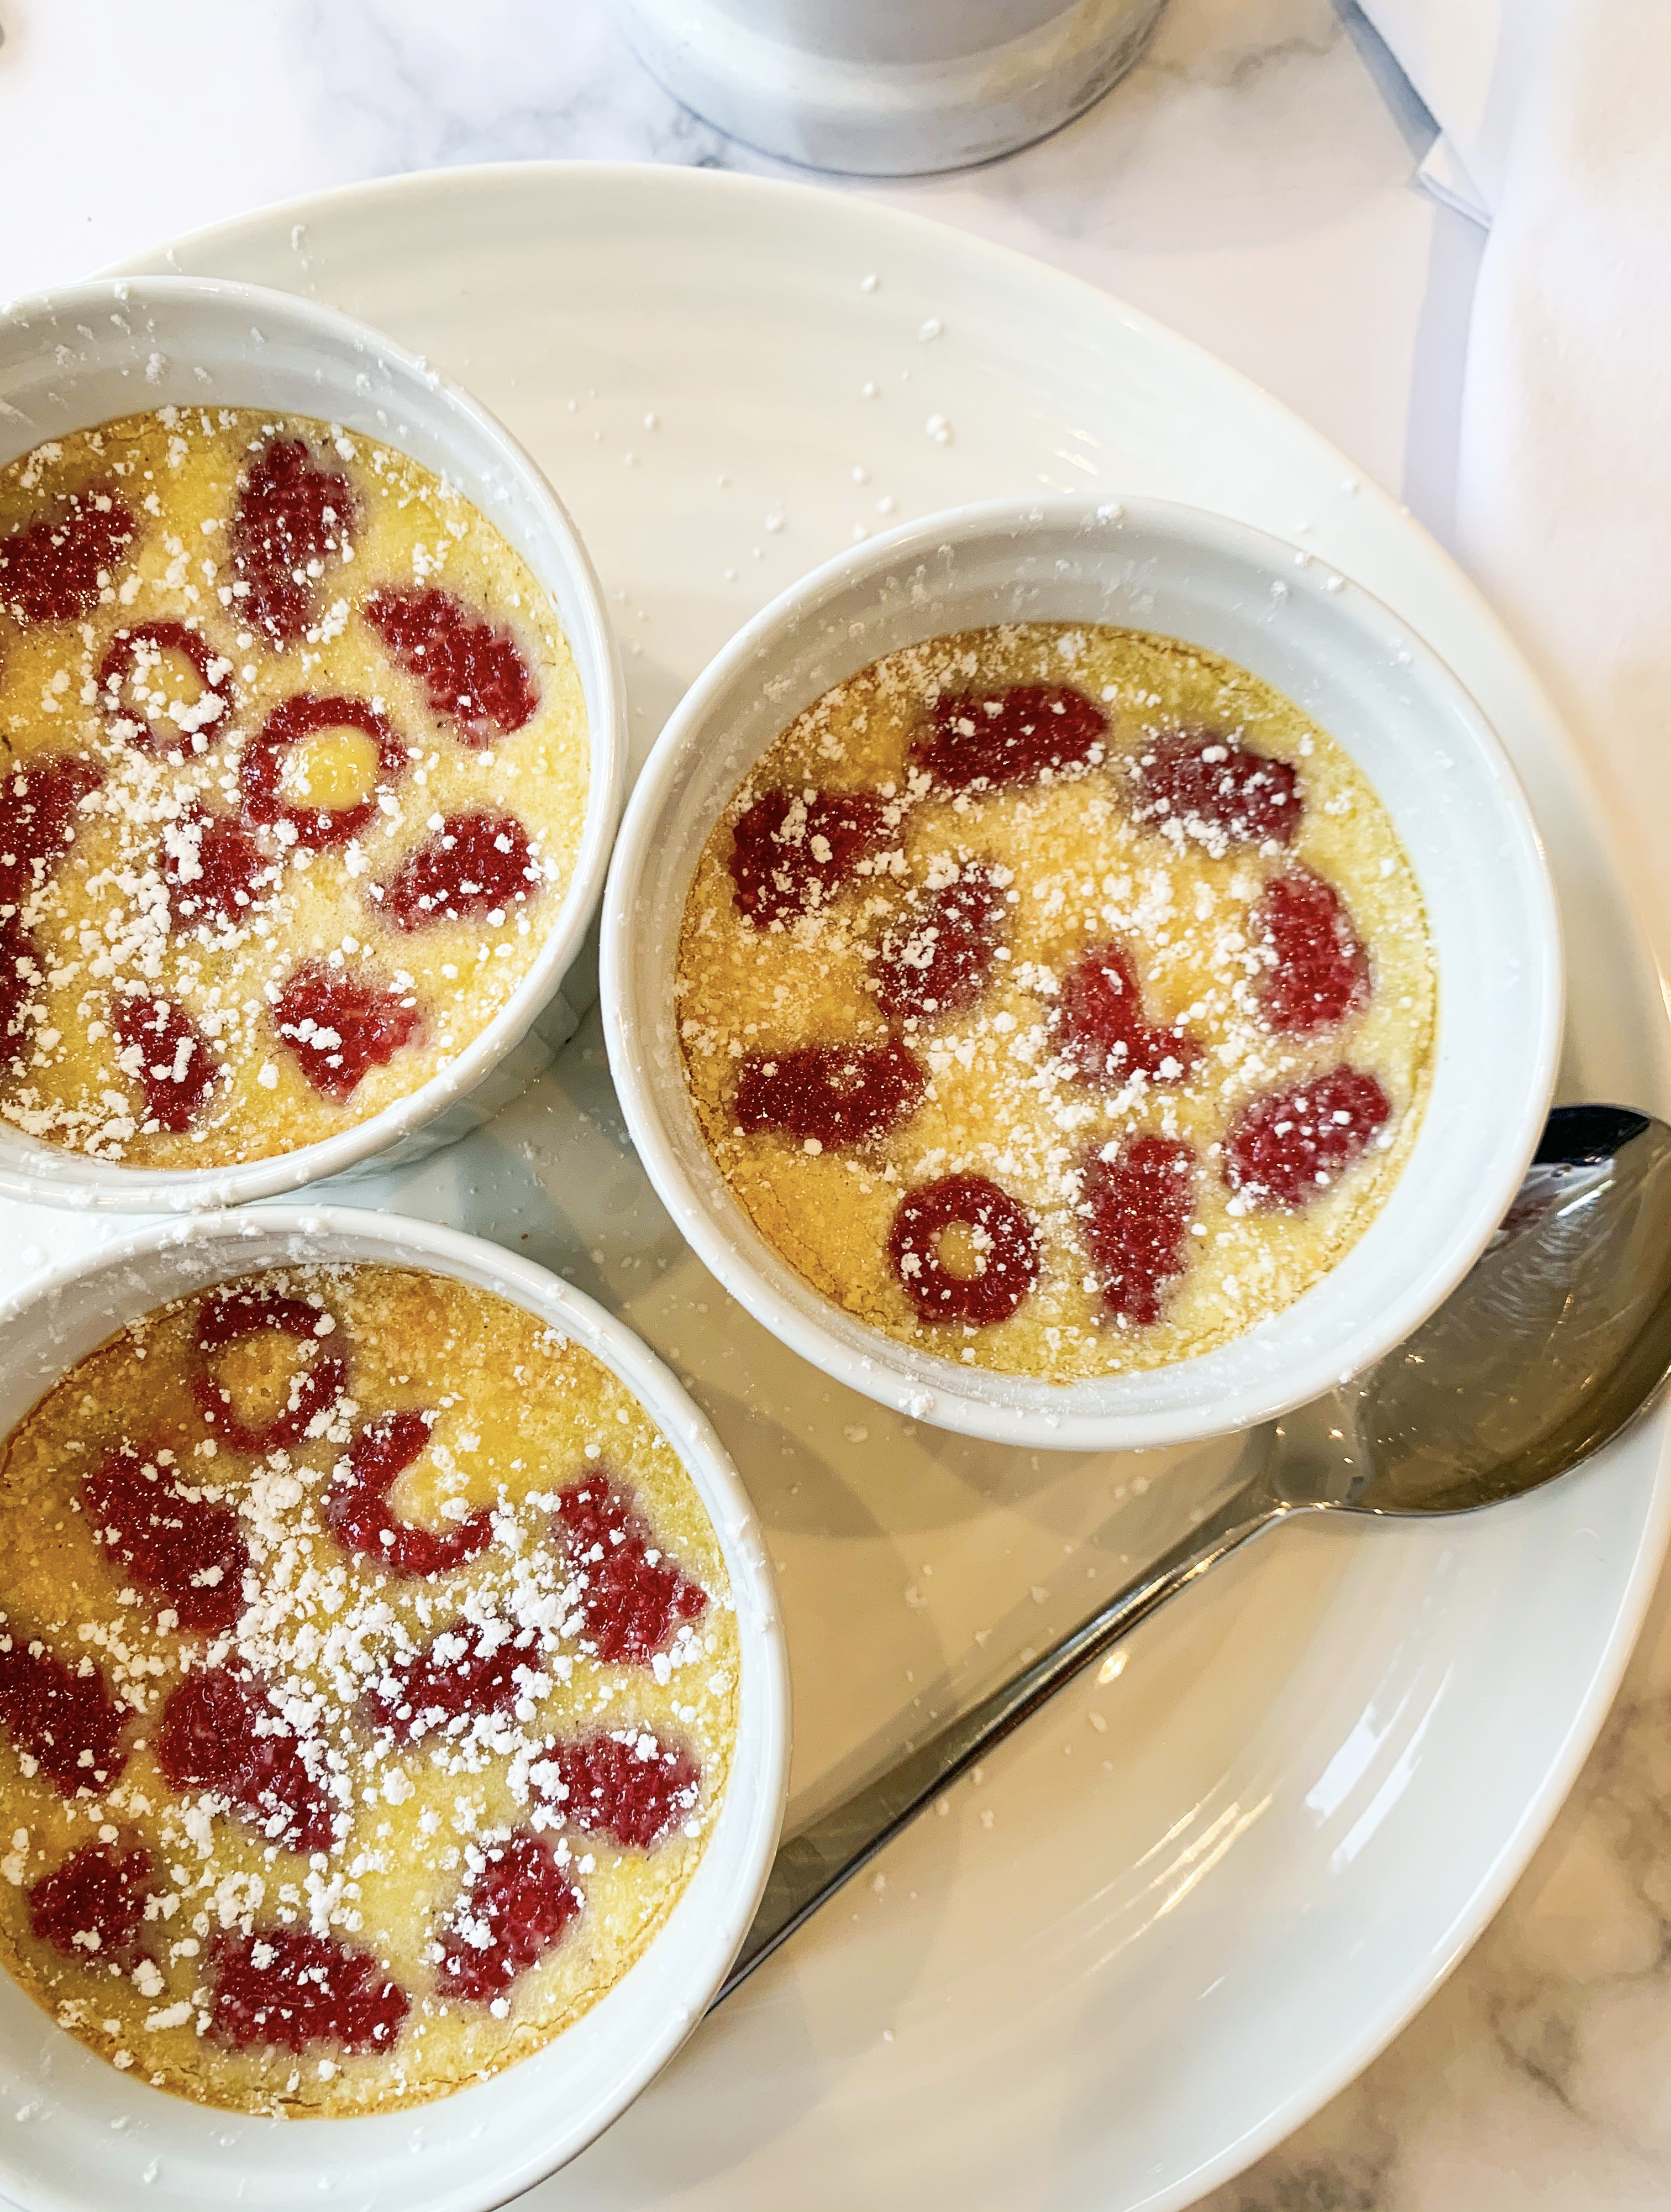
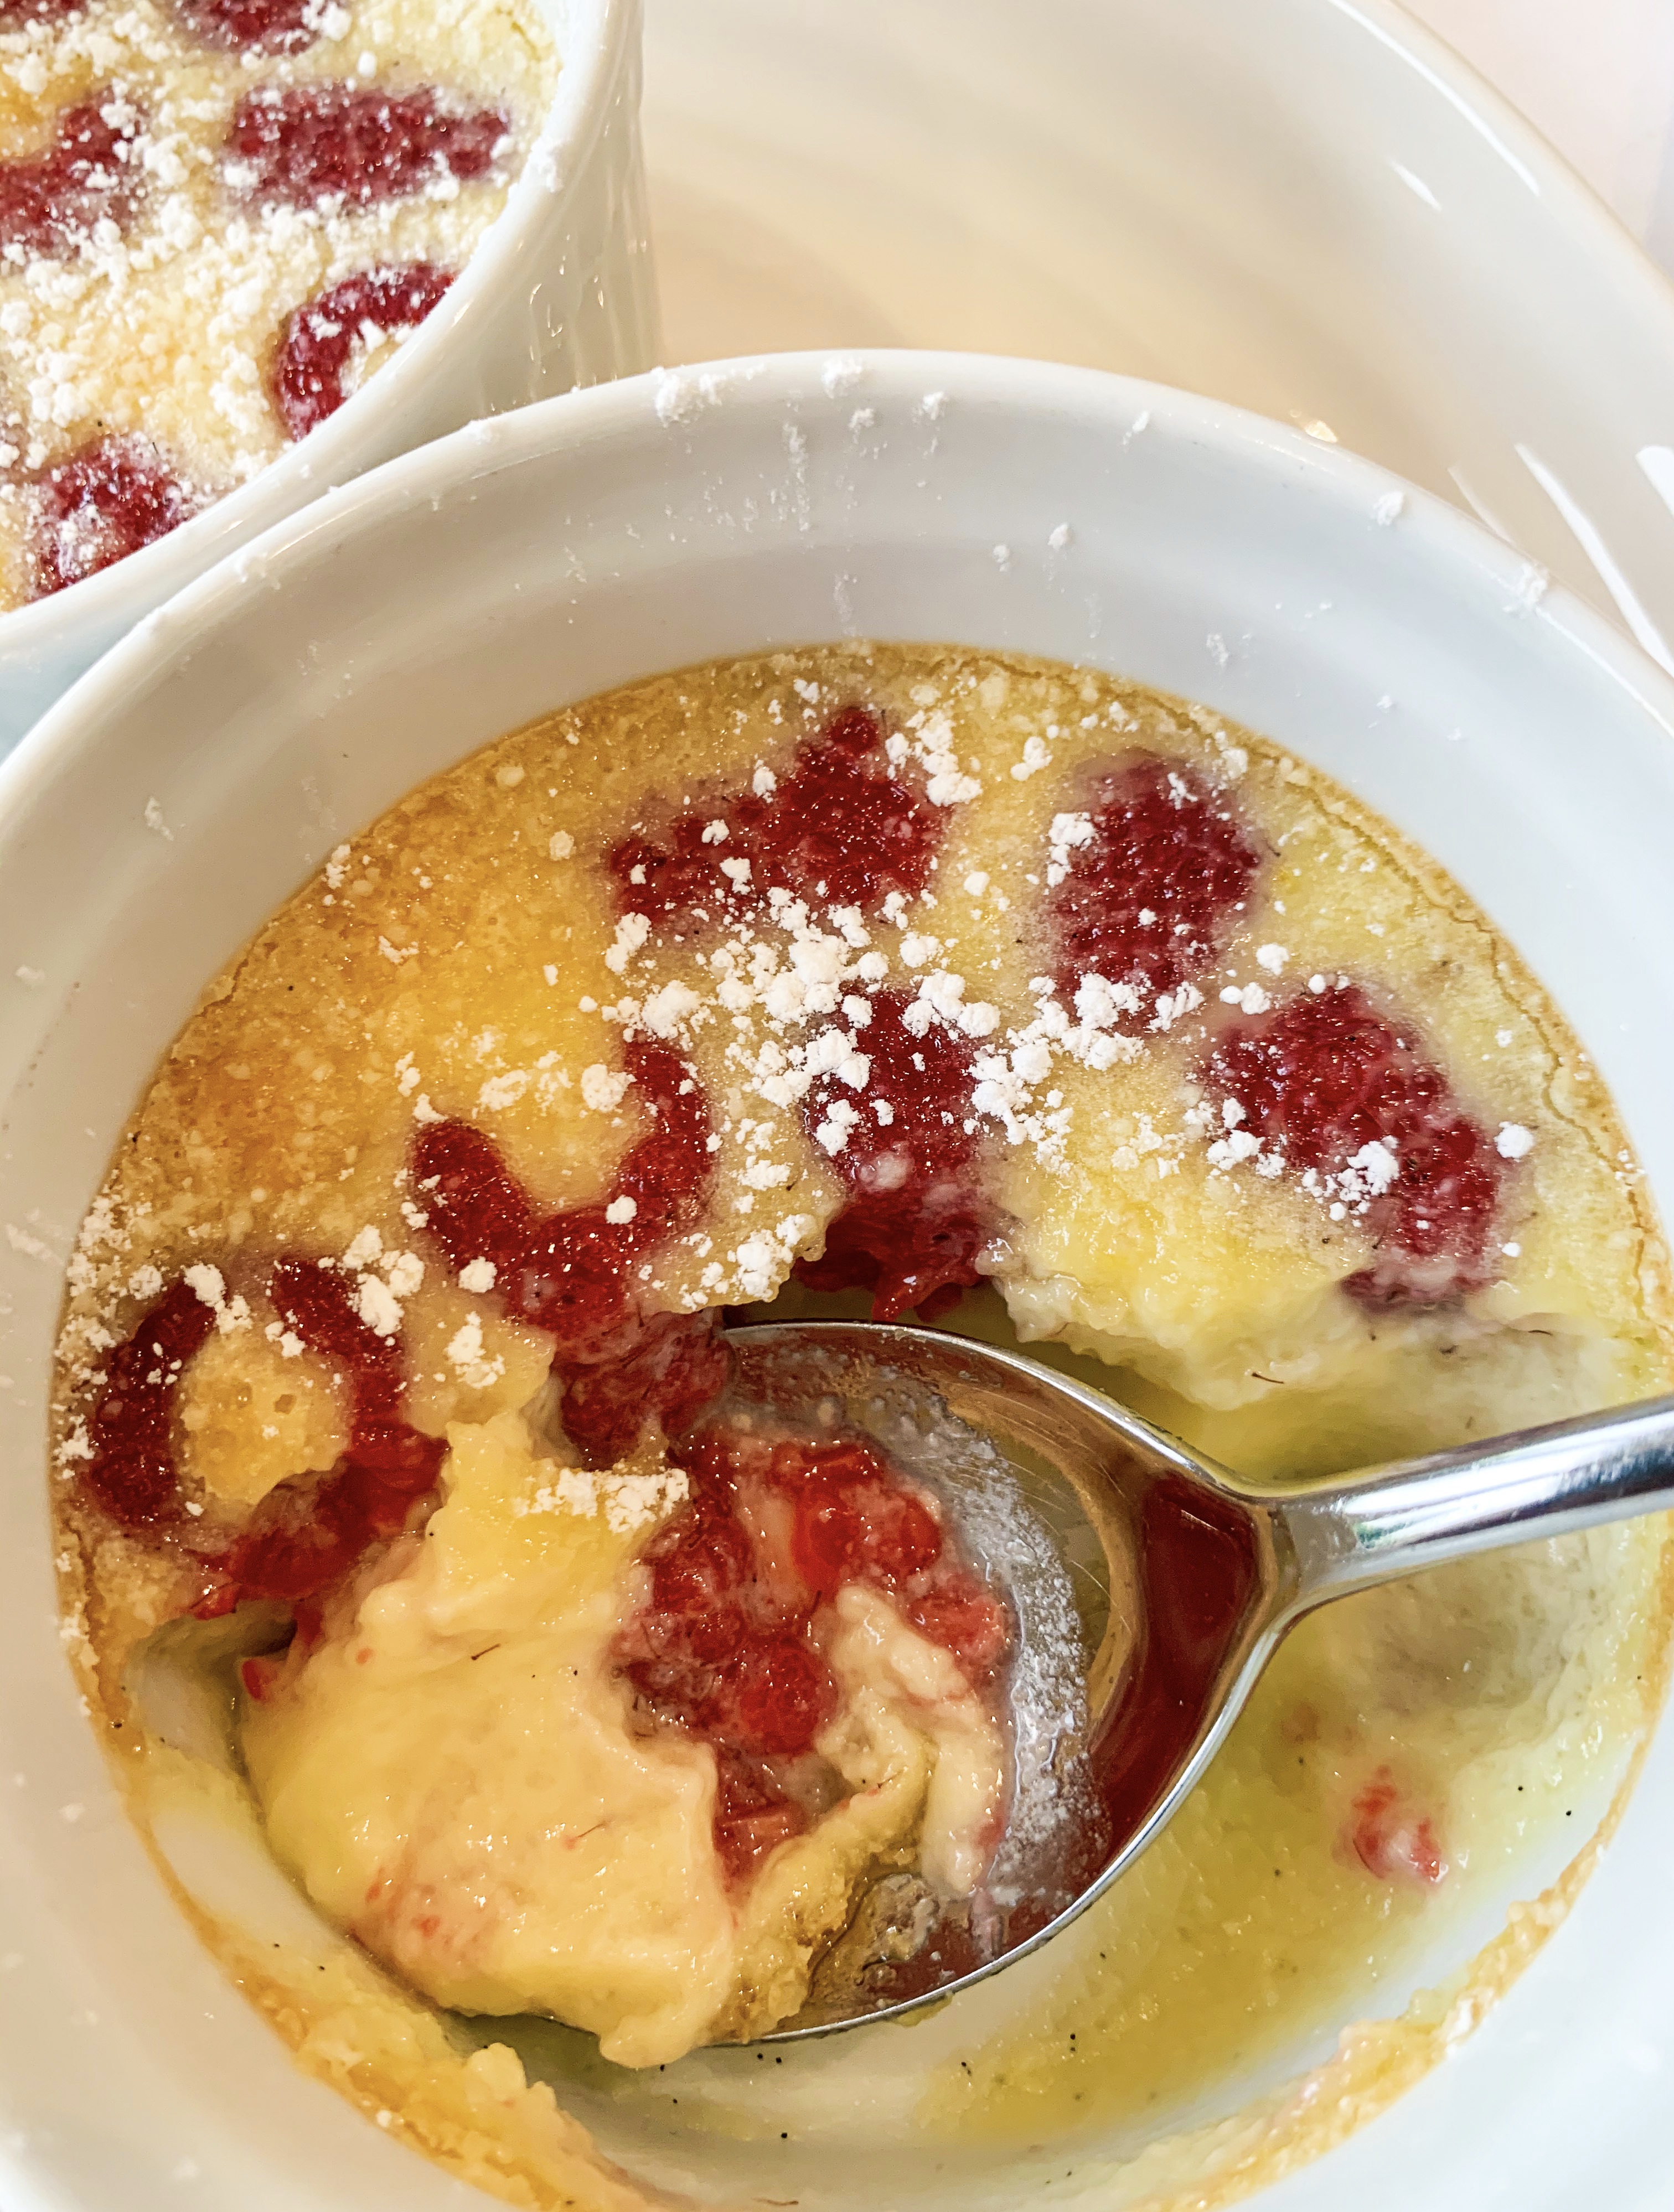
This recipe for Clafoutis is wonderfully light and rather like a baked custard, it is definitely the best clafoutis recipe I have tried. I found the recipe in Simon Hopkinson’s wonderful cookbook, ‘Roast Chicken and Other Stories’. I have been known to eat this dessert cold for breakfast!!…
(I think it is perfect served on its own, but in his cookbook, Simon Hopkinson does suggest a dollop of whipping cream if you fancy!)
1 vanilla pod, split lengthways
250ml whipping cream
A tiny pinch of salt
250g raspberries
1 egg
2 egg yolks
100g caster sugar
1 teaspoon potato flour (fécule de pommes de terre)
A little sifted icing sugar
Softened butter to grease dishes
Whipping cream to serve (optional)
- Put the vanilla pod in a small pan with the whipping cream and salt. When just coming to the boil remove from the heat and whisk carefully to dislodge the vanilla seeds from the pod into the cream. Cover and leave to infuse for 30 minutes or so.
- Take four ovenproof dishes – I use small individual soufflé dishes – or you could use one large dish if you like, either way butter the dish(es) and arrange the raspberries evenly in them.
- Beat together the egg and egg yolks, caster sugar and potato flour, then incorporate the cream and whisk together.
- Carefully pour over the raspberries, so as not to dislodge them. Then place the dishes in a roasting tin. Fill the tin with water so that it comes at least halfway up the sides of the dishes then sift a little icing sugar over their surface.
- Carefully place in a preheated oven, 180’c fan, for 25-30 minutes until slightly puffed and a little wobbly – if using a larger dish you may need to increase the cooking time by 10 minutes or so.
- Switch off the oven and open the door. Leave them like this, in the oven for a further 5 minutes before removing. Take the dishes out of the roasting dish and allow to cool to lukewarm before serving with a little more icing sugar sifted over (and with some whipped cream if you fancy!).
Roasted Raspberries with Vanilla Ice Cream (Serves 4)
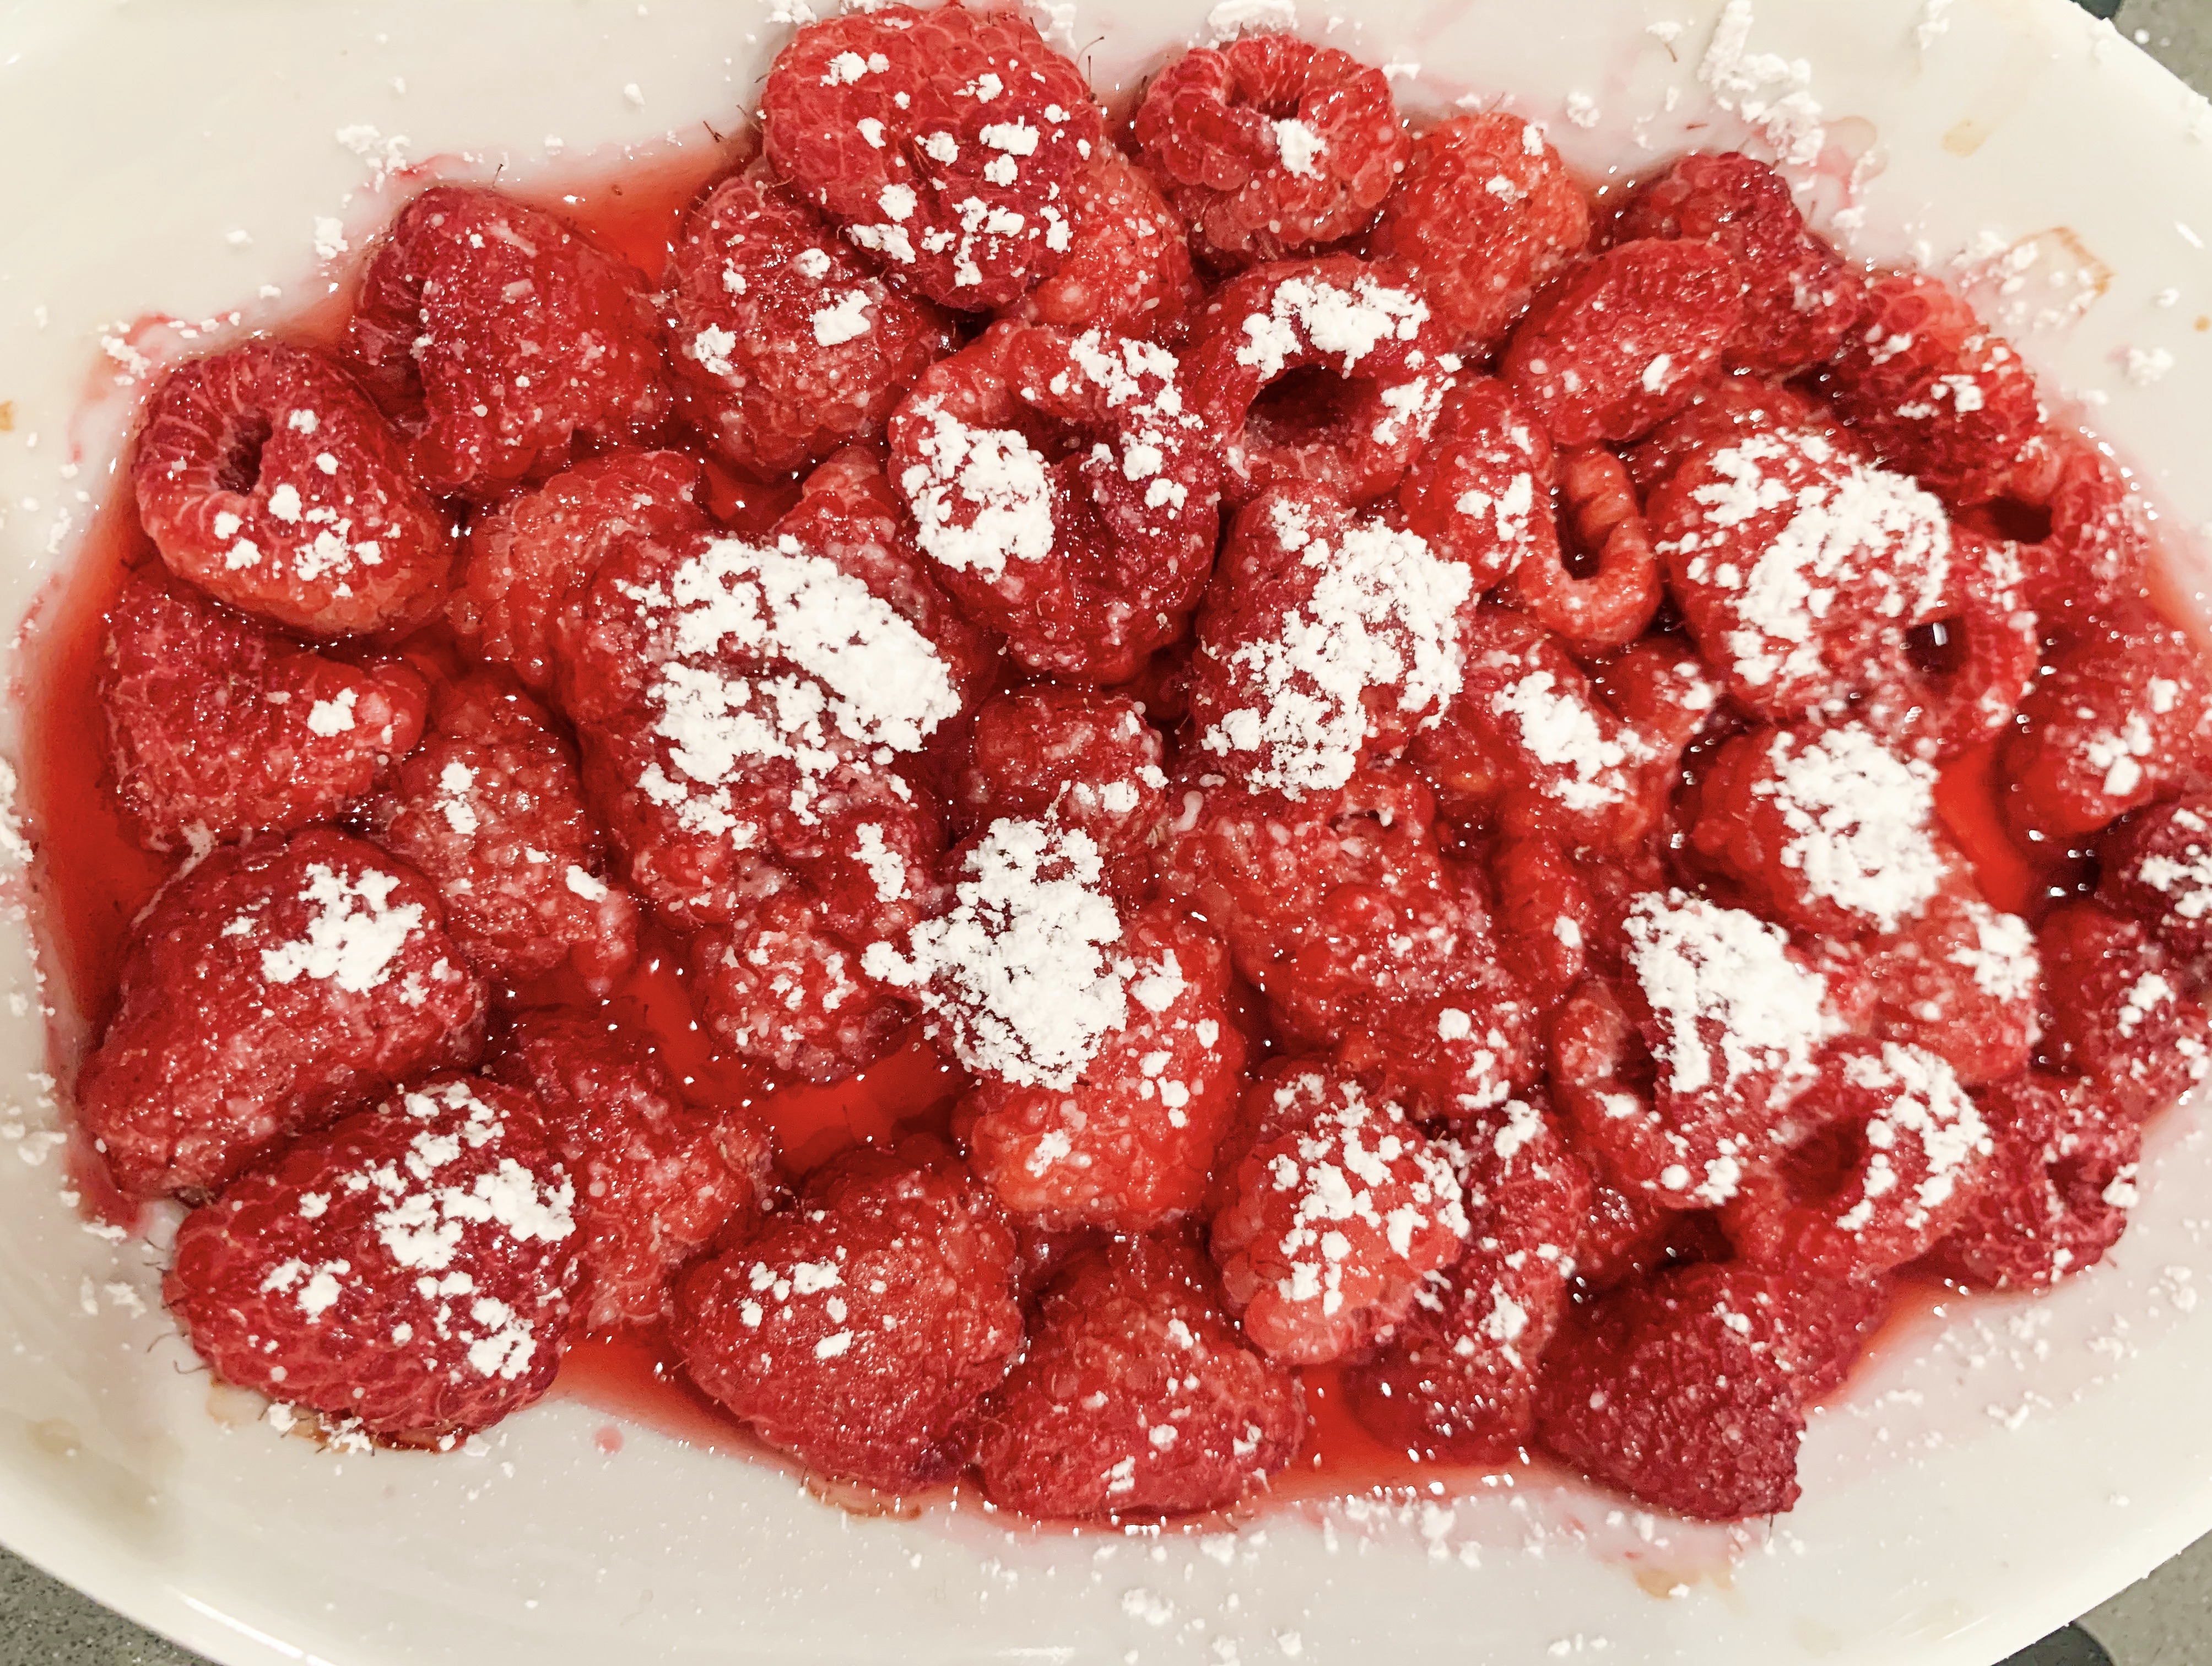
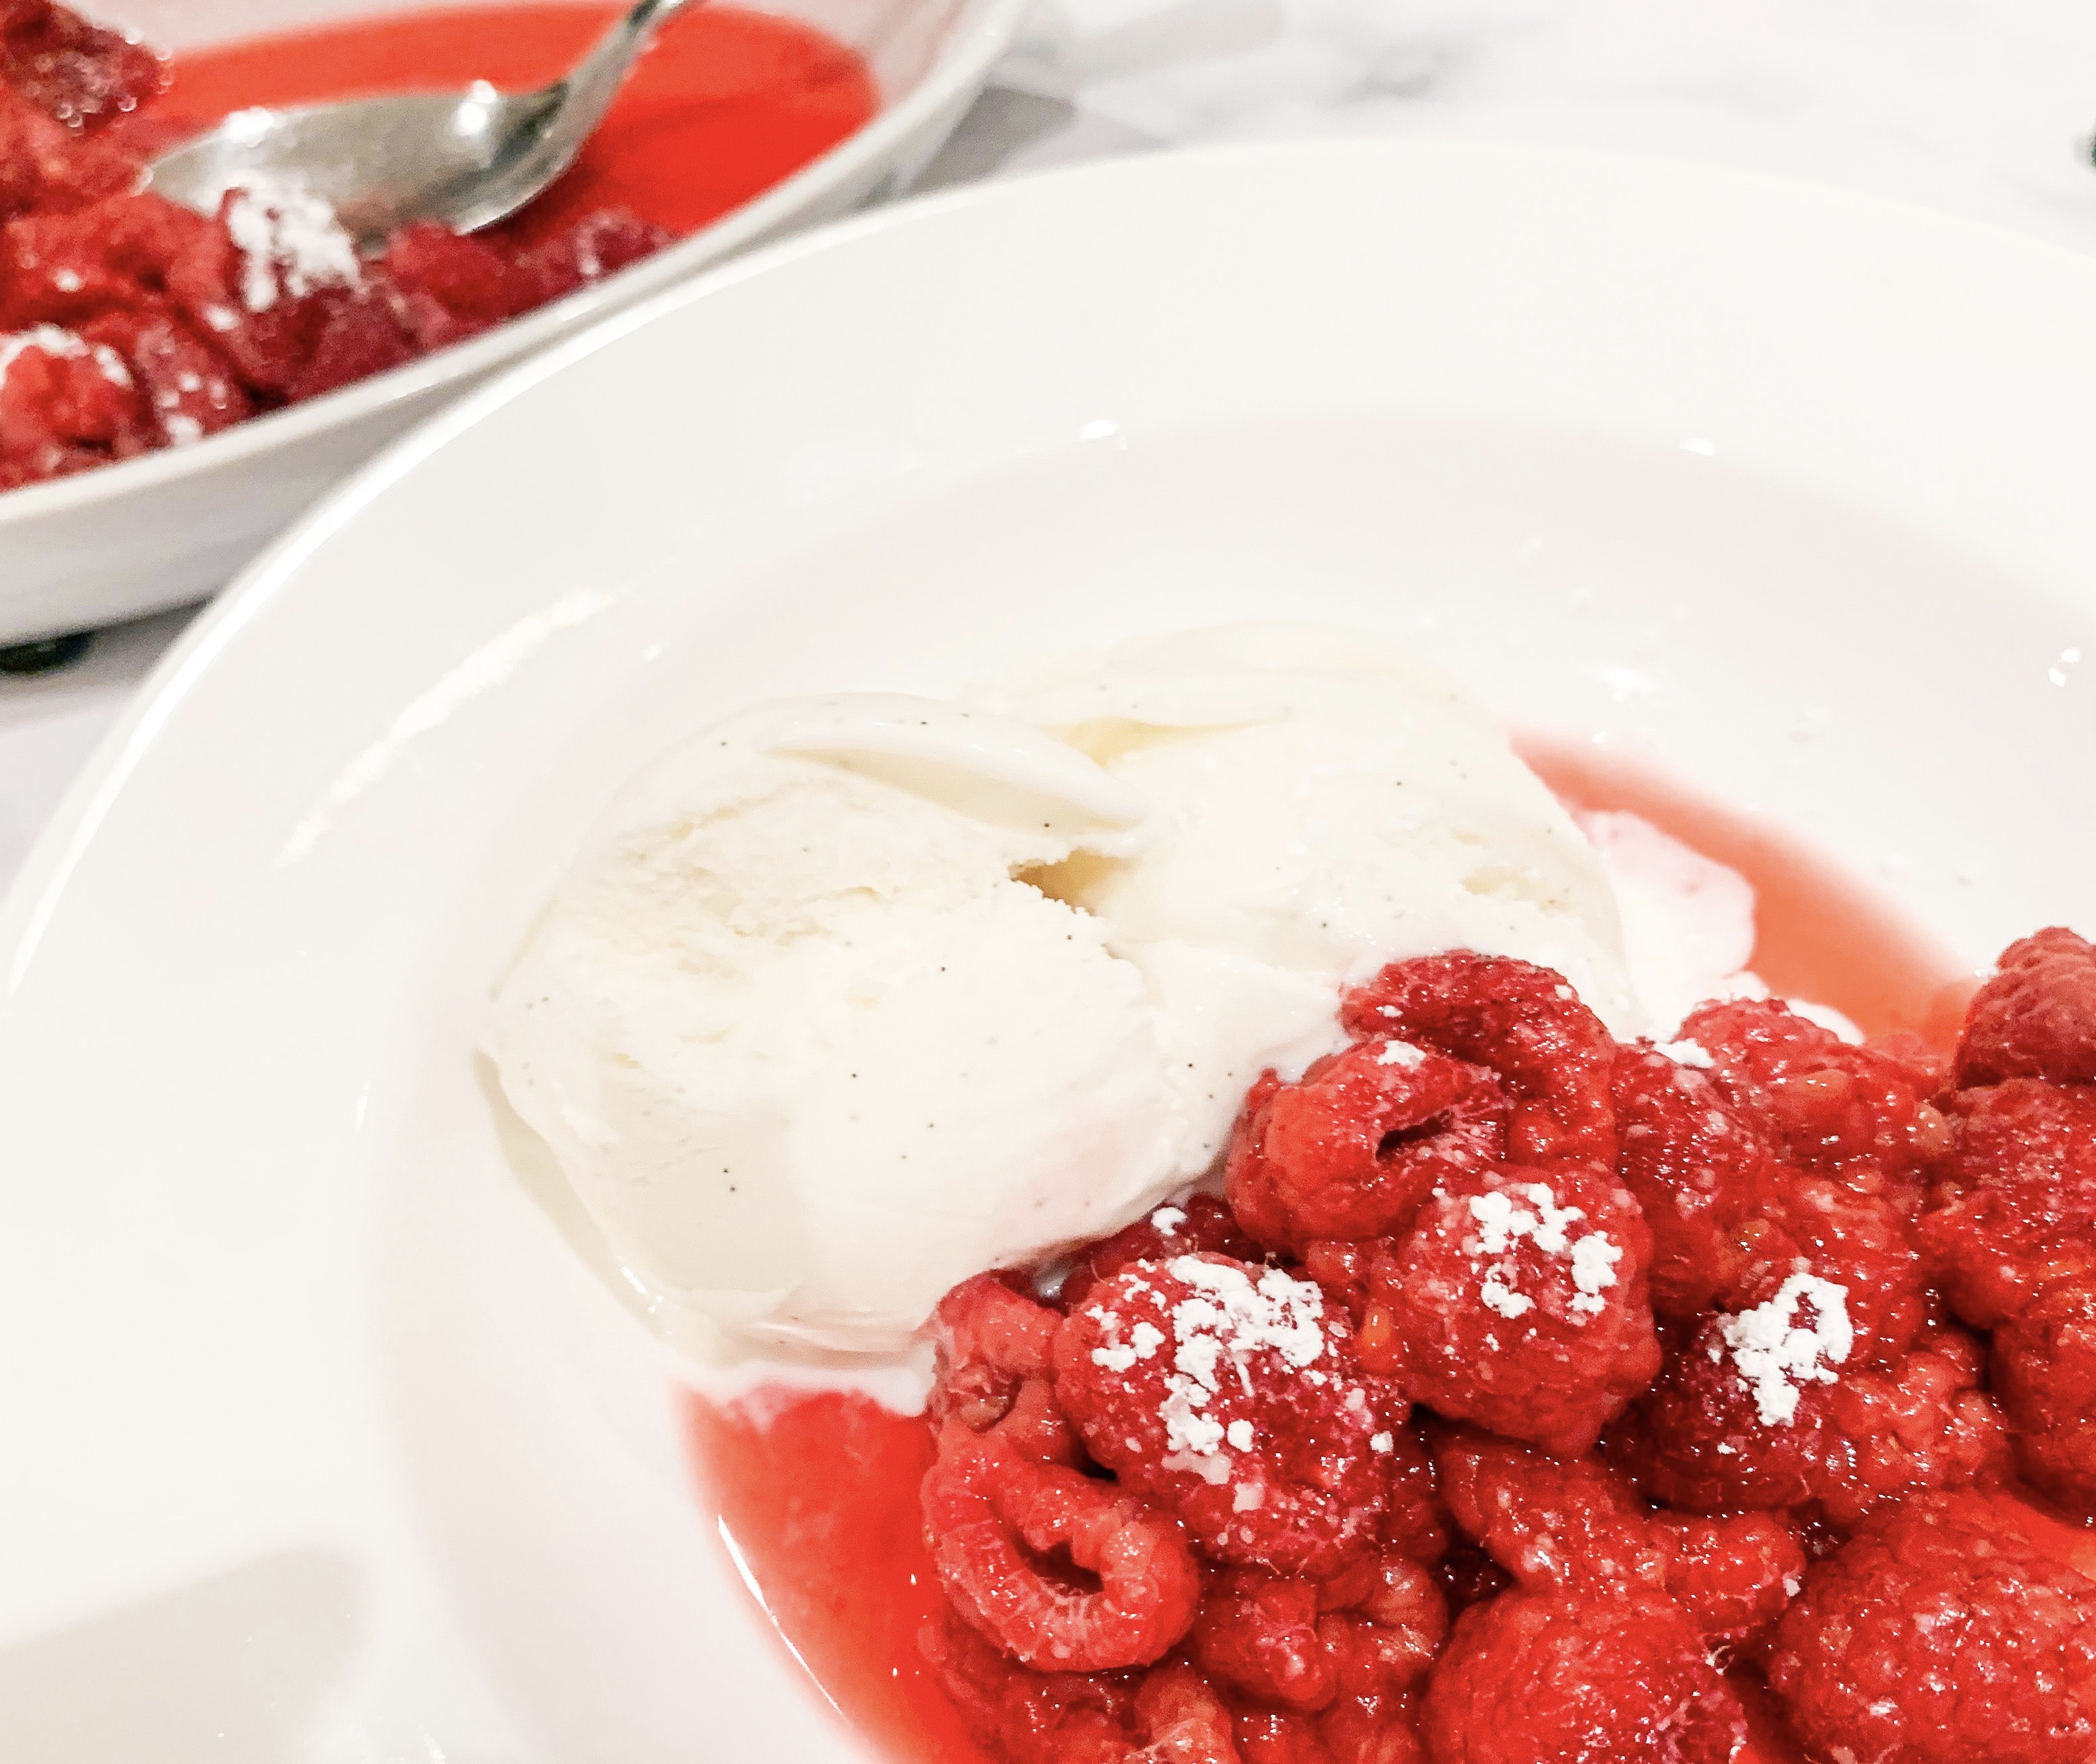
You will thank me for this simple recipe!! It’s such an obvious idea, I wonder why I never thought of it until I saw the recipe in a magazine some years ago. Winter raspberries often lack flavour, but by roasting them you can intensify the flavour and produce a lovely warming treat at the same time!
400g raspberries
2 tablespoons caster sugar
A dusting of icing sugar (2-3 teaspoons)
4 scoops of vanilla ice-cream
- Put the raspberries in an ovenproof dish. Sprinkle with caster sugar. Cook in a preheated oven, 200’c fan, for about 15 minutes until the juices have come out of the raspberries but they are still keeping their shape.
- Remove from the oven, either serve at the table in the oven proof dish or transfer to individual bowls – either way sprinkle with icing sugar before serving.
- Serve with vanilla ice-cream.
‘Crumbles in a Cup’
This is a great idea that I have taken from Nigella Lawson’s cookbook, ‘Nigella Express’. The idea is to freeze the crumble topping and some summer berries, then at any given time you can quickly make up a ‘Berry Crumble in a Cup’! You just need to cook them from frozen for 15 minutes! I have changed the recipe slightly; I make my crumble topping with the addition of ground almonds as I think it improves the flavour. You can either make the crumbles in a cup/small mug or in a ramekin, the measurements of the ingredients will differ slightly depending on which you choose – see below
For the Crumble Topping
200g plain flour (gluten free if required)
125g butter, cold and cubed
50g caster sugar
50g ground almonds
50g soft brown sugar
1 teaspoon ground cinnamon
- Place the flour and butter in a large mixing bowl and rub together with your fingers until the mixture resembles breadcrumbs.
- Add the caster sugar, ground almonds, soft brown sugar and ground cinnamon – stir to combine.
- Place in a freezer bag and freeze until needed for a ‘Crumble in a Cup’ – see below.
‘For a Crumble in a Cup’ (approx. 300ml capacity)
100g summer fruits (see note above)
1 teaspoon corn flour
2 teaspoons vanilla sugar (or regular sugar and a drop of vanilla essence)
75g frozen crumble topping
‘For a Crumble in a Ramekin’ (approx. 125ml capacity)
50g frozen summer fruits
½ teaspoon cornflour
1½ teaspoons of vanilla sugar (or regular sugar and a drop of vanilla essence)
30g frozen crumble topping
(To serve – ice cream or thick cream)
- Put the summer fruits in either the cup or ramekin, sprinkle with the cornflour and sugar – stir gently.
- Sprinkle the frozen crumble topping over the fruit (if desired you can add a little more topping)
- Bake in a preheated oven, 220’c fan; for the cups 20 minutes, and for the ramekins 15 minutes.
- Serve with a scoop of ice-cream or a dollop of thick cream.
Apple Gingerjack (Serves 6)
This is a great pudding from Nigella Lawson’s cookbook, ‘At My Table’. Being gluten free, I often find it difficult to find wheat free ‘cosy, cake- like’ puddings but this recipe uses oatmeal for the topping so is totally gluten free! It is best served warm or at room temperature rather than hot – I’ve even eaten the leftovers cold for breakfast – delicious!!
I like to serve this with either double cream or clotted cream, but of course custard would be good too!
For the base:
15g unsalted butter
2 tablespoons golden syrup
750g Bramley apples, peeled, cored and cut into 3cm chunks
For the topping:
200g Fine oatmeal (if required make sure it’s totally gluten free)
75g soft light brown sugar
4 teaspoons ground ginger, plus a extra ¼ teaspoon for sprinkling
½ teaspoon bicarbonate of soda
250ml full-fat milk
125g unsalted butter, soft, cut into cubes
1½ tablespoons demerara sugar
Double or clotted cream, or custard (to serve)
- Gently melt 15g butter in a large saucepan (in which the apples will fit – not too heaped up), once melted add the syrup, stir well and then add the apples. Cook over a high heat for about 5 minutes, stirring frequently , until the apples start to soften around the edges – have a fuzzy appearance. Pour into a pie dish.
- Meanwhile, mix the fine oatmeal, soft light brown sugar, 4 teaspoons of ginger and the bicarbonate of soda together, using your fingers to break up any lumps in the sugar.
- Using the same saucepan that you used to make the apple mixture, heat the milk and 125g butter together gently, until the butter is melted and the milk is almost at boiling point. Remove from the heat and, using a wooden spoon, stir in the oatmeal mixture beating until smooth – it will thicken a little.
- Pour the oatmeal mixture over the apples, spreading it out to cover them evenly.
- Mix the ¼ teaspoon of ginger with the demerara sugar and sprinkle over the top.
- Place in a preheated oven, 180’c fan, and bake for about 30 minutes until the apple is soft and the top has firmly set.
- Let it stand for about 30 minutes or more and serve warm at room temperature with double or clotted cream, or custard.
Wreath Pavlova with Summer Berries
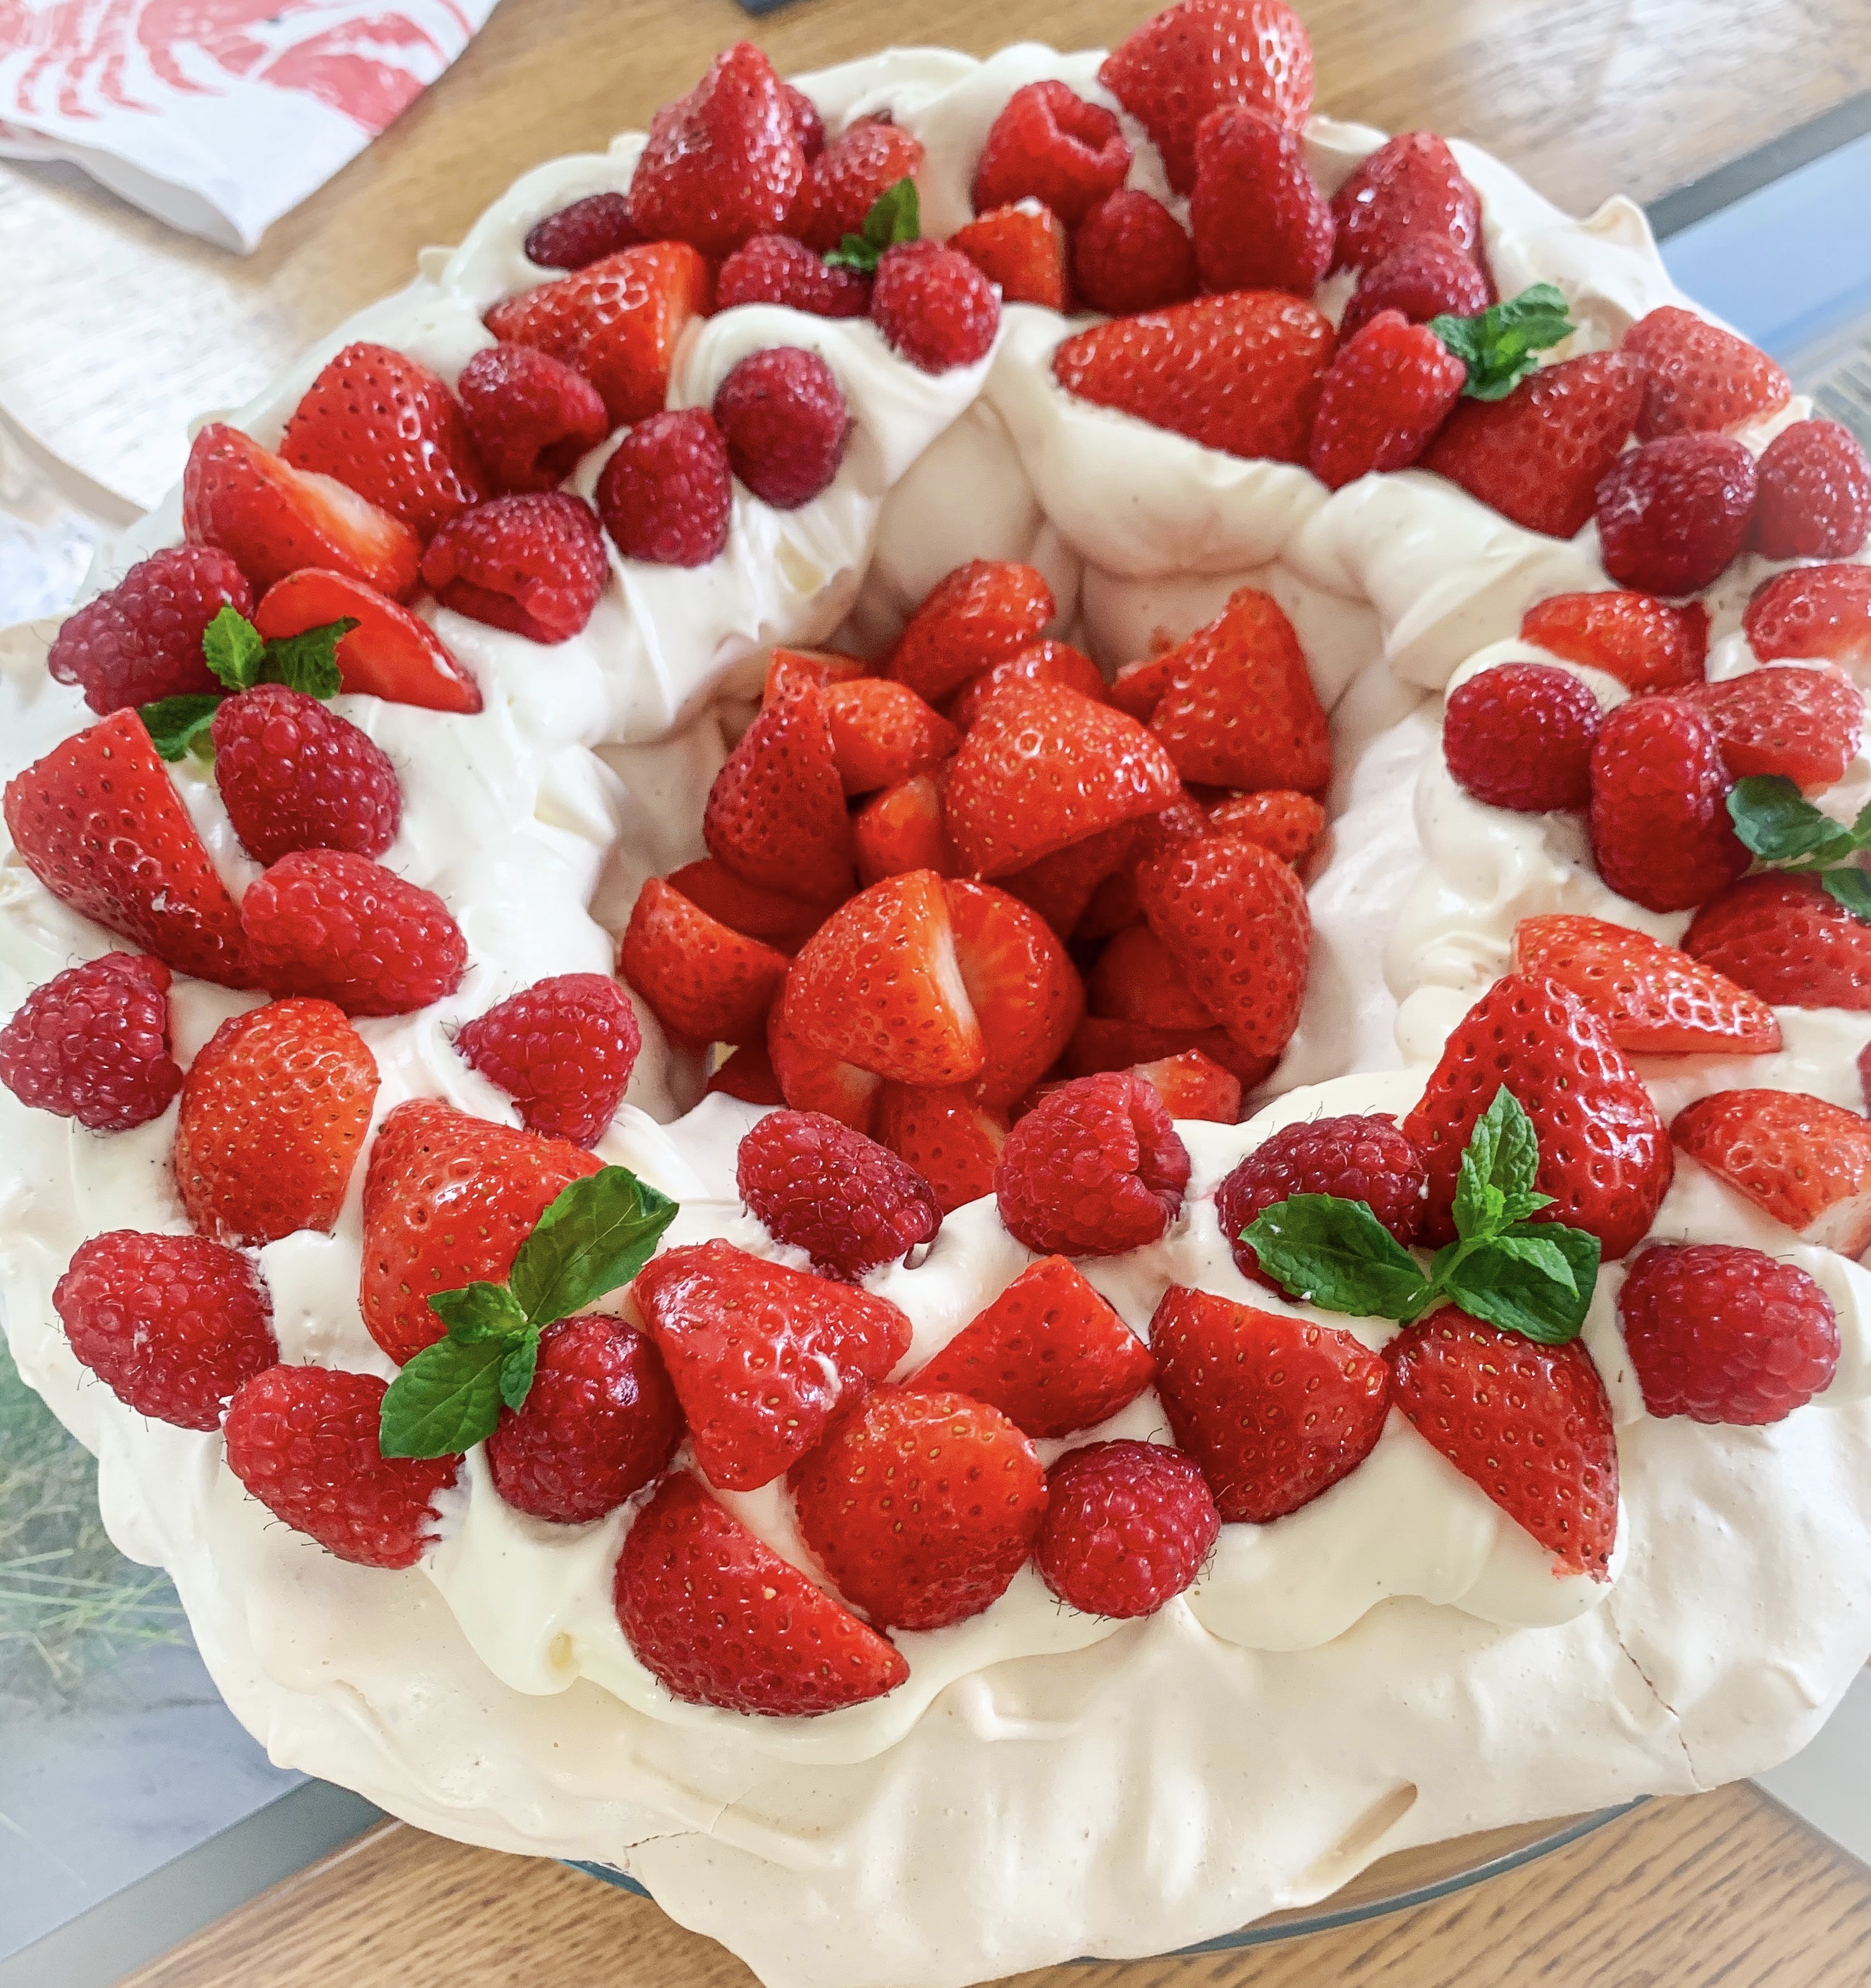
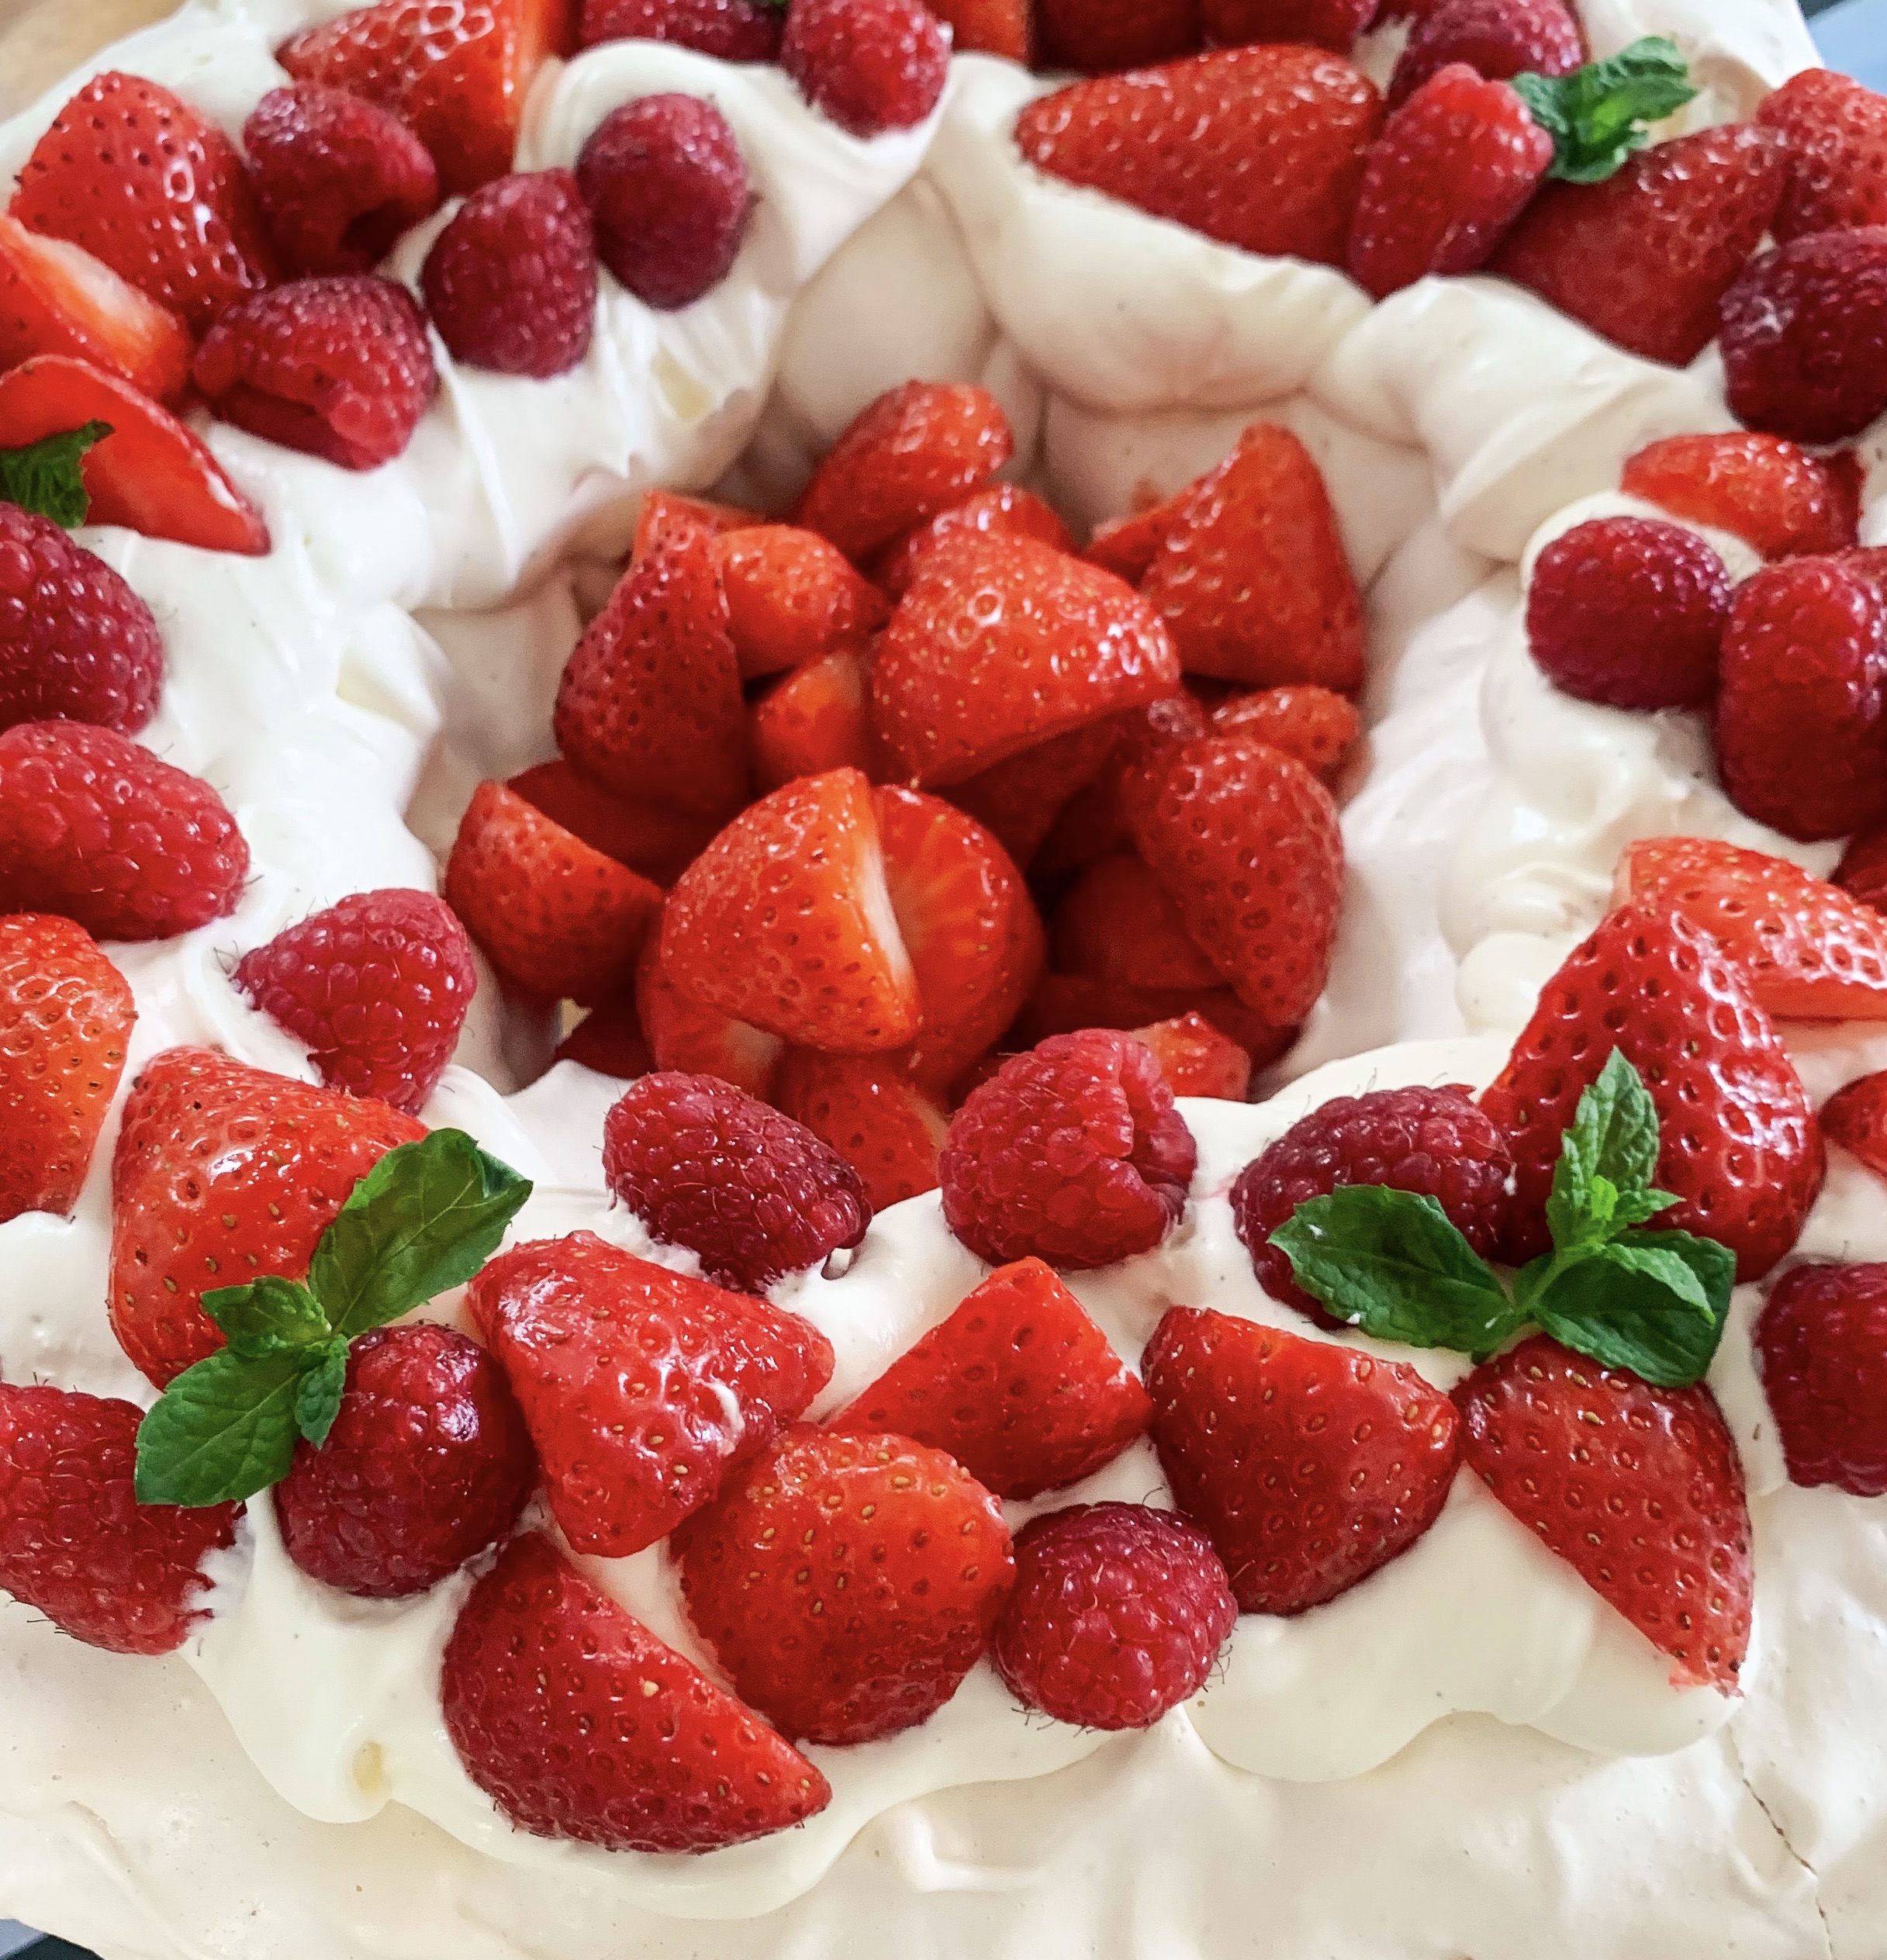
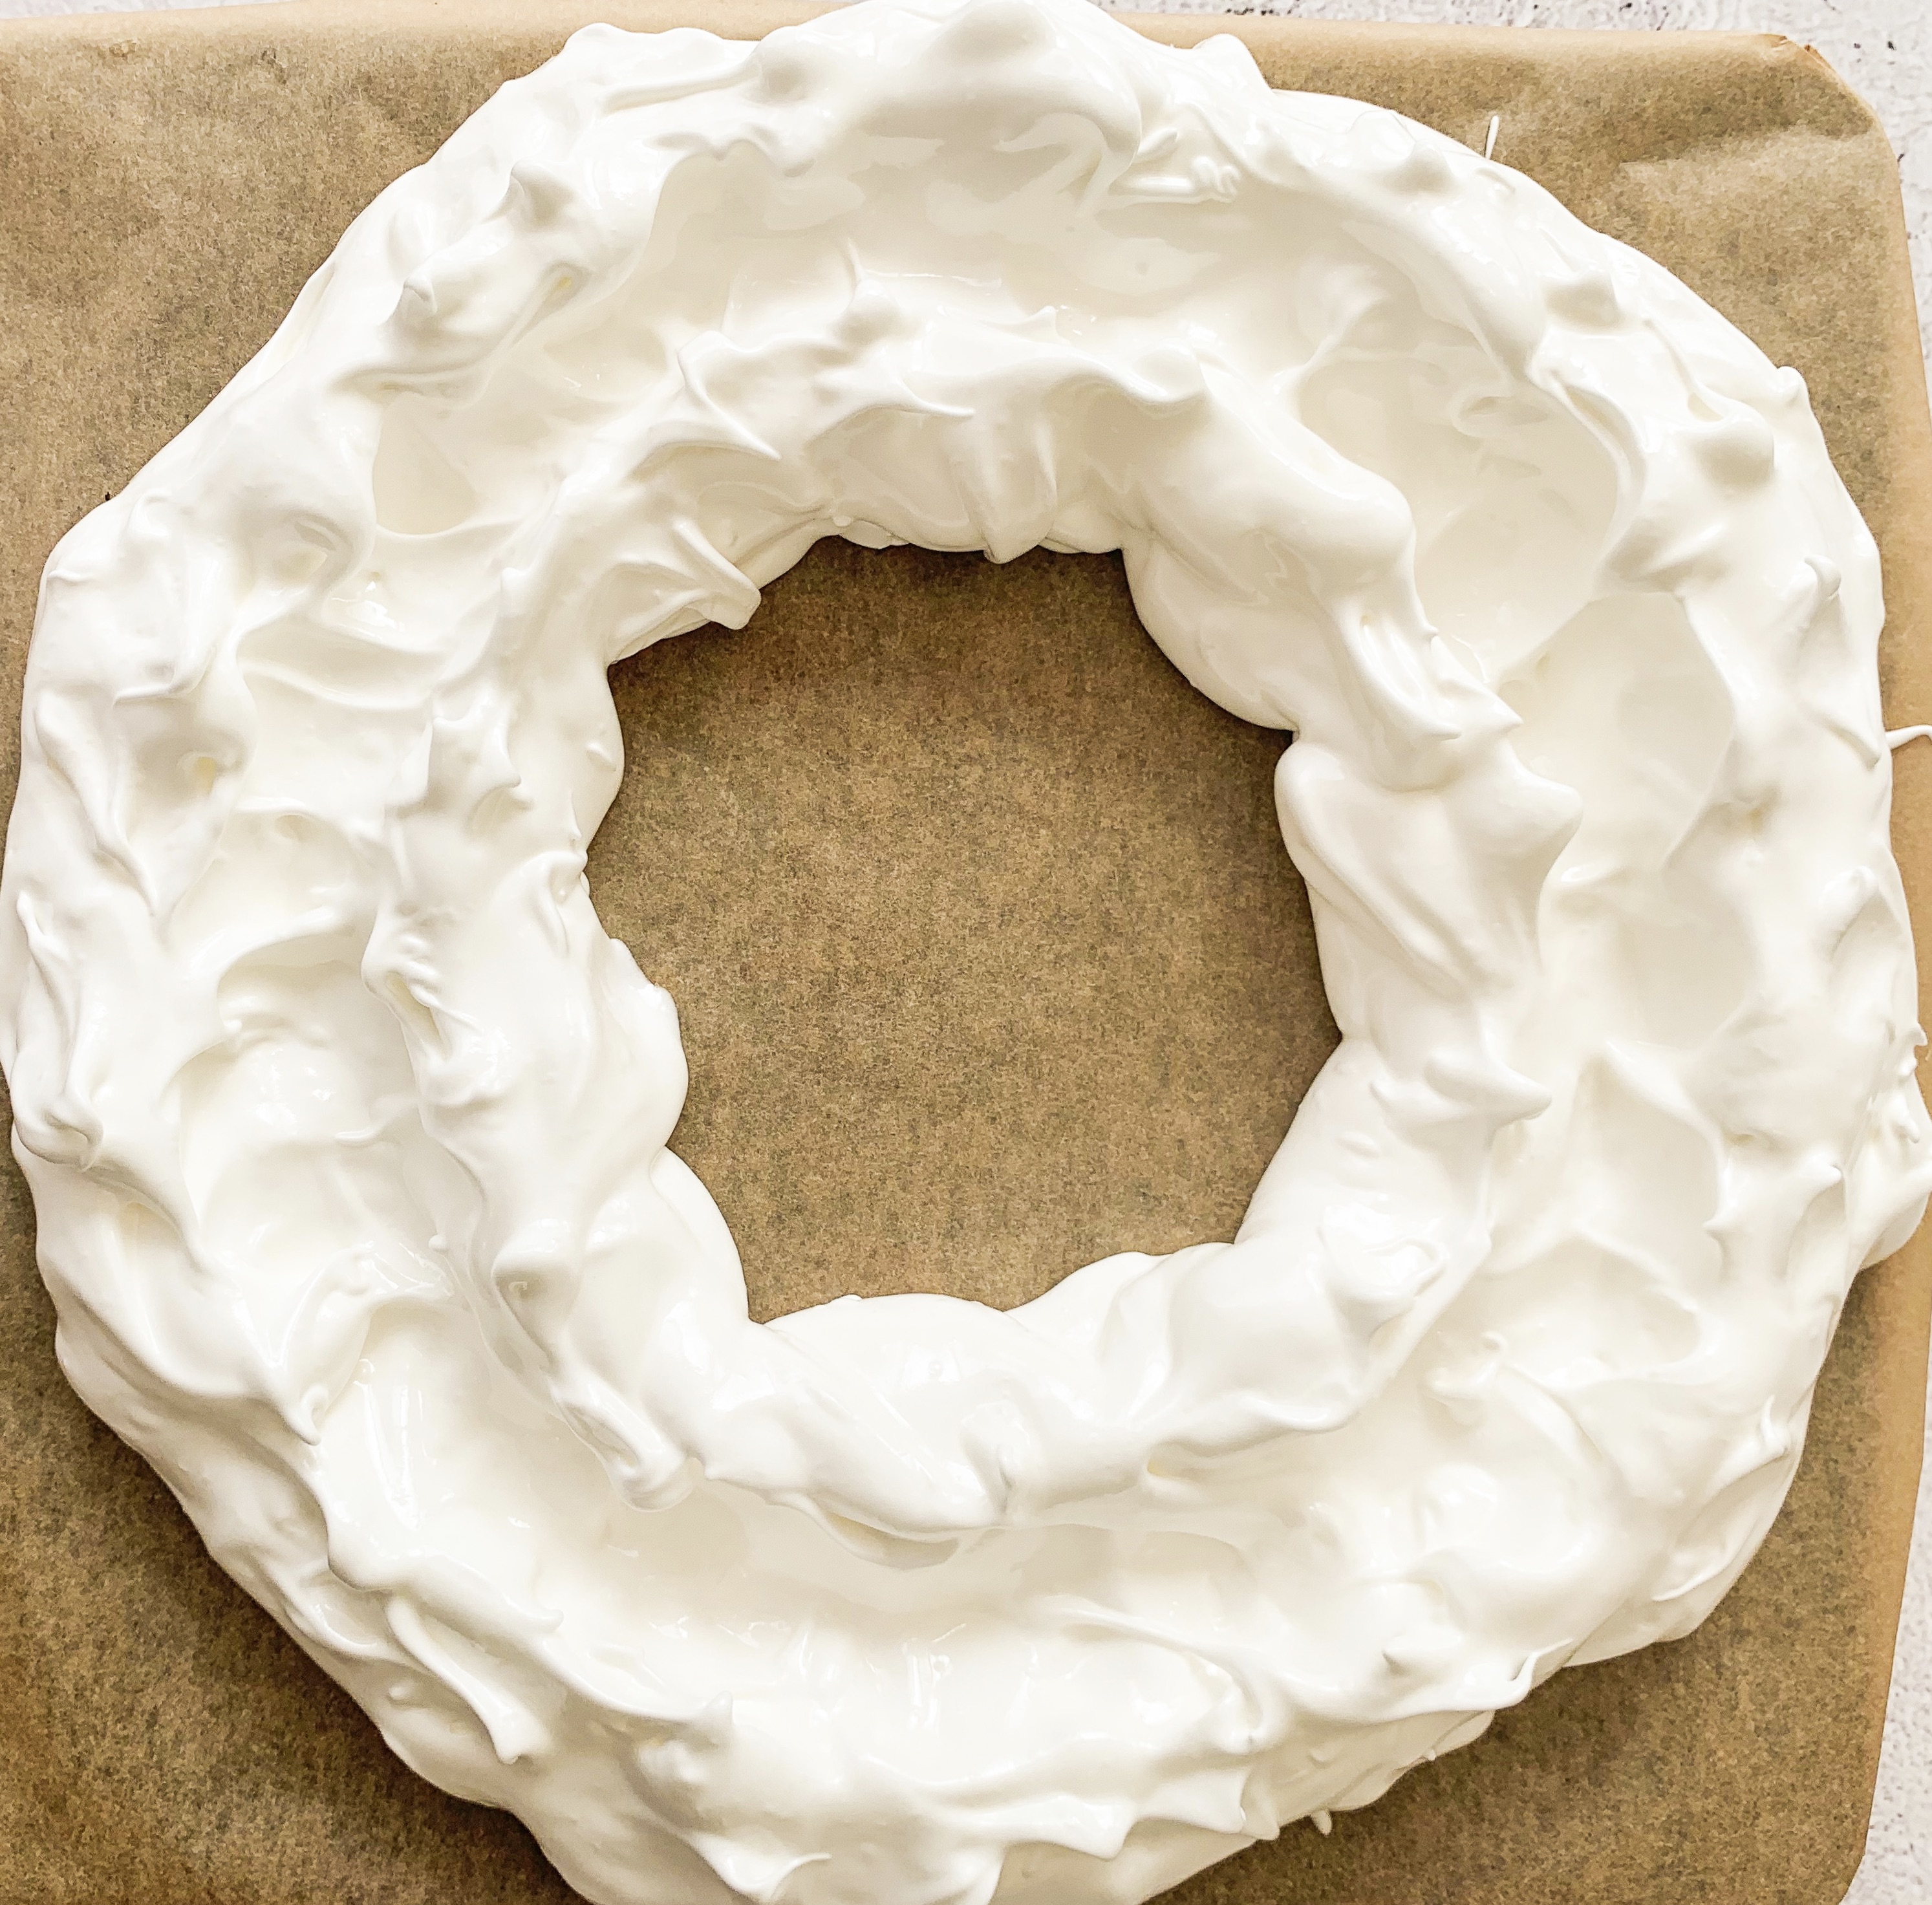
I make this pavlova in the shape of wreath, having seen the recipe by Mary Berry for a Christmas pavlova in this wreath shape some years back. I find that this shape is not only stunning to look at but also easier to slice. I use a mixture of summer berries, but most fruits work well, so you can use whatever you have to hand. You will need to draw out the shape of the wreath on baking parchment – I find that at large plate and a saucer are about the right size – see photo above.
For the Pavlova:
6 large egg whites
350g caster sugar
1 teaspoon white wine vinegar
1 teaspoon cornflour
For the Filling:
600ml double cream
1 teaspoon vanilla paste
50g icing sugar, sifted
300g strawberries, hulled and quartered
300g raspberries
200g blueberries
A few mint leaves to decorate (optional)
Icing sugar to dust
- Preheat the oven to 140’c fan.
- First place a large piece of baking parchment on a baking sheet and draw 30cm circle (you could use a large dinner plate) and inside this circle an inner circle of 15cm (you could use a saucer) – thus creating a wreath shape.
- Put the egg whites in a mixing bowl and with an electric whisk, whisk until soft peaks form. Gradually whisk in the caster sugar a little at a time until the whites are stiff and glossy. Mix the cornflour and vinegar together in a small cup and then whisk into the whites.
- Spoon the meringue mixture onto the ring drawn on the parchment. Using a spoon to make a shallow trench in the meringue for the cream to sit in – see photo above.
- Place in the oven and immediately reduce the temperature to 120’c. Bake for 1 hour- 1 hour 15 minutes until the outside is hard but still white. Turn off the oven and leave the pavlova inside for at least an hour or overnight to cool and dry (don’t forget it’s in the oven!)
- To assemble, whip the cream, vanilla paste and icing sugar together until stiff peaks form. Spoon the cream in the trench of the pavlova and top with the berries and decorate with the mint leaves (if using). Finally sprinkle with icing sugar. Delicious!!
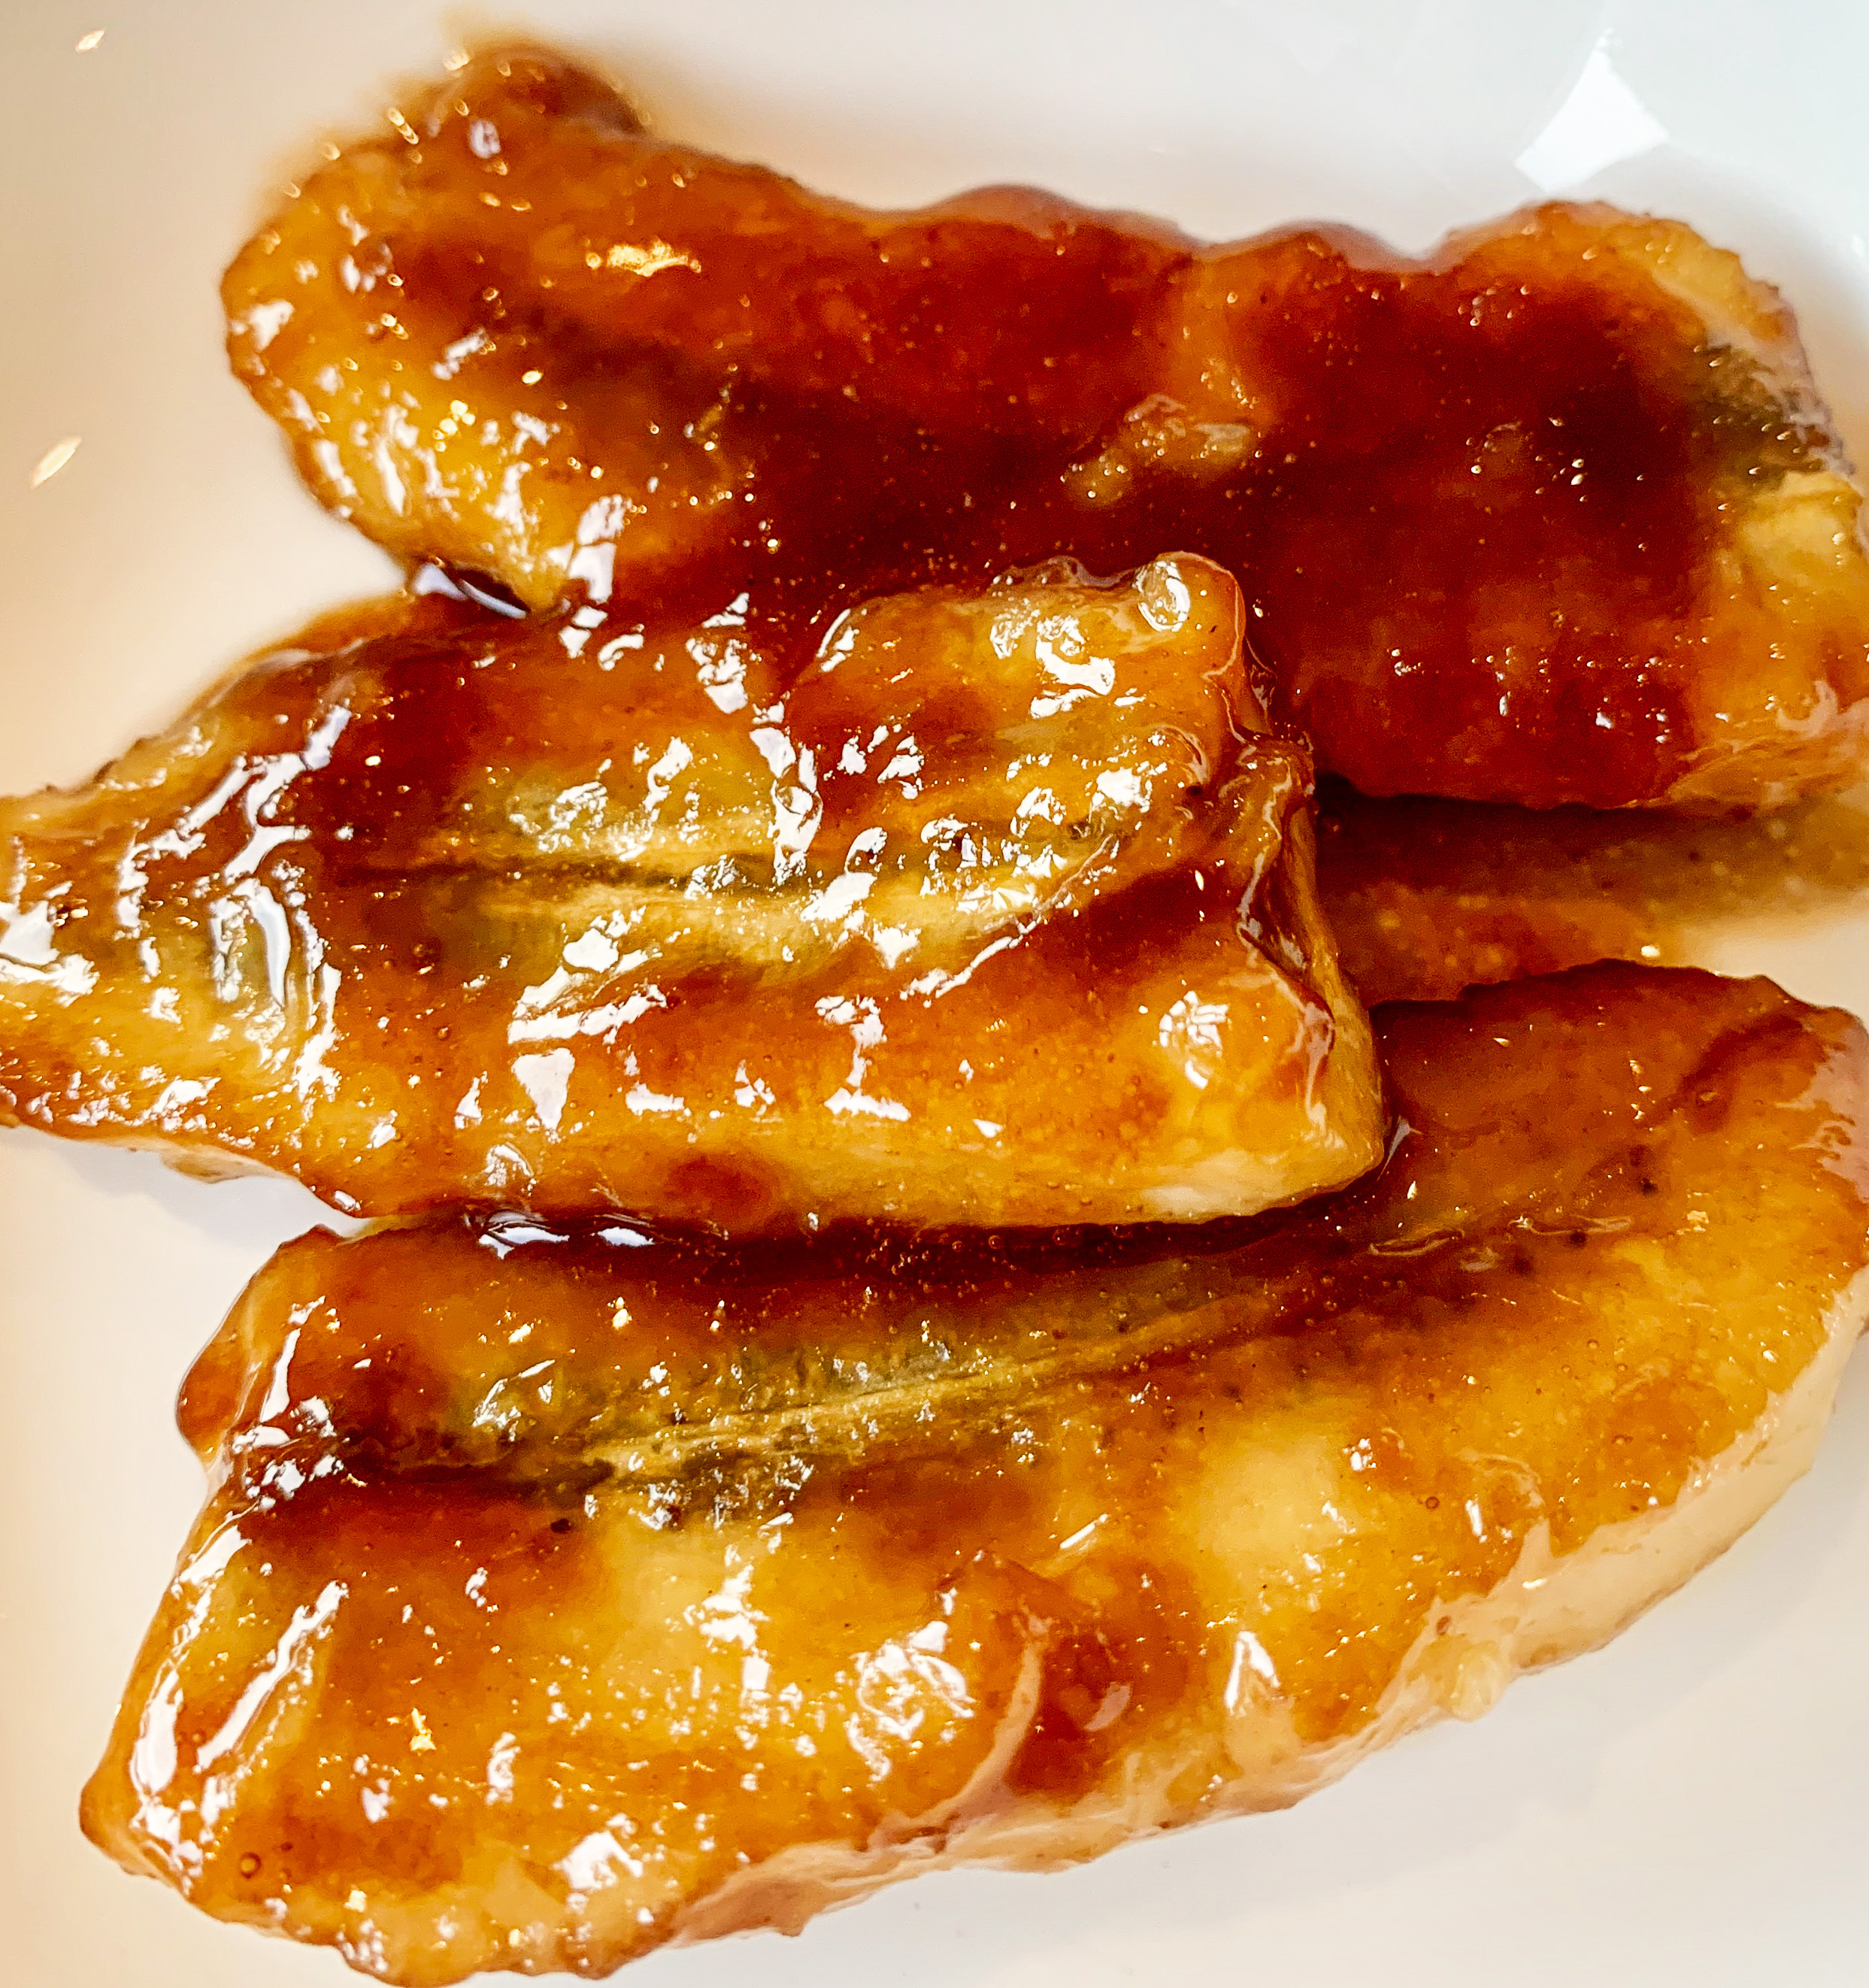
Caramelised Rum Bananas with Vanilla Ice-Cream (Serves 4)
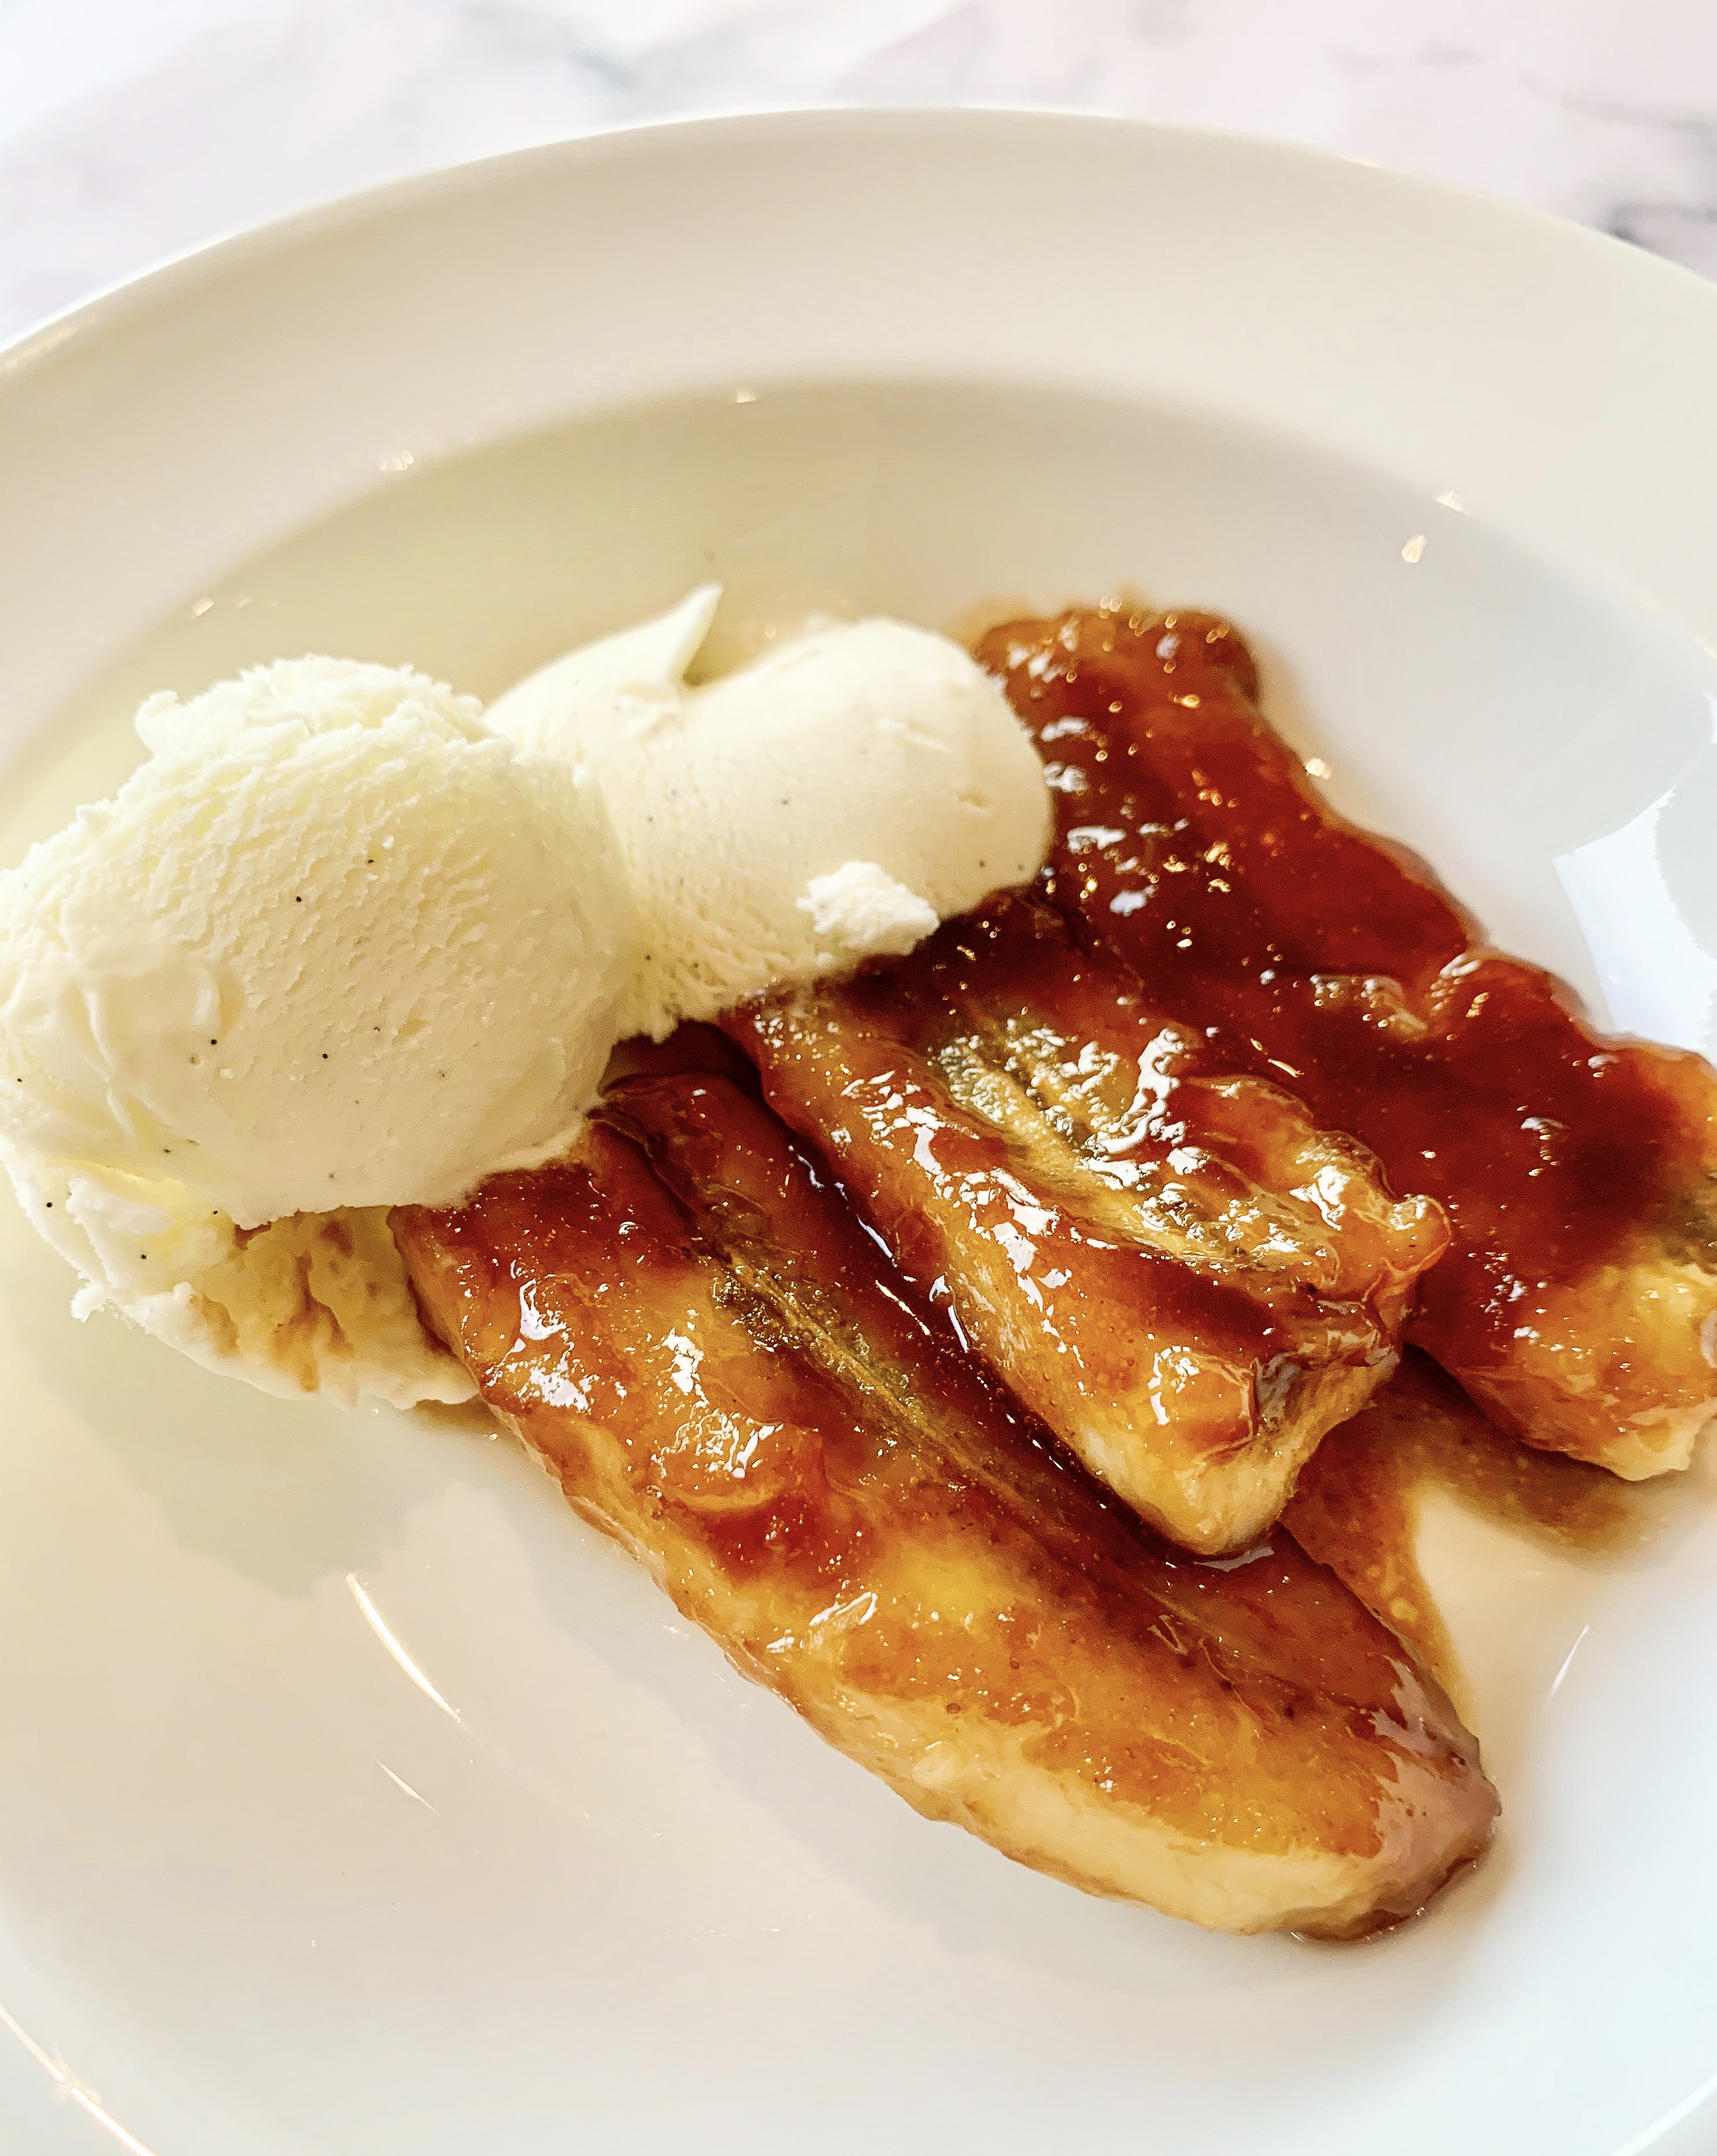
A super quick and a very delicious dessert!…
*you could make this without the rum for an alcohol free option
60g unsalted butter
6 tablespoons dark brown sugar
4 ripe bananas, cut in half and sliced lengthways
3 tablespoons dark rum (optional)
Vanilla ice-cream to serve
- Place the butter and sugar in a frying pan over a low heat, stir until the sugar dissolves and begins to bubble. Simmer for about 2 minutes then add the bananas, continue to simmer for another minute or so.
- Add the rum, stir and remove from the heat.
- Serve with a scoops of vanilla ice-cream.
*You can see the video of this dessert being made by clicking on this link to my Instagram Page
Marsala Fried Figs with Vanilla Mascarpone (Serves 4)
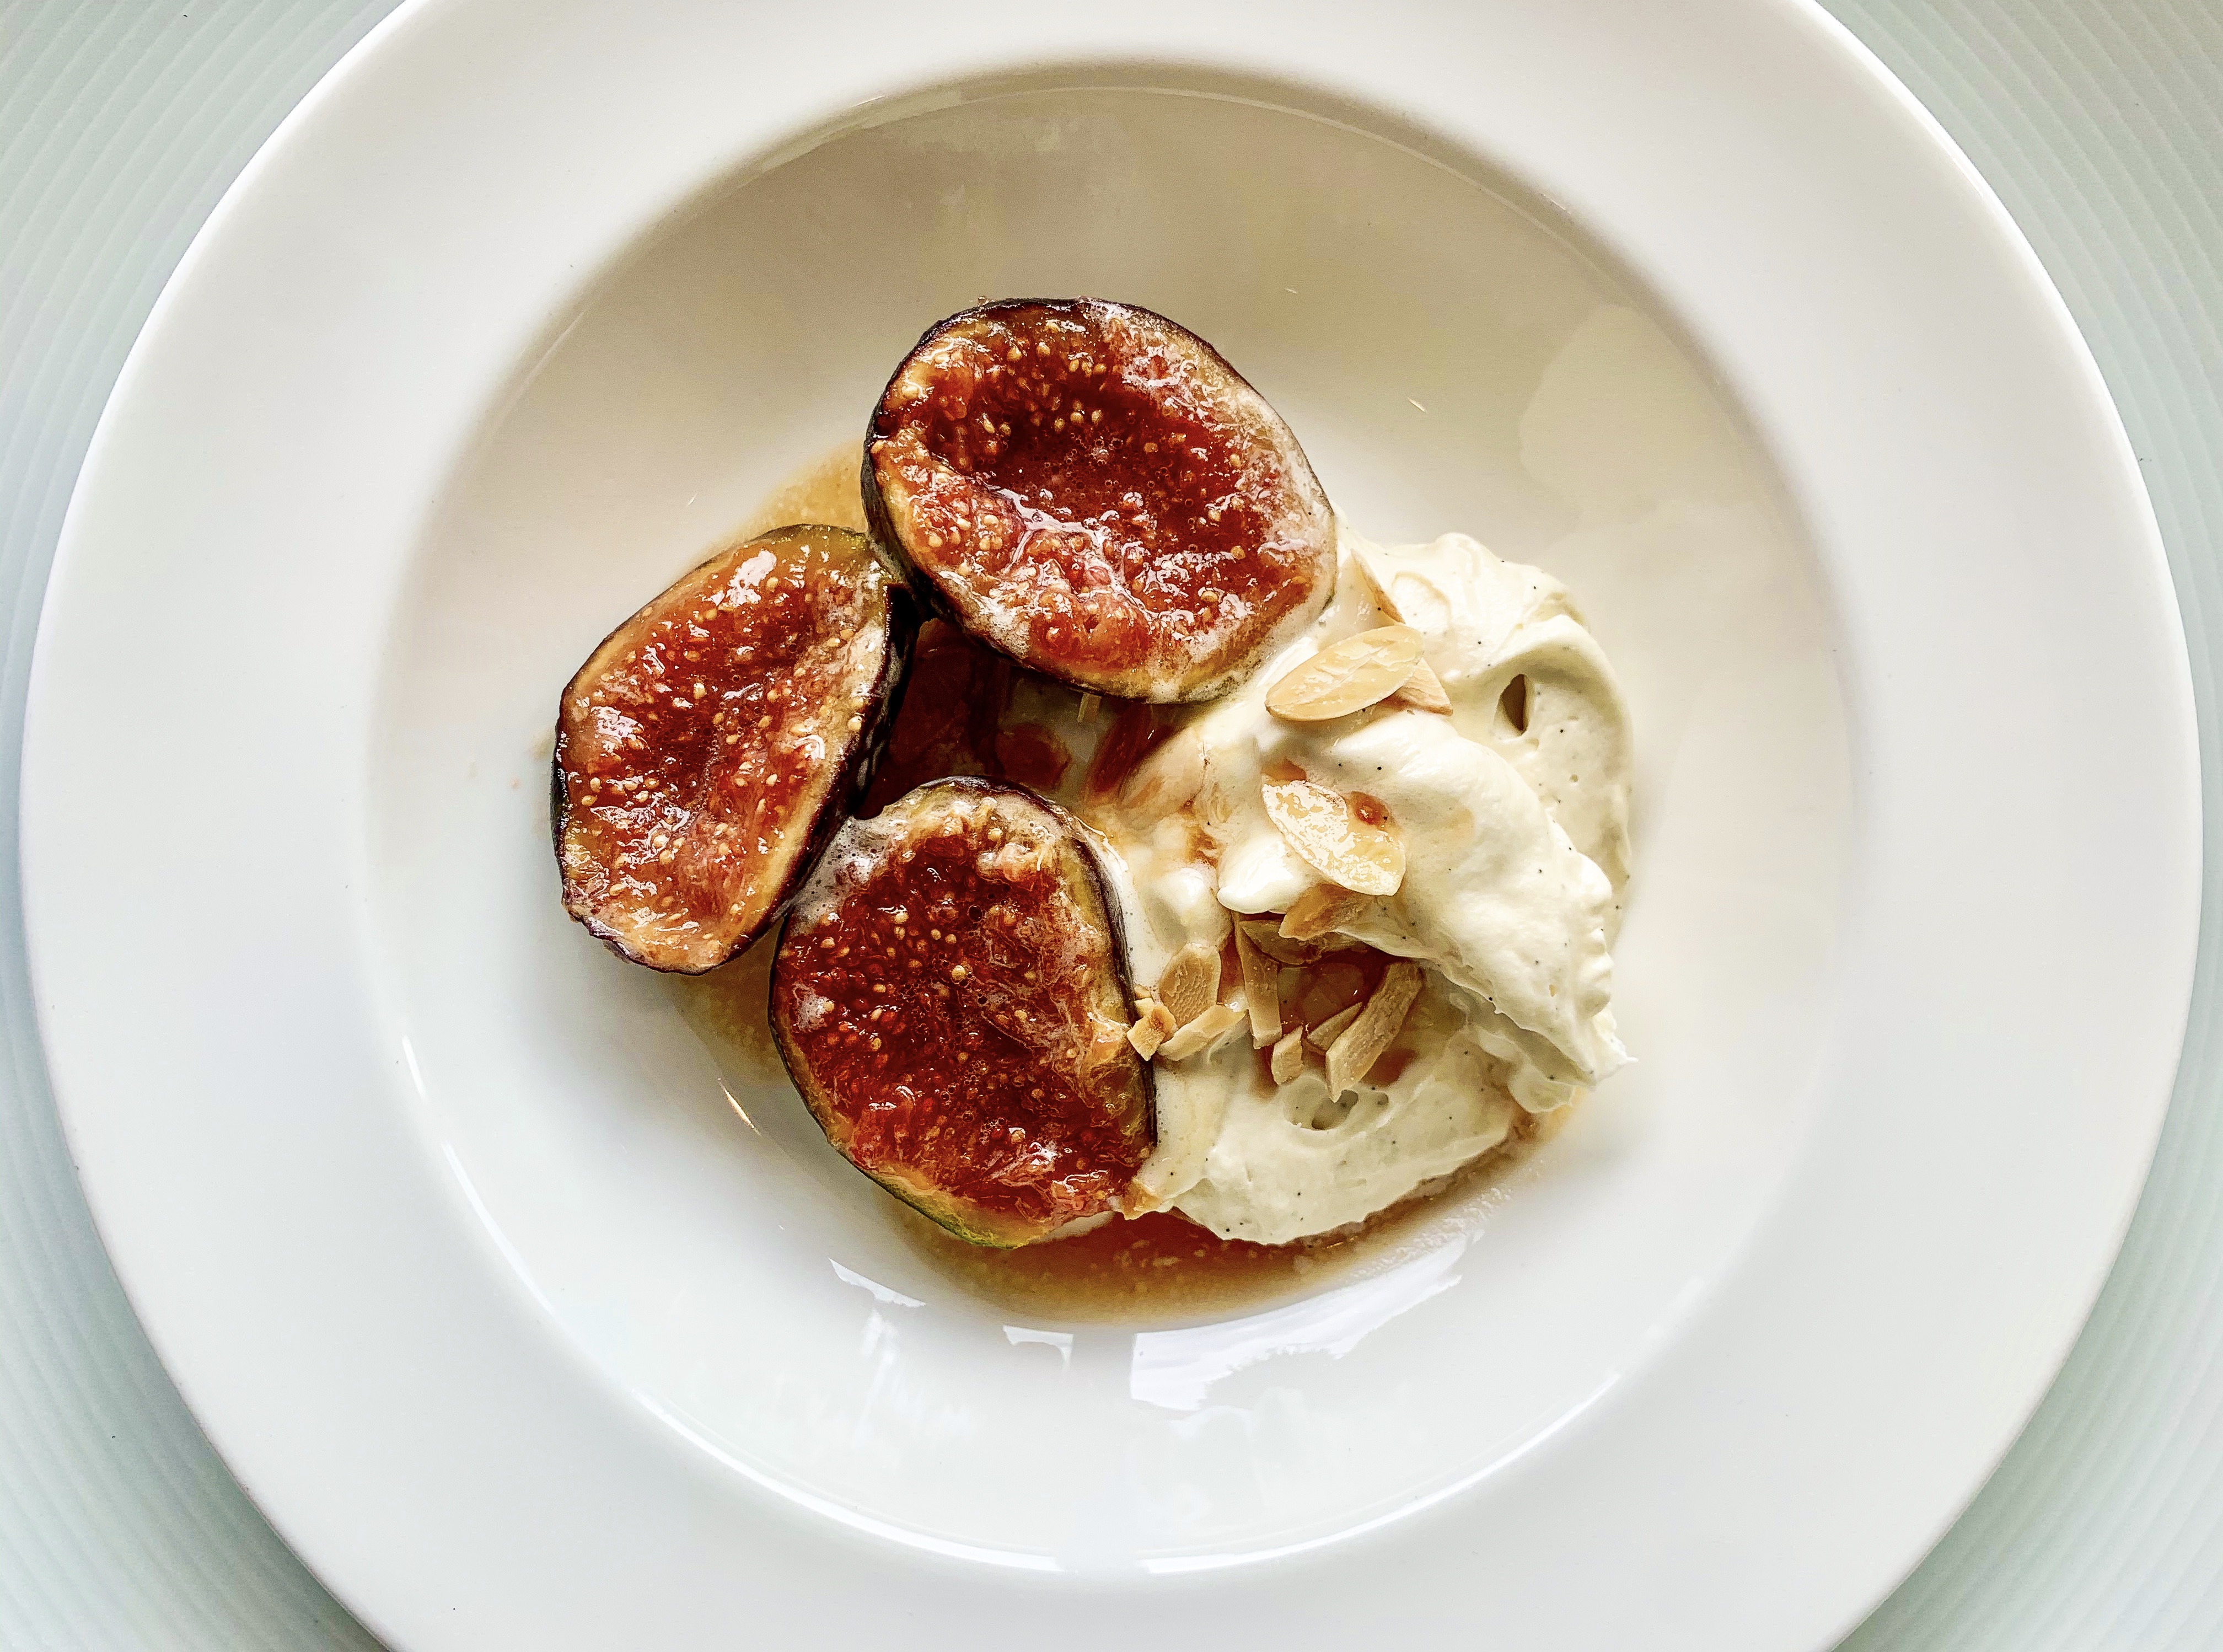
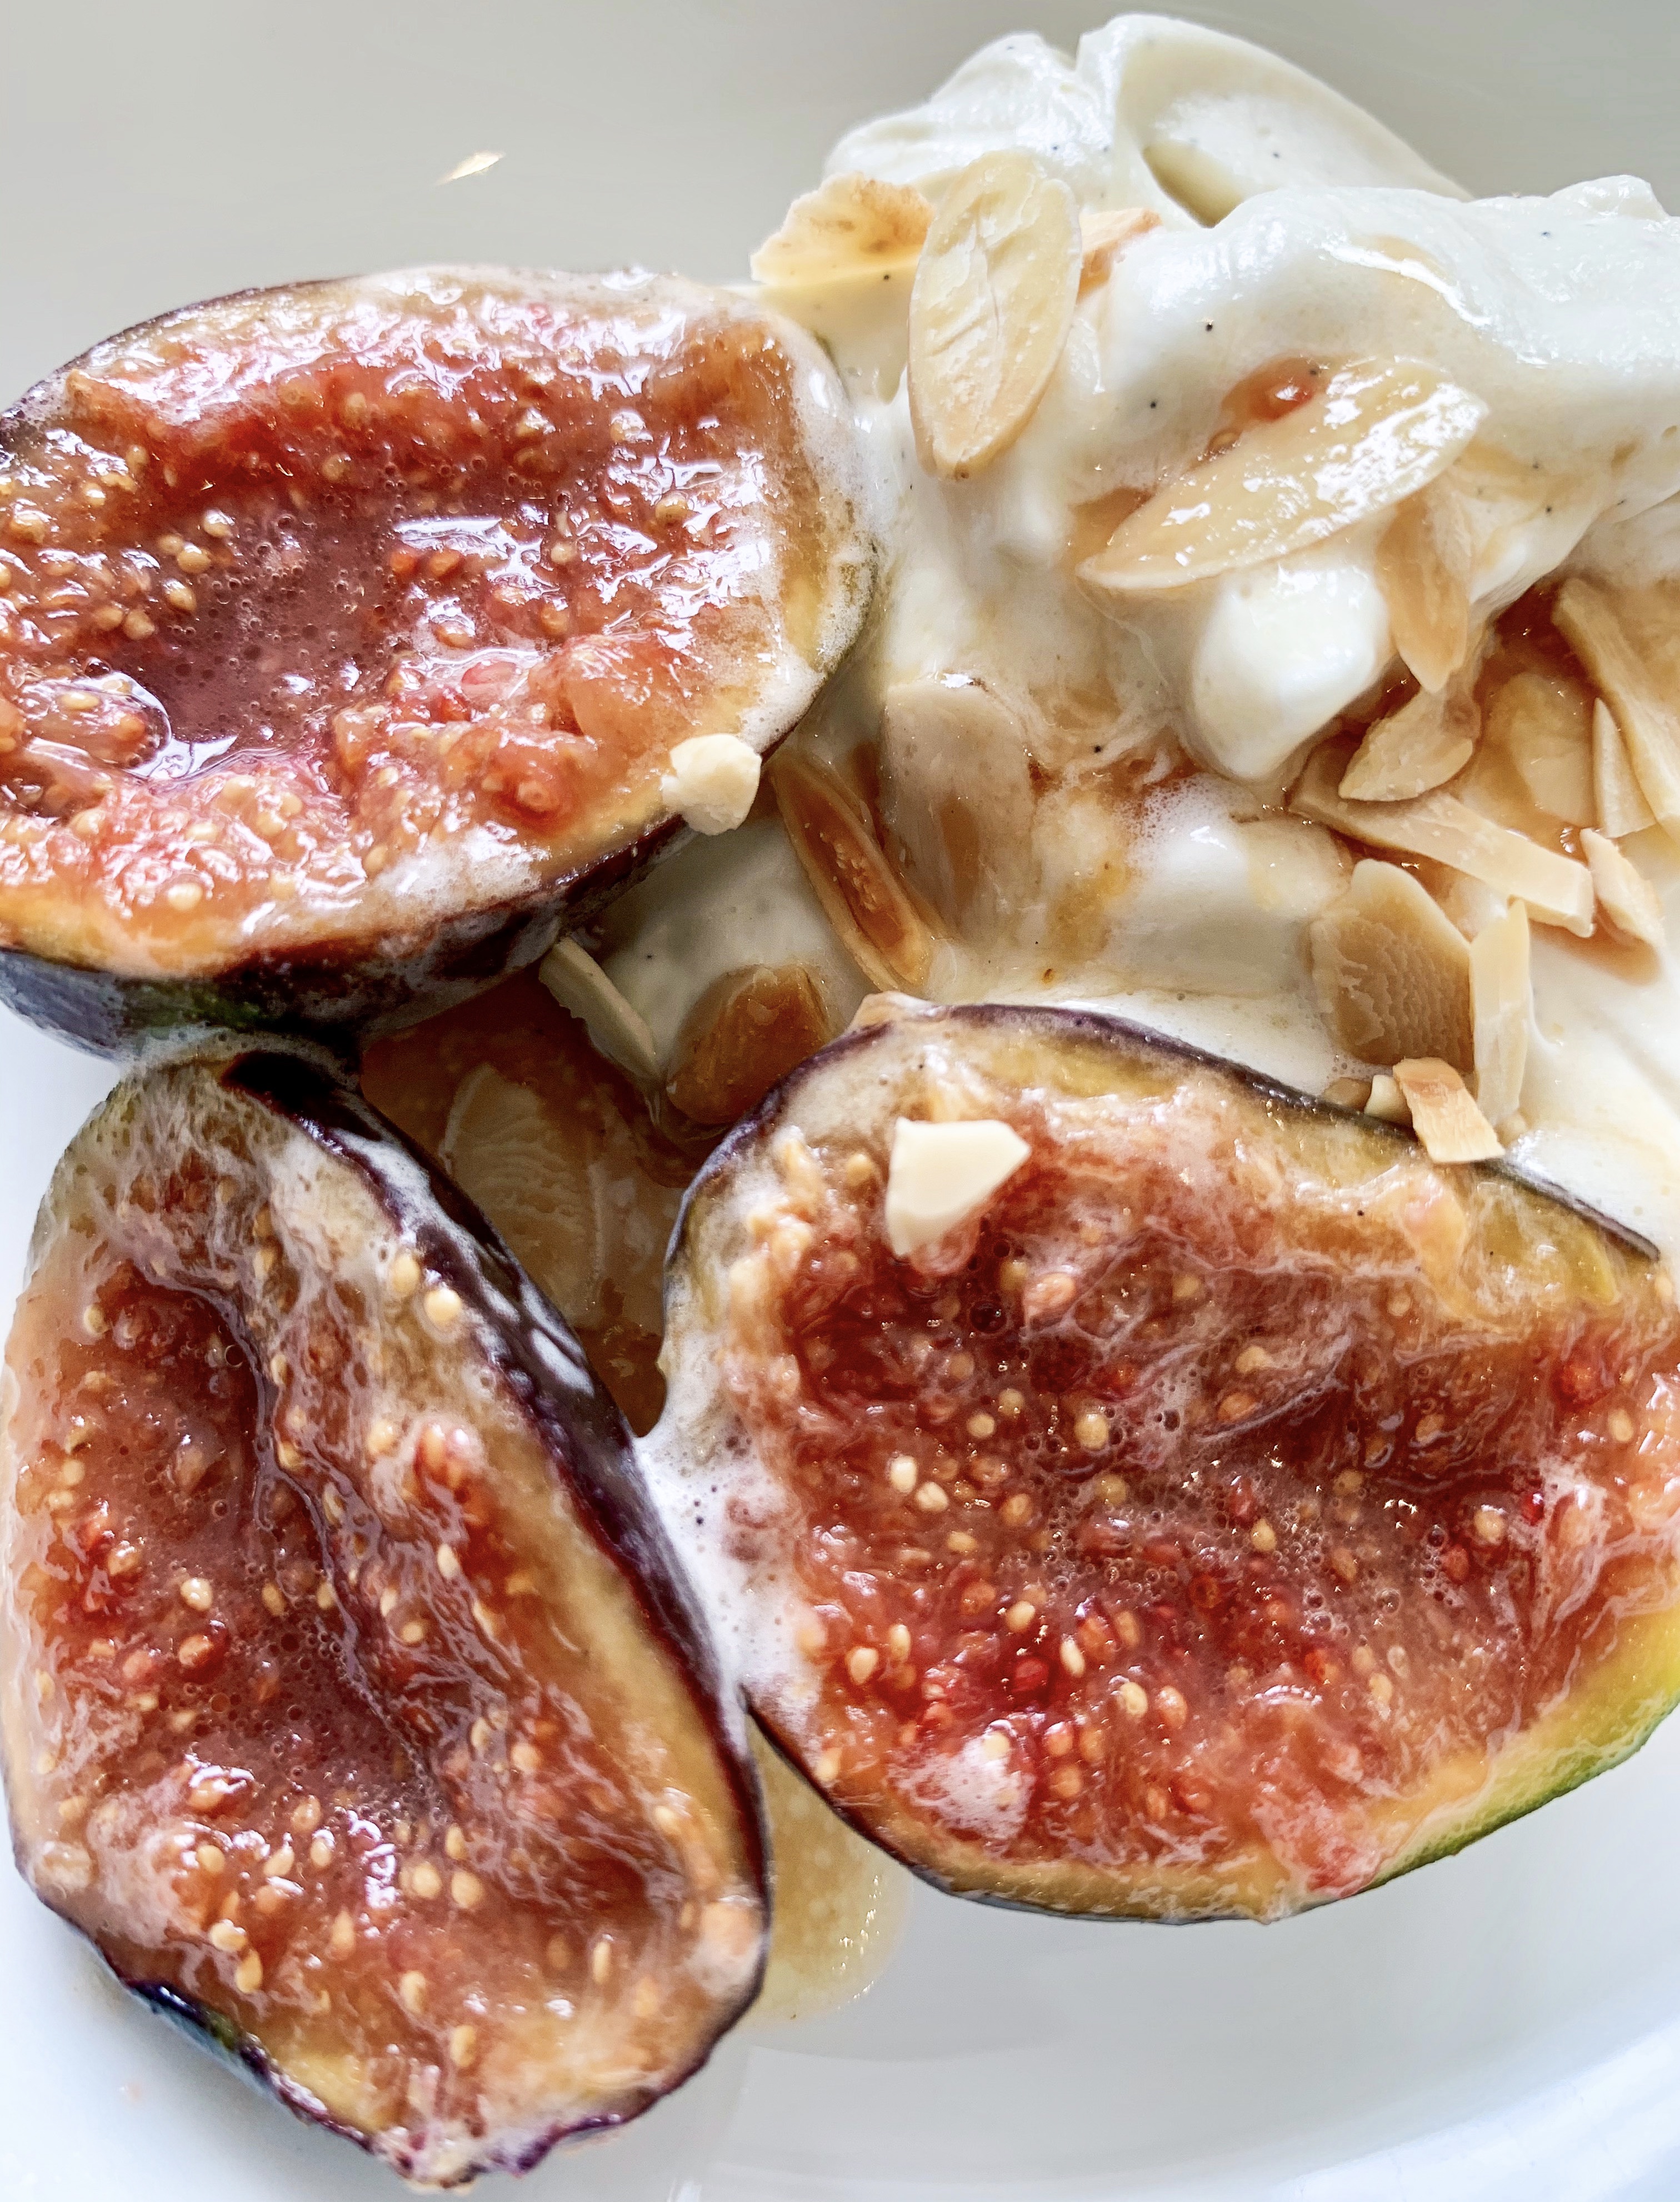
This must be one of the quickest desserts – perfect for a midweek treat…(and it almost feels healthy as it’s fruit!!). Like Maderia wine, Marsala wine, once opened can be kept refrigerated for some months without deteriorating, it is great to have around as just a splash will often lift a simple sauce – try it!…
200g mascarpone cheese
2 tablespoons icing sugar
2 teaspoons vanilla paste
20g unsalted butter
8 ripe figs
1-2 teaspoons honey
4 tablespoons Marsala wine
30g sliced almonds, toasted in dry frying pan (optional)
- Place the mascarpone, sugar and vanilla paste in a bowl and use an electric beater to whip for 2 minutes until light and fluffy.
- Melt the butter in a frying pan, once foaming add the figs, rounded side down. Fry for 1 minute. Add the honey and turn the figs over, fry for another minute then pour over the Marsala, allow it to bubble for a minute or so until syrupy.
- Spoon the mascarpone into bowls and top with the figs and some of the sauce. To finish sprinkle with the toasted almonds.
- Enjoy!
Lemon Posset with Raspberries (Serves 4-6)
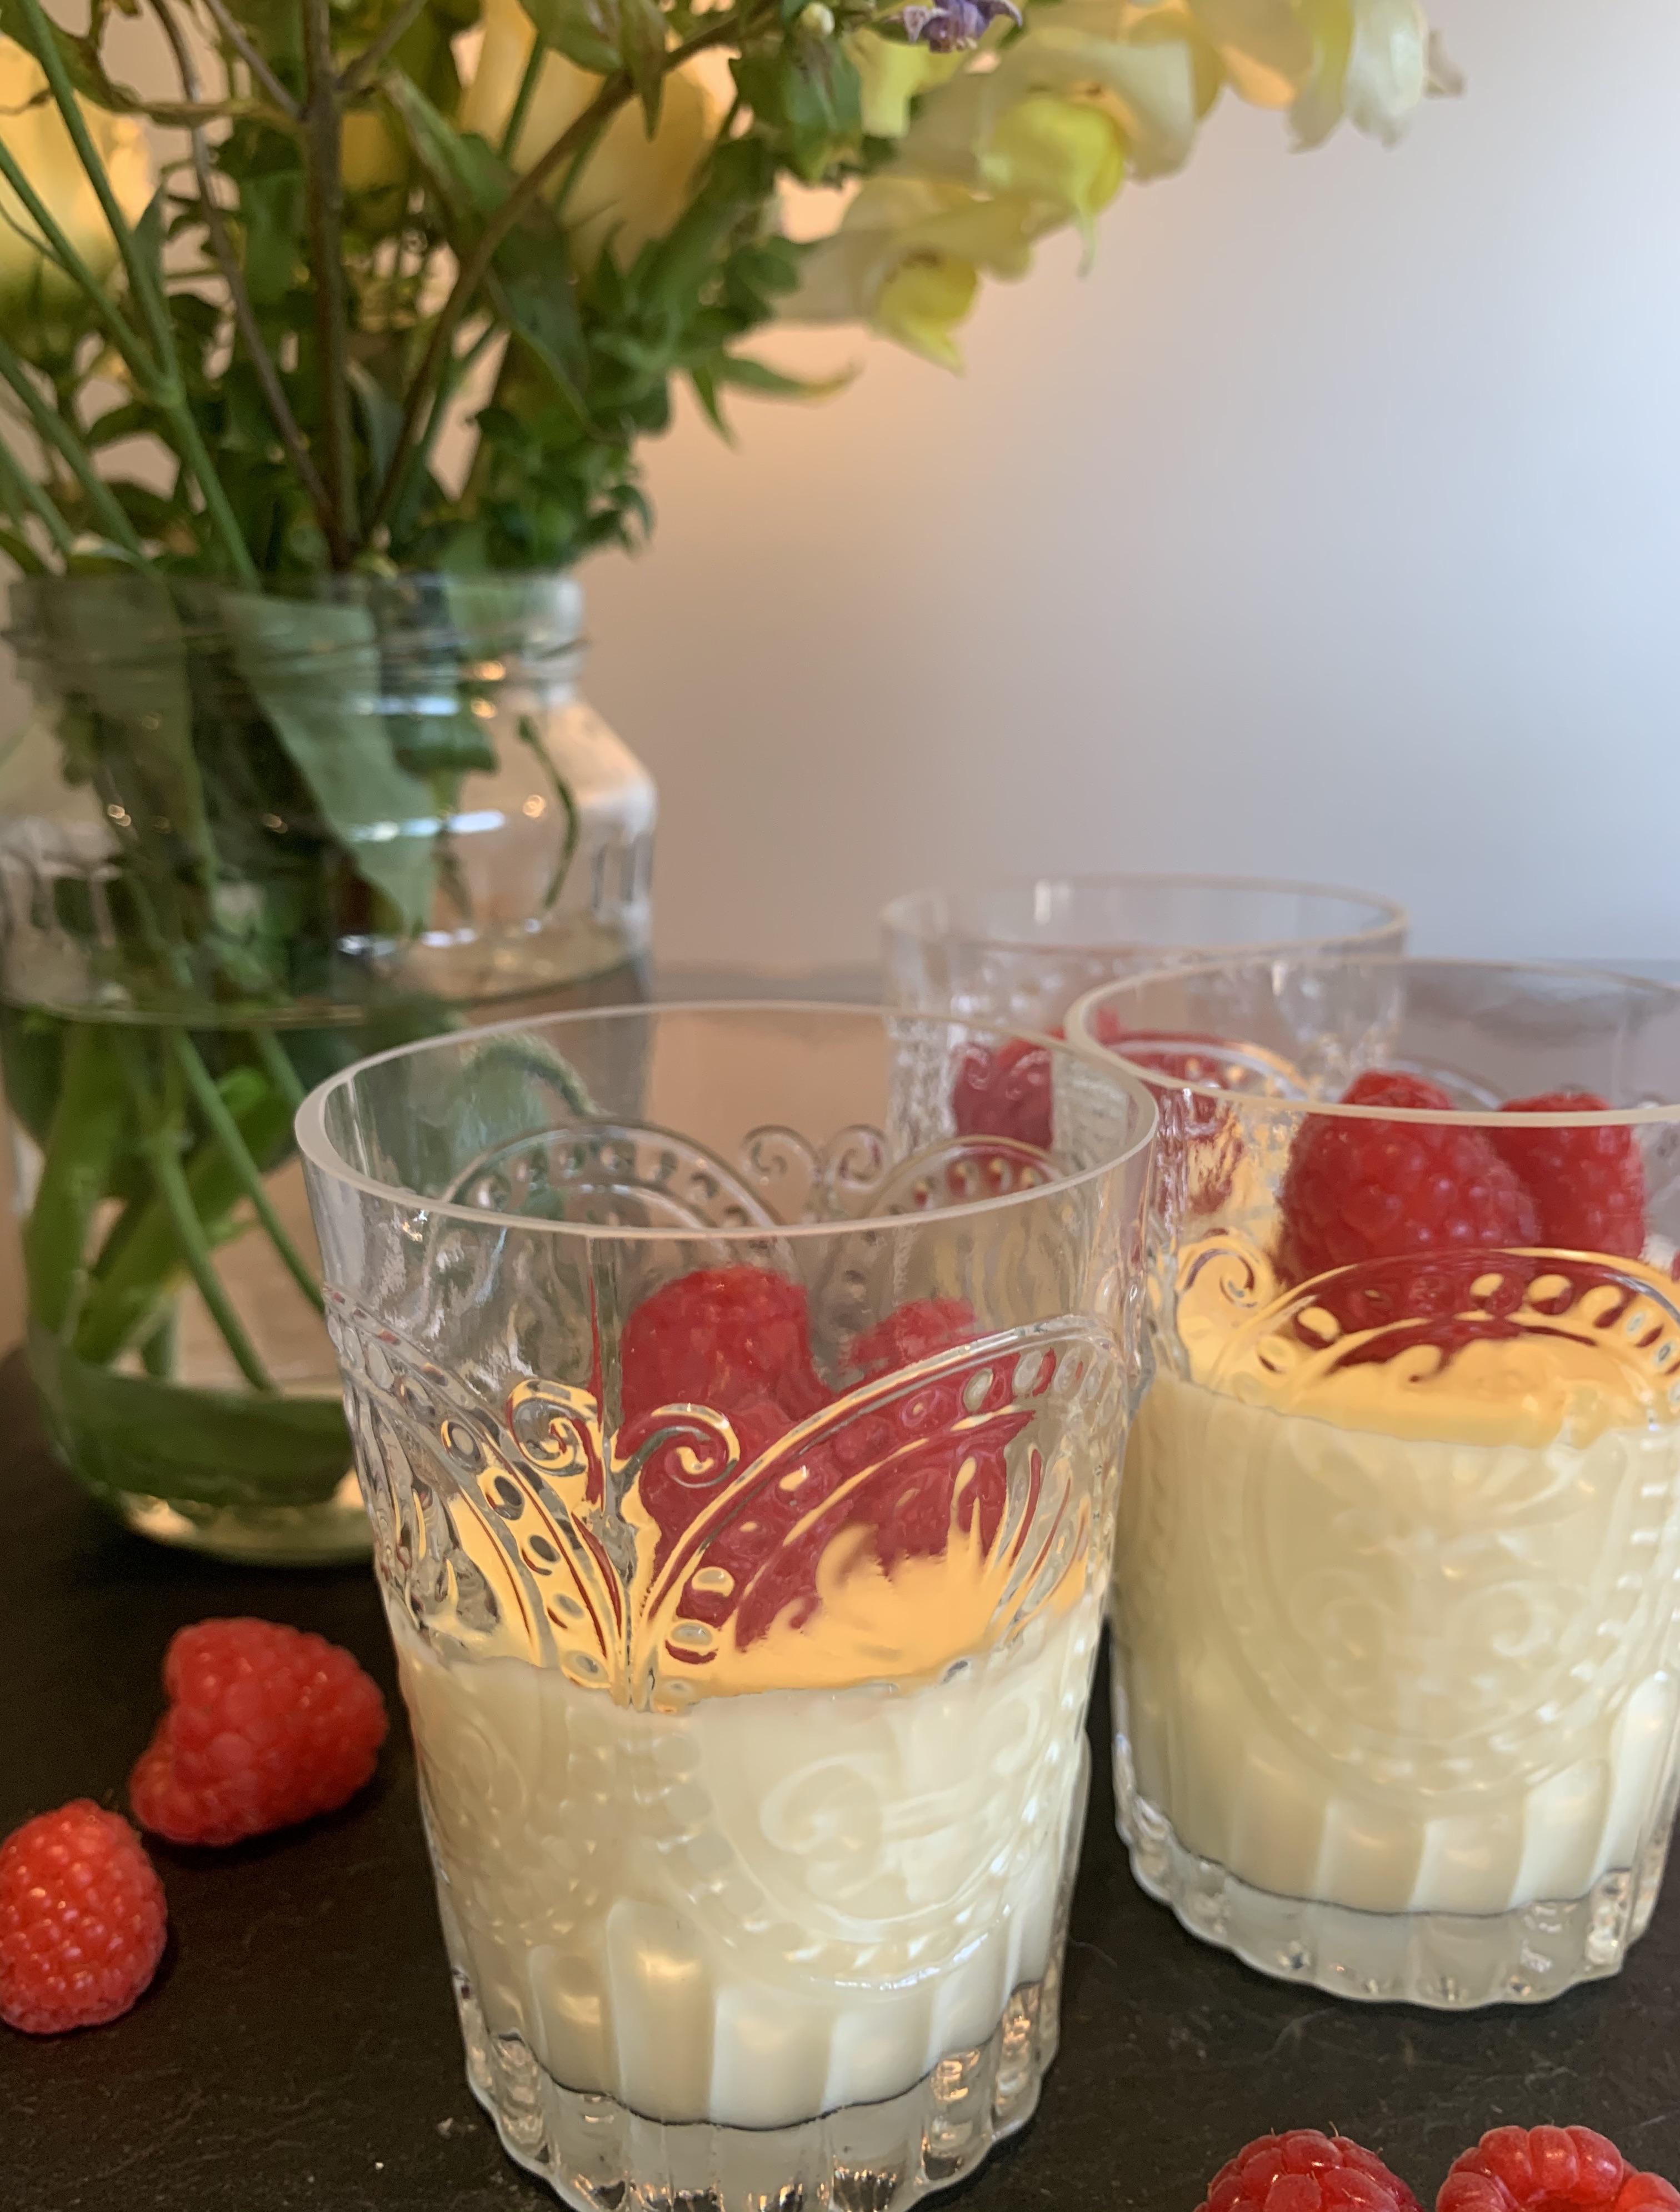
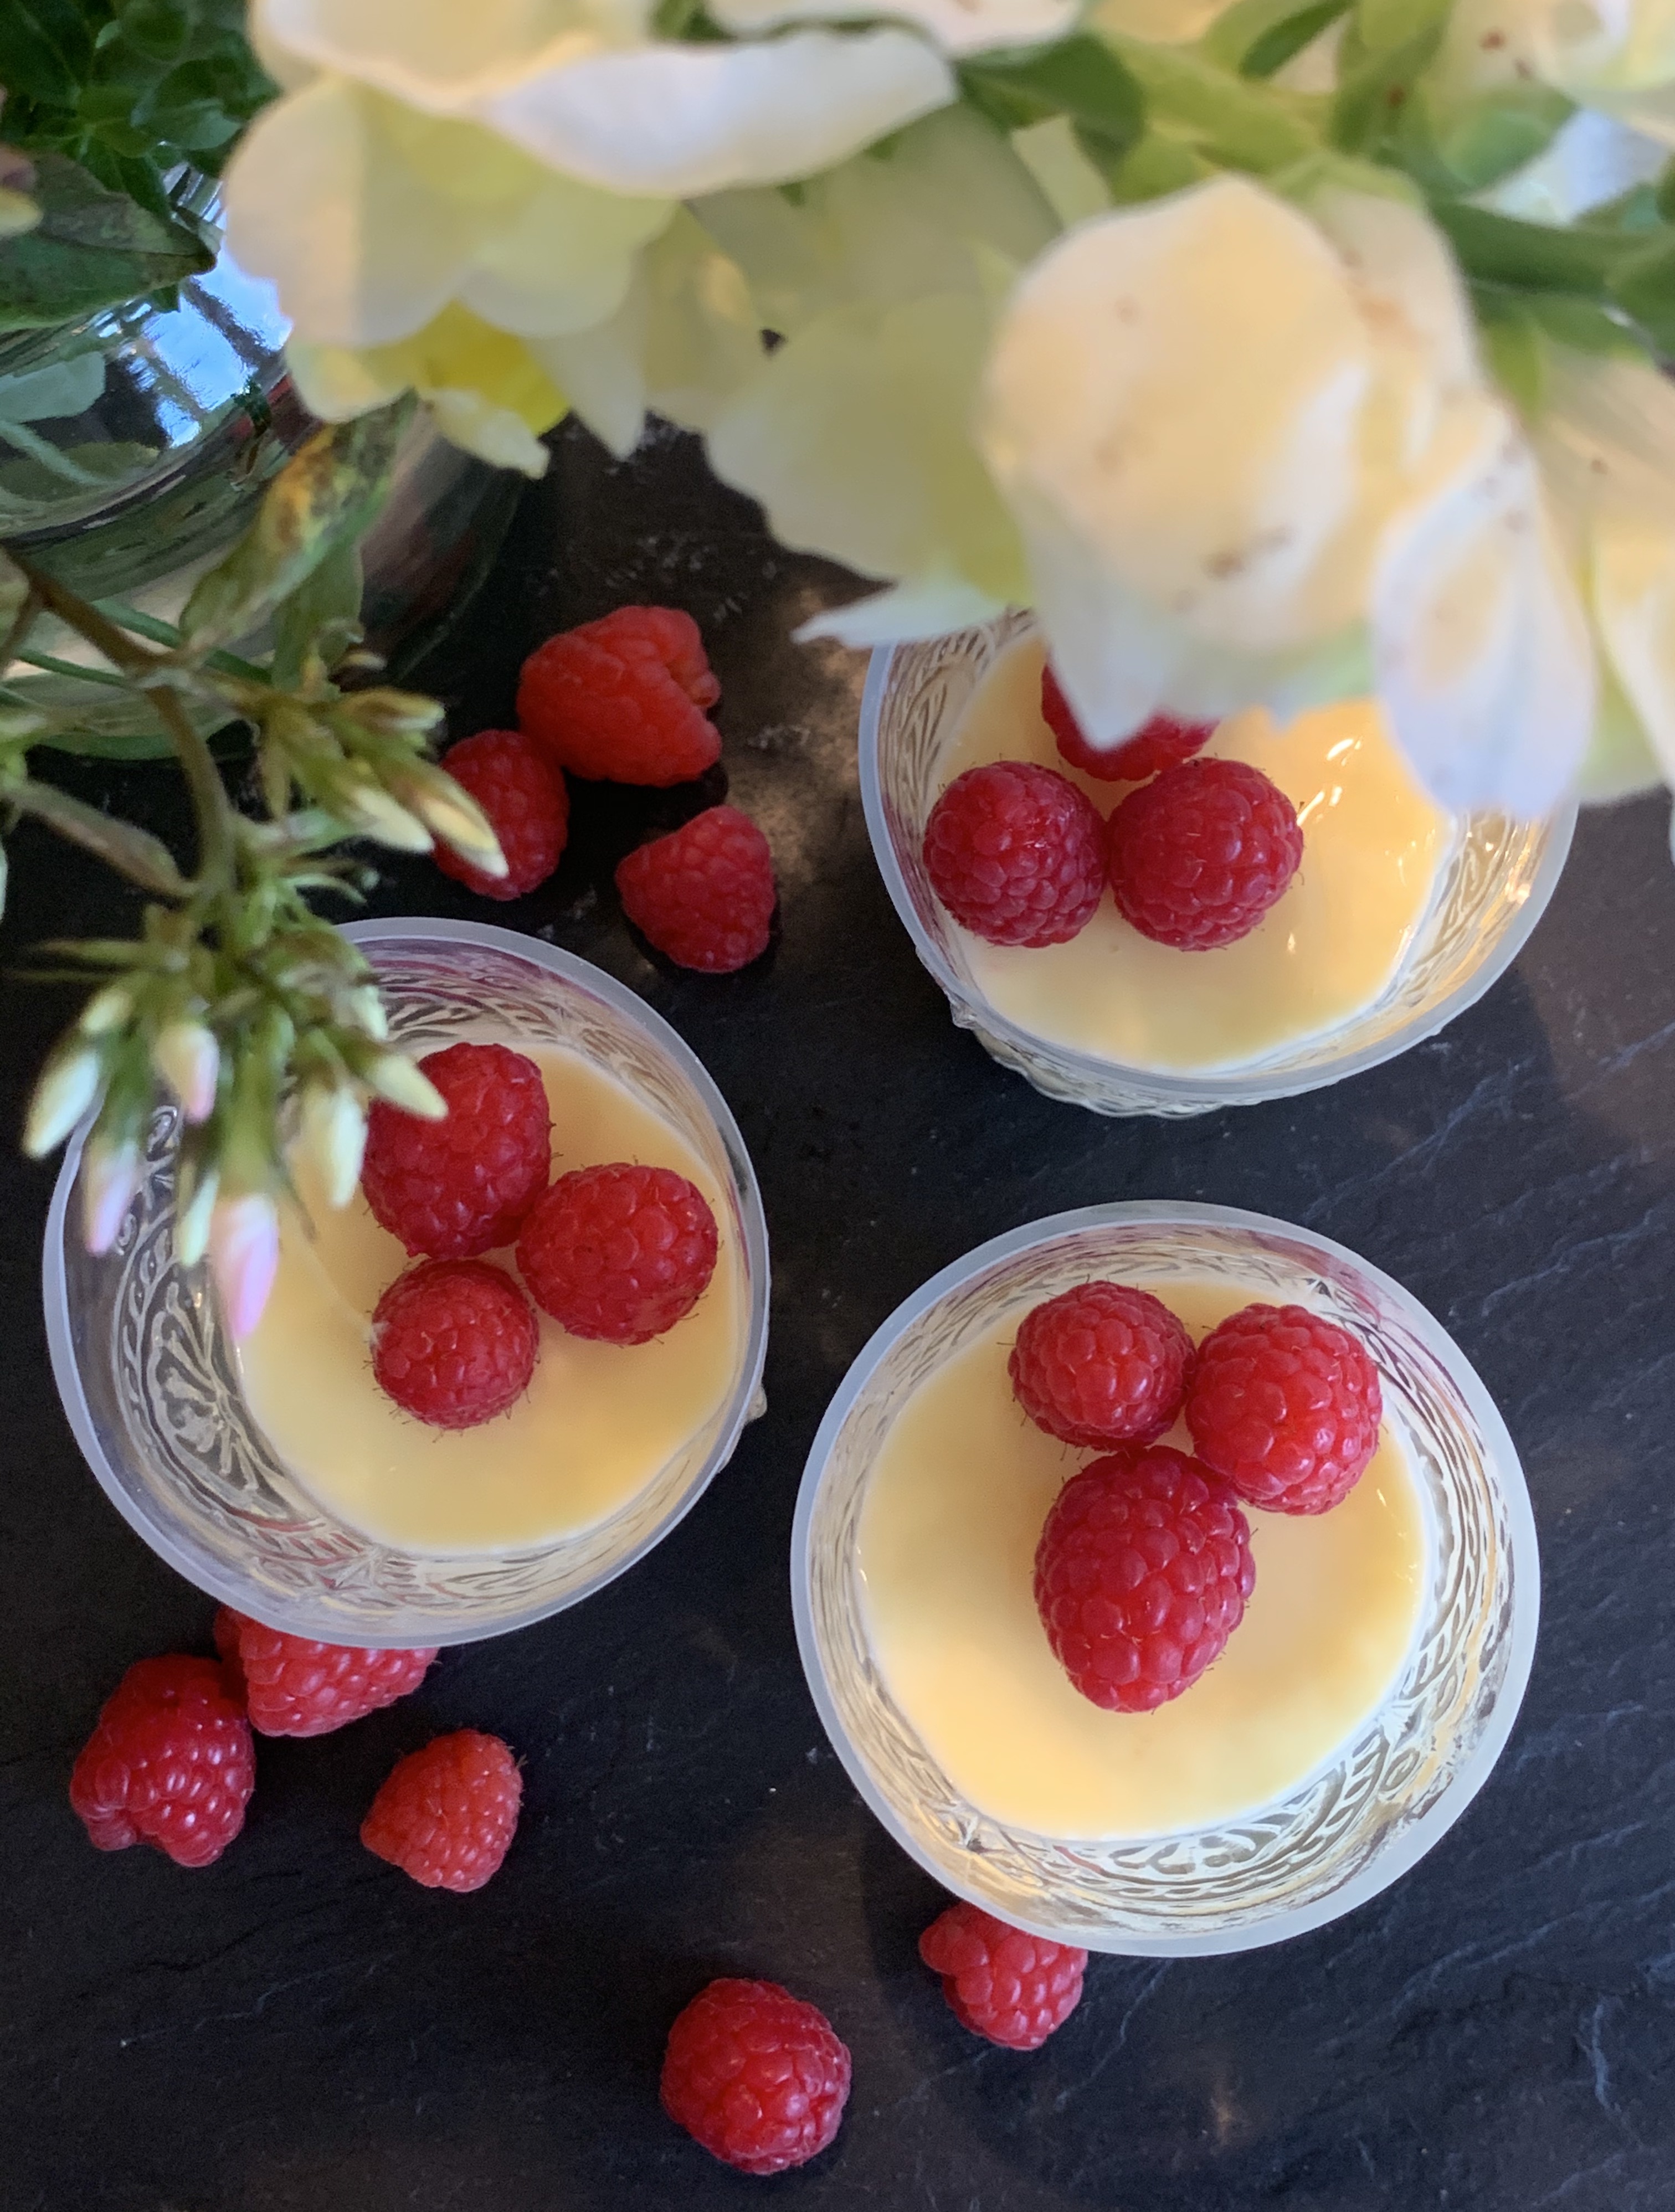
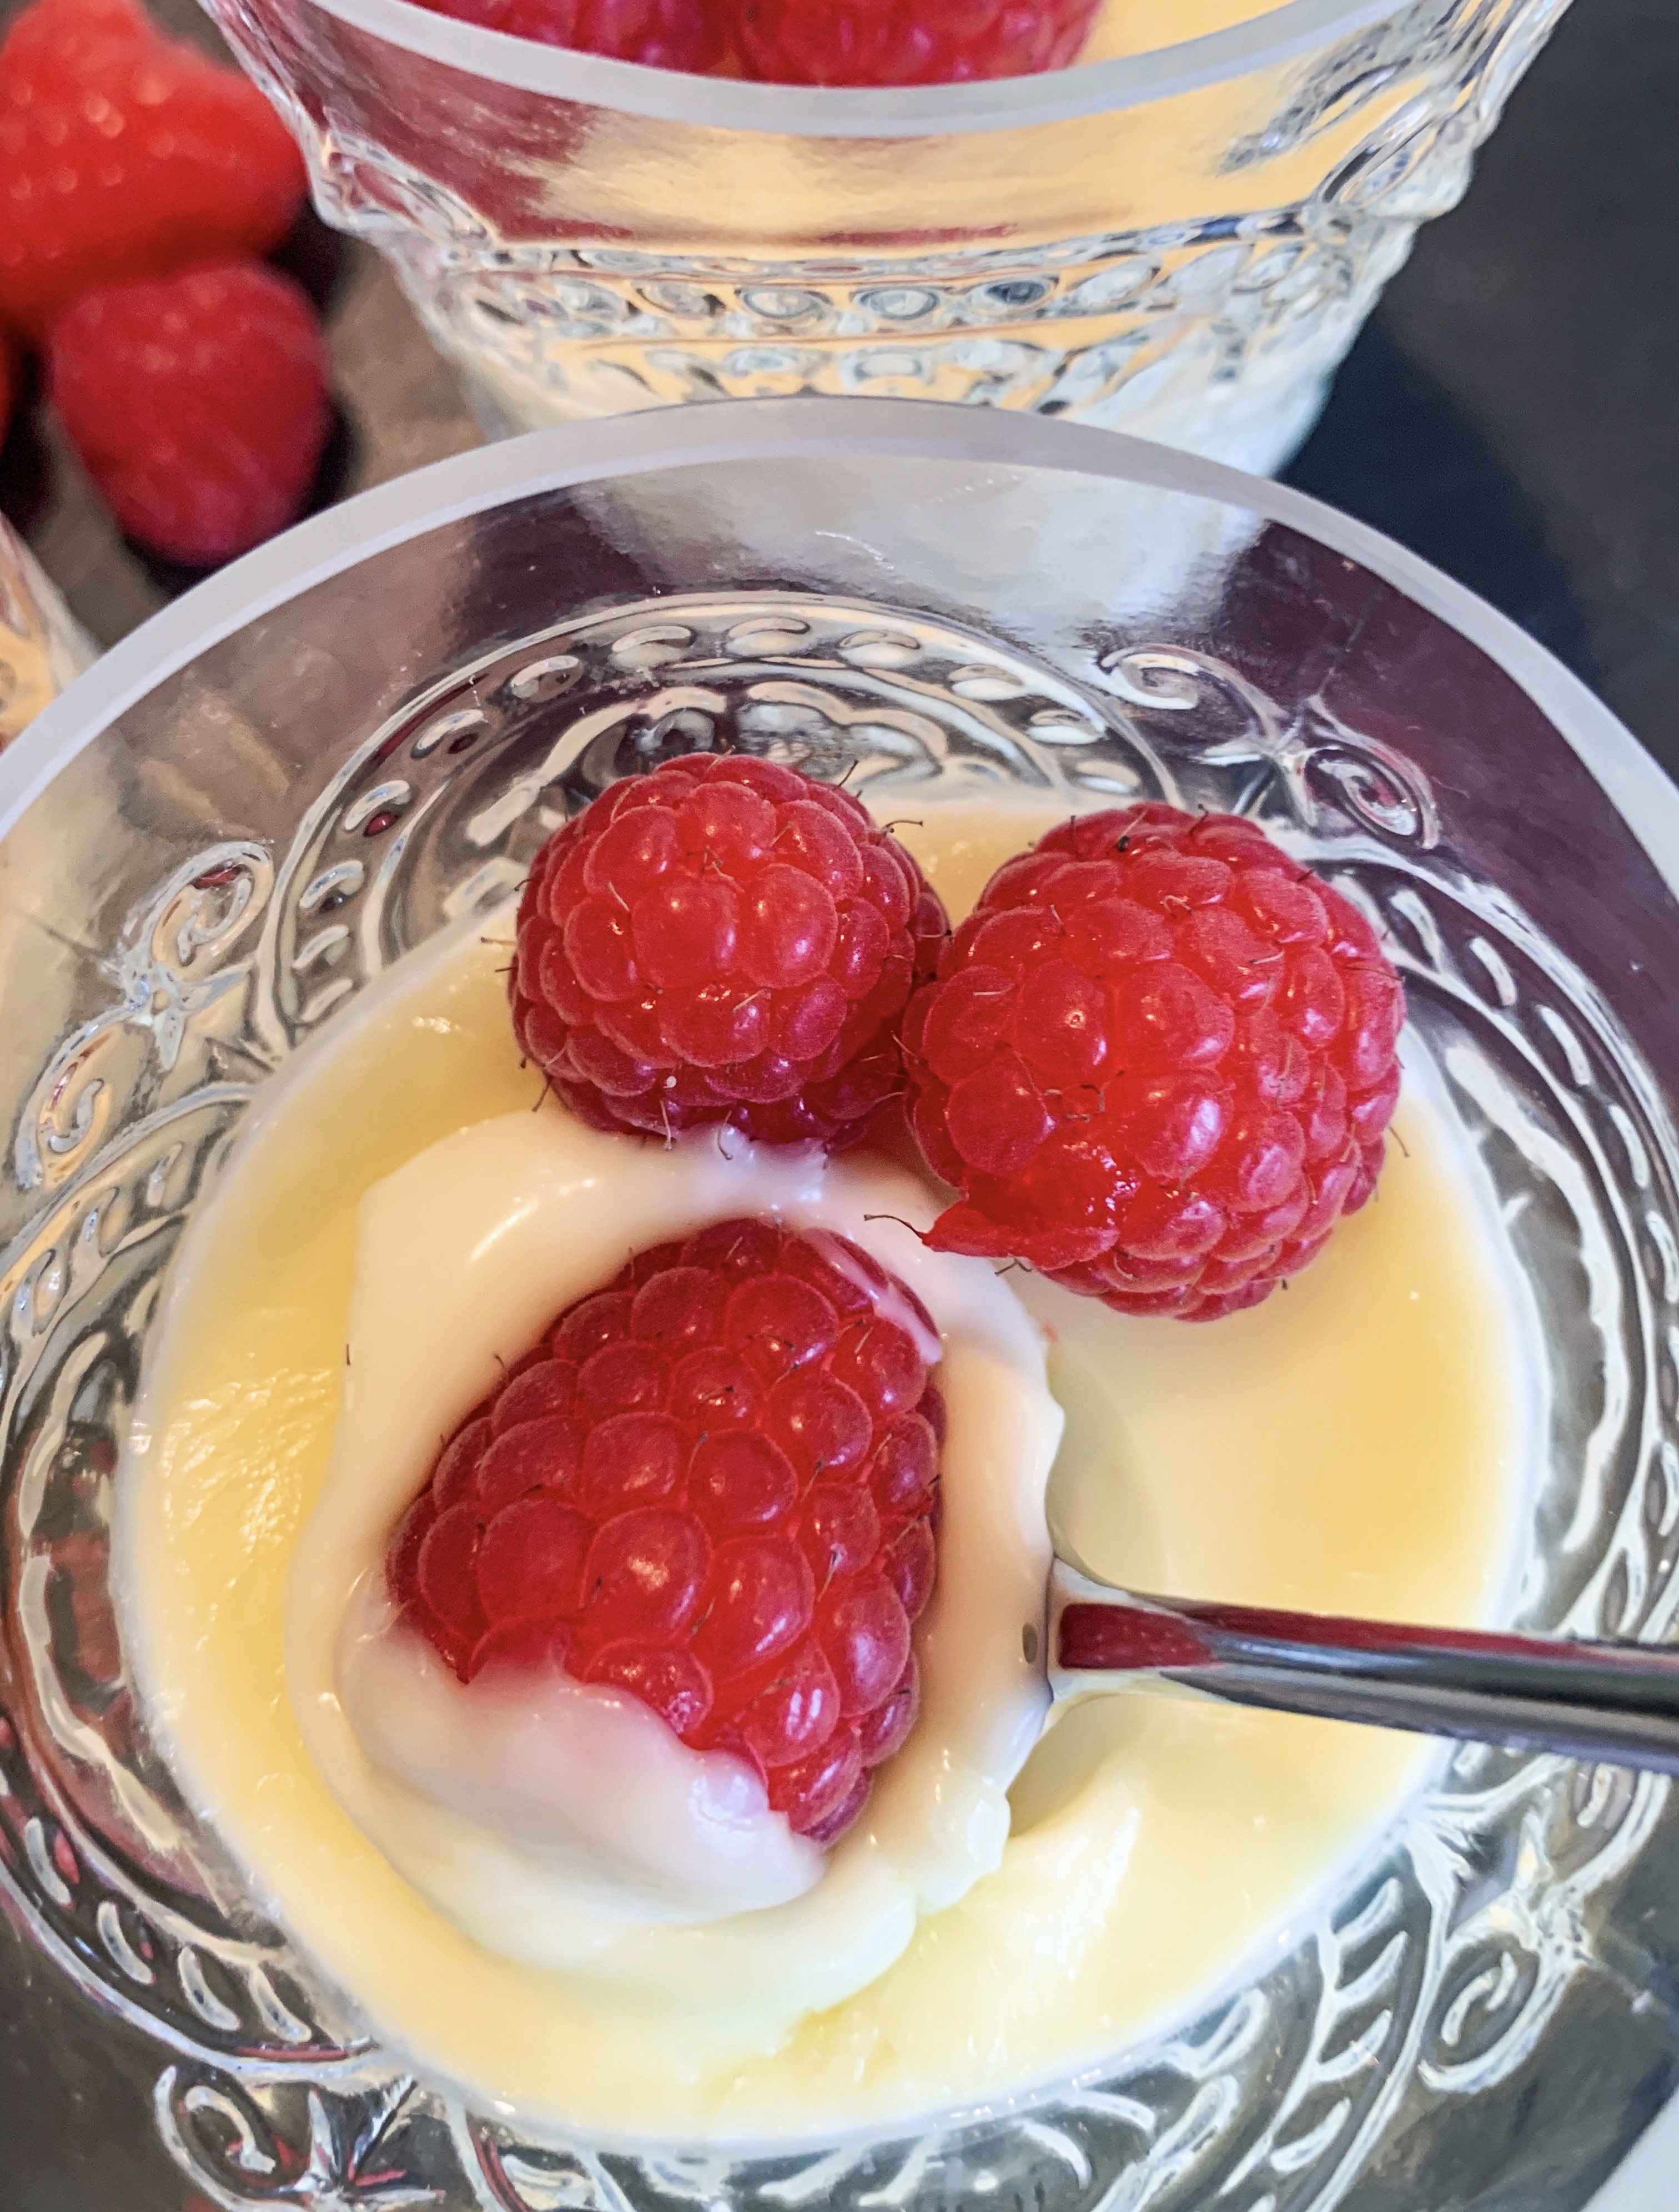
There are lots of slightly different variations of this simple, summer dessert; over the years I have tried a few and this is my favourite…
600ml double cream
150g caster sugar
Finely grated zest of 2 lemons
4 tablespoons of lemon juice (from above lemons)
Raspberries to serve
- Combine the cream, sugar and lemon zest in a small pan over a low heat. Stir constantly until the sugar is completely dissolved, when bubbles start to appear around the edges of the mixture continue to cook without stirring for 2 minutes – Do Not let the mixture come to a rolling boil!
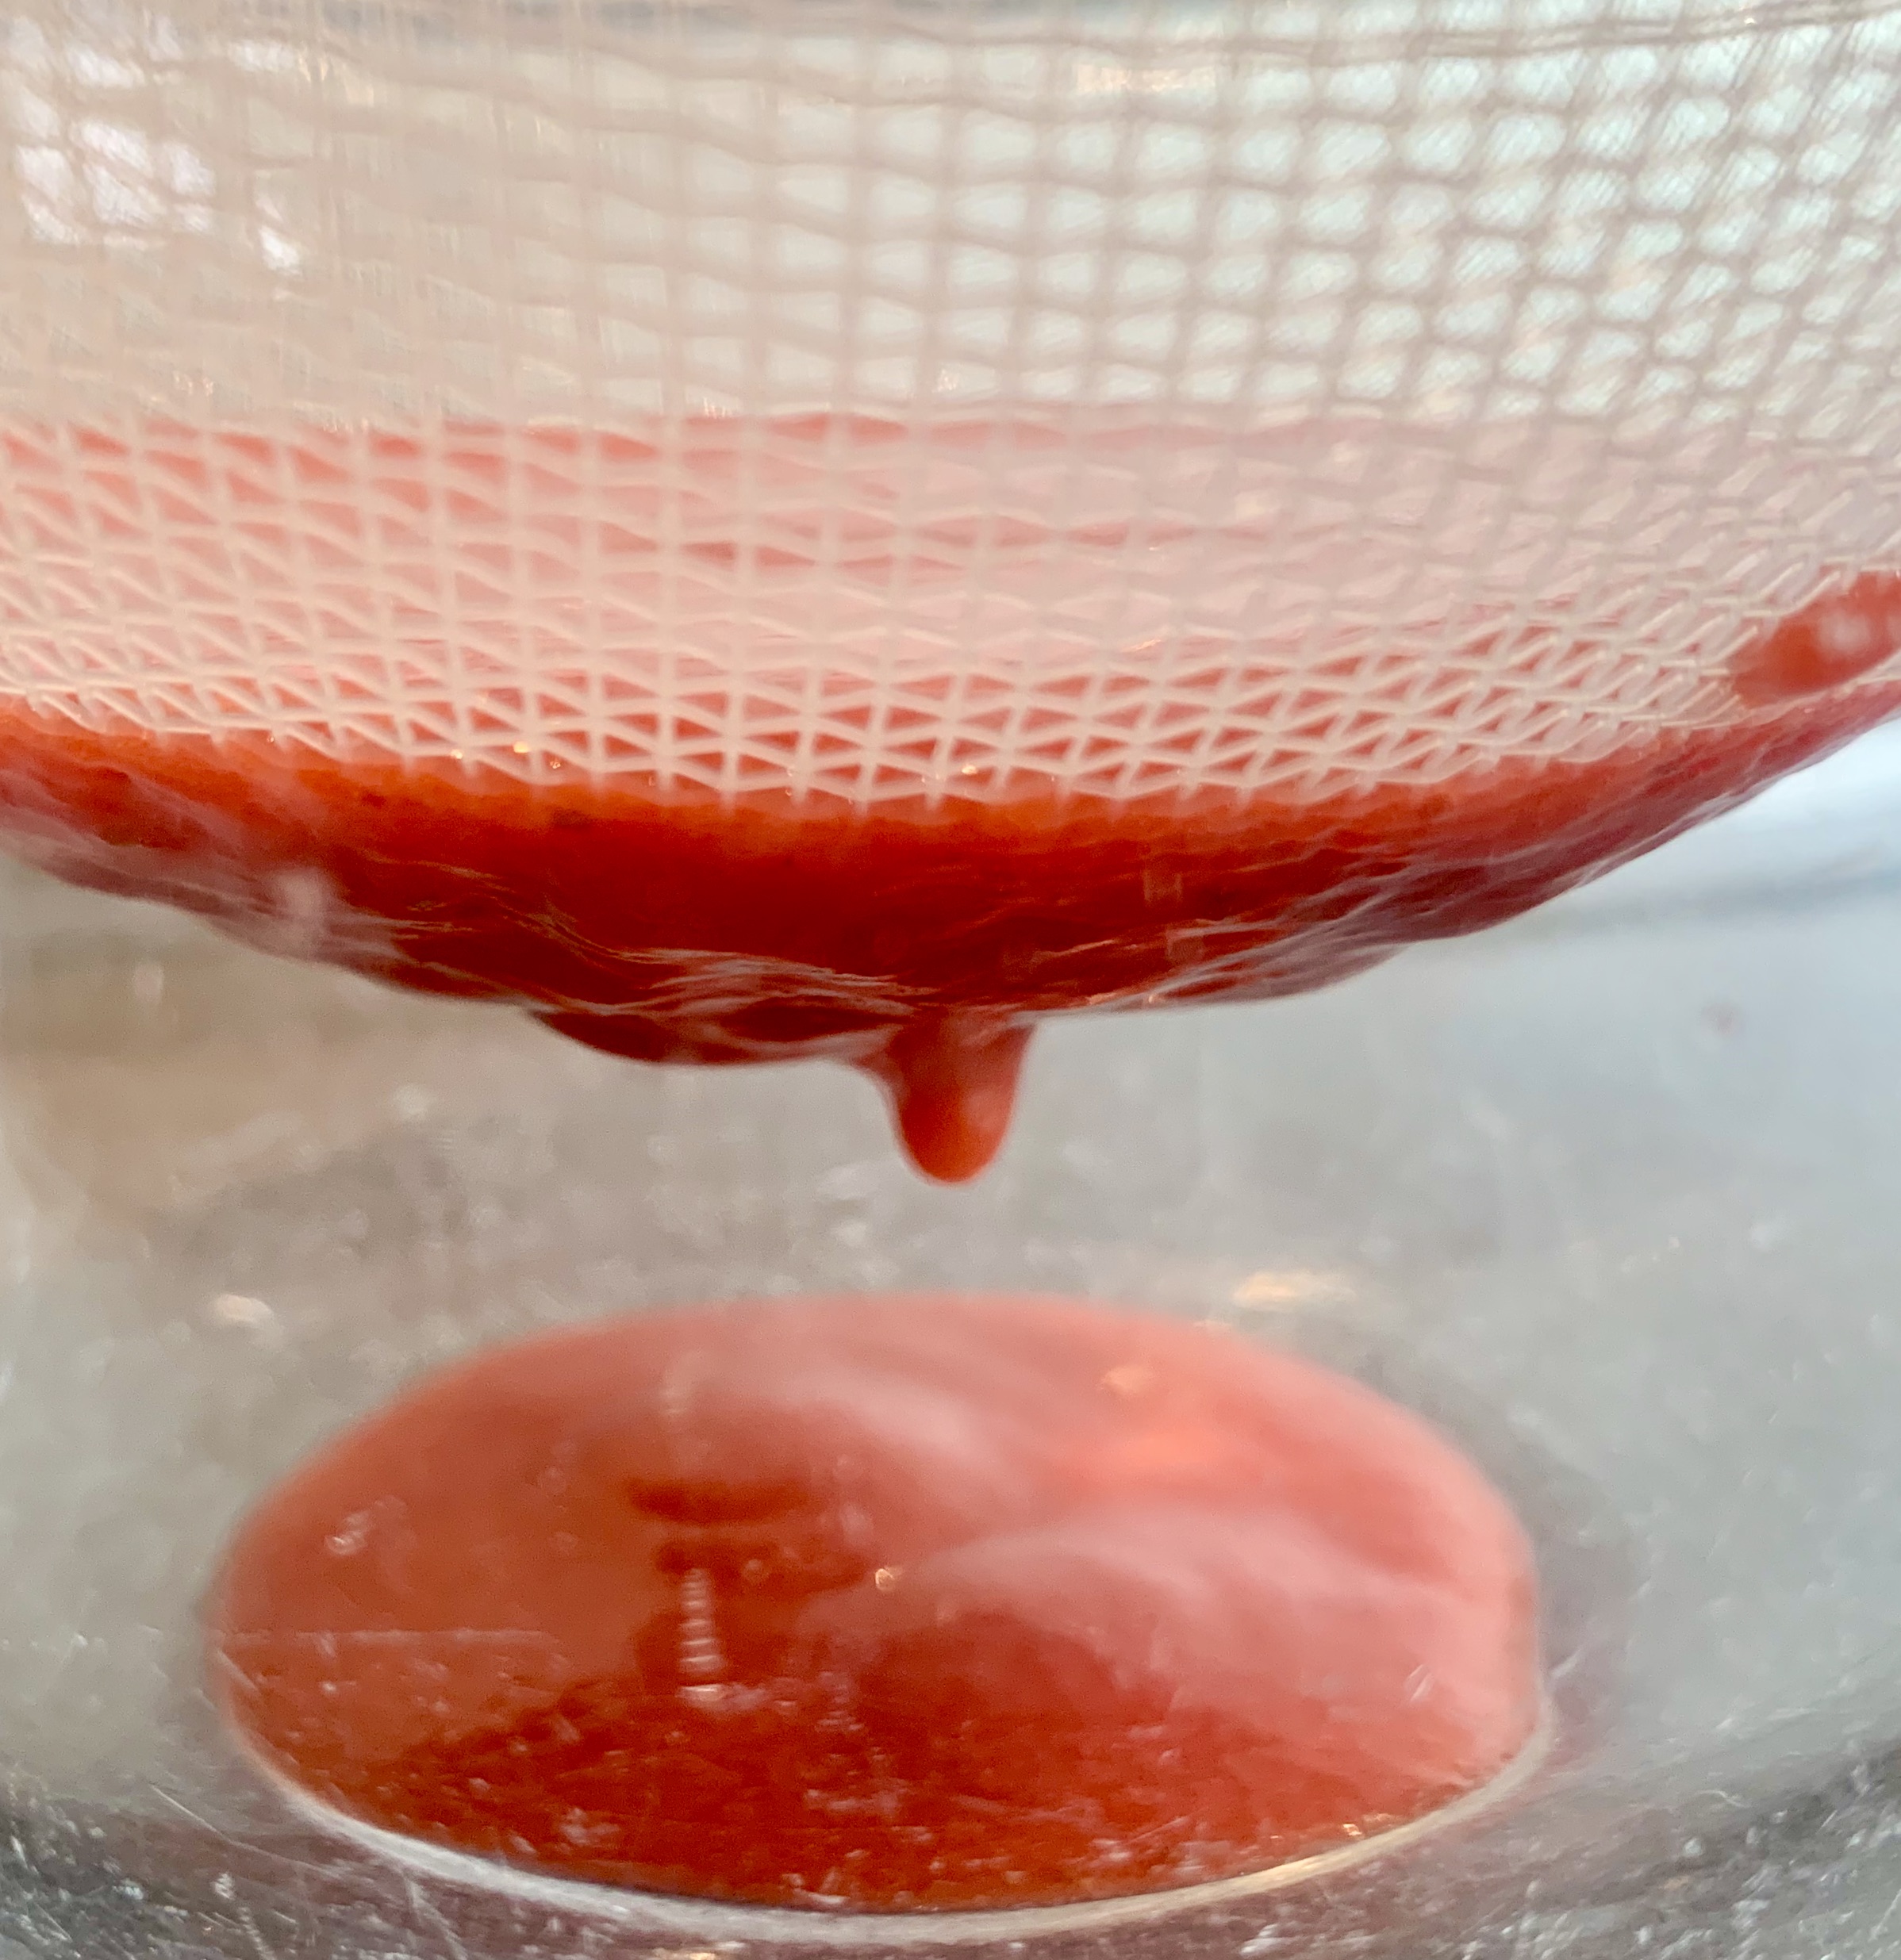
- Remove the pan from the heat, stir in the lemon juice, then strain through a sieve into a jug.
- Pour into small dishes or glasses to serve. This is a rich dessert, so I would keep the portions on the small side.
- Cover each dish with cling film and refrigerate for at least two hours until set.
- Serve with raspberries.
Strawberry Eton Mess (Serves 4)
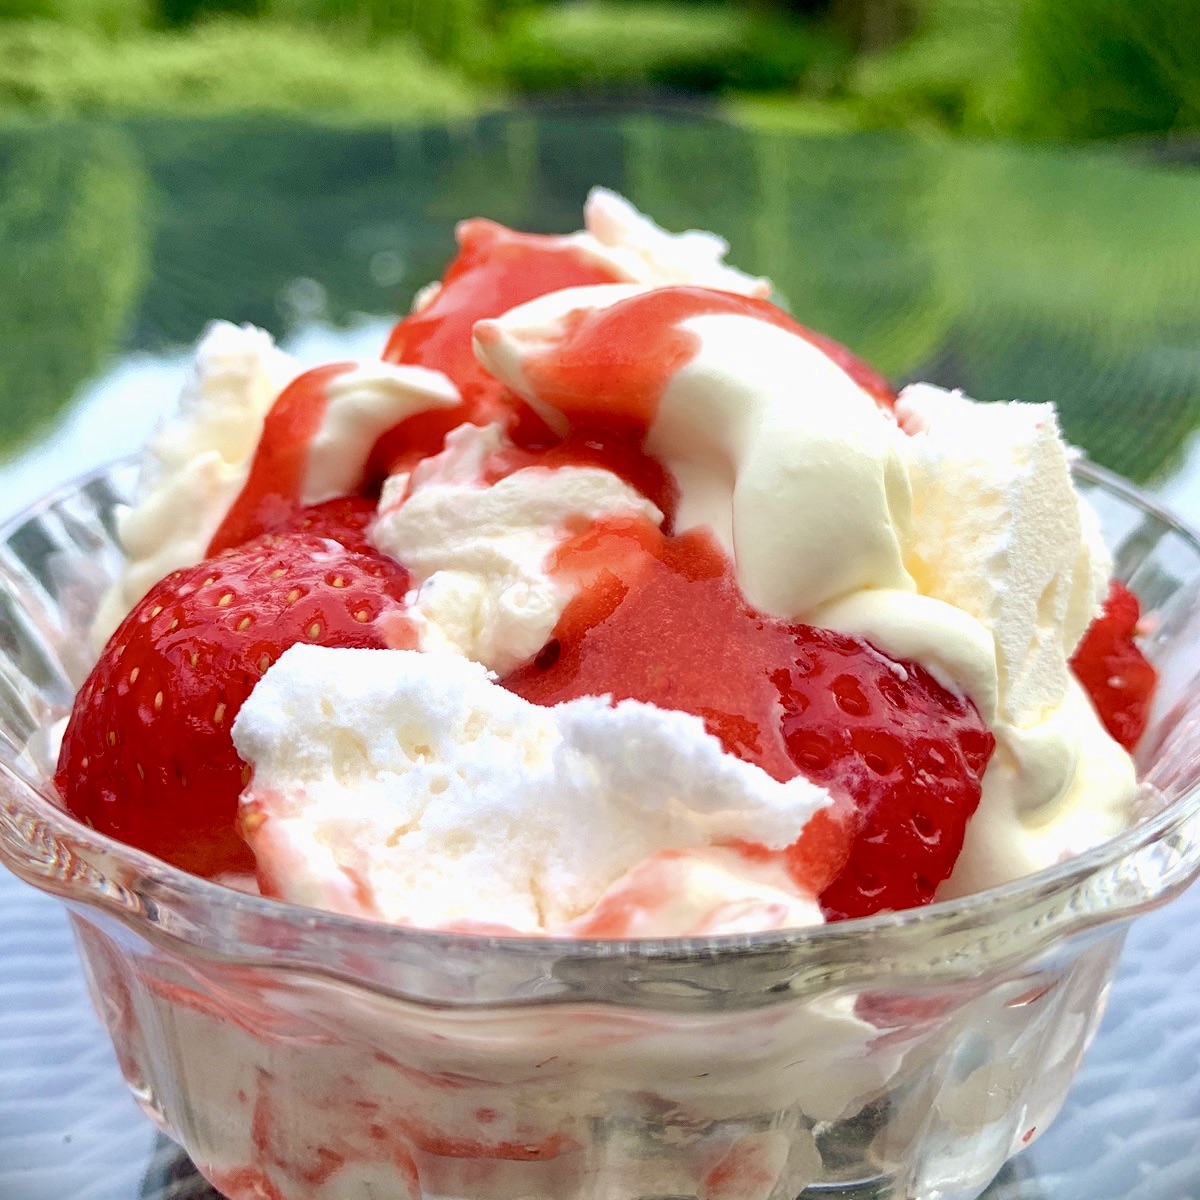
There are numerous recipes for Eton Mess, and I must admit to trying my fair share of them over the years!… I think this one has the perfect balance of ingredients. In my opinion, life is too short to be making meringue to be broken up for an Eton Mess, so for this recipe I recommend you use shop bought meringue; I particularly like the meringue nests by Waitrose, which are slightly chewy in the middle. It is important to assemble this dessert at the last minute as otherwise the meringue will go soggy in the cream. (I do have a fantastic recipe for meringue – if you’re not breaking them up – which I use for Pavlova…you can find the recipe above!)
450g strawberries, hulled
1 rounded tablespoon icing sugar
300ml double cream
4 meringue nests (see note above)
- Place half the strawberries in a blender with the icing sugar and whizz until puréed.
- Pass the purée through a sieve to remove the seeds.
- Whip up the cream until it is just floppy – not too stiff.
- Chop up the remaining strawberries and break up the meringues into roughly 1inch pieces.
- To assemble (see note above): in a bowl, gently mix the meringues and strawberries (reserve a few for decoration) into the cream and gently fold in about 2 tablespoons of the purée.
- Spoon the mixture into individual bowls, top with the reserved strawberries and pour over more of the purée.
- Serve straightaway!
